IPhone and other platforms to develop applications,Always need to use an Apple computer,Or iMac or rmbp,Even the mac mini is also OK。but,When a relatively large development projects,We need something more,Such as me,While doing a littleInput,But what algorithm run run thesaurus,A trip down must one day,It might also collapse again。Whenever Xcode disappointing at every turn white when,I wanted to - to a mac pro how good。
but,The price is a bit Oh。
Finally,exist CycleUser Agitation and temptation,I used his recipe with a black line and Apple。
Price is set down 8000 rmb,As a comparison,rmbp buy when I have been using it for two years 11000 rmb,Still count the student discount price,Of course,Buy apple care。
So let me talk configuration,A 64GB ddr4,256 SSD,i7 6700k.
This is by far the biggest I've ever used the computer memory of it!
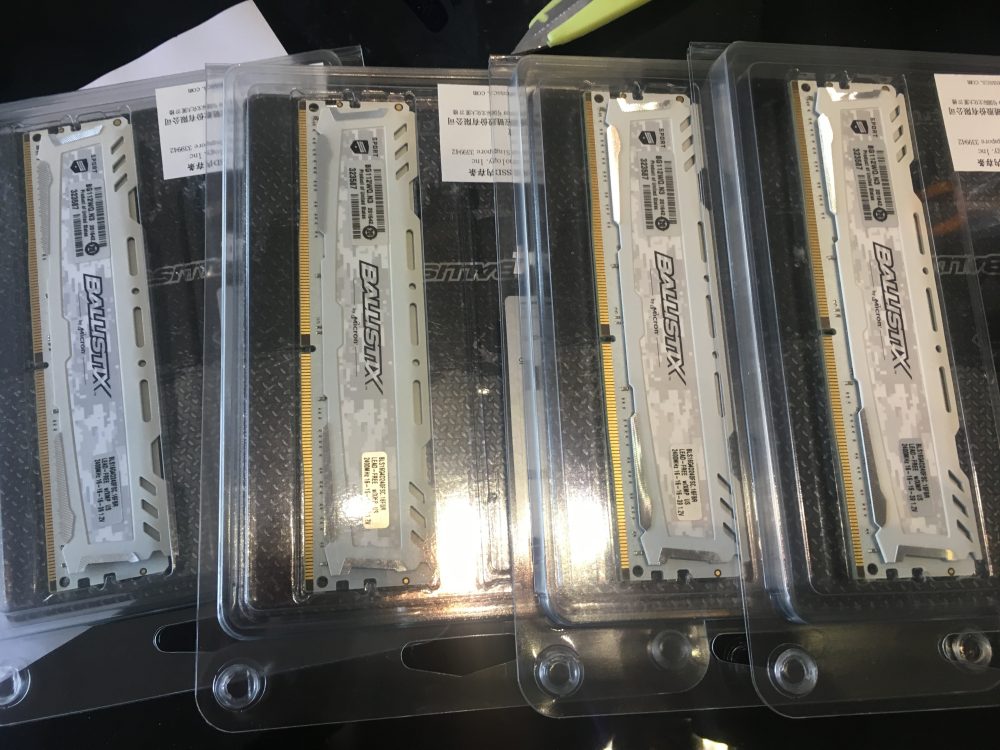
ICR of 16G x4
Other,My motherboard is Gigabyte GA-Z170X-UD3 。
It is worth mentioning that,I spent ssd NVMe,So do additional configuration to make osx identified。
Before you begin,I have to say something,Until now,You can not use the function:
- Microphone jack can not be used,Front and rear will not work (but play correctly);
- Unable to restart,Will get stuck (but normal shutdown);
- On the motherboard that only USB-C interface is not tested, A port can only be inserted with the mouse。
All right,Then,We start to prepare the installation disk。
Production system tray
You need a system capacity of more than U disk 8GB Black Apple to make the installation disk,My suggestion is to use an old old U disk,Because in the future you are likely to use the U disk to an emergency,So the U disk once done,It is not supposed to be used for other purposes。USB is the best 2.0,So you do not feel bad。I'll tell you anyway when the installation should be inserted in the USB 2.0 Jack on it?
According to this first tonyX86 tutorialTo go,The boot disk to do。Note to put its own system language to English,In the "System Preferences",The first line in,"Language and Region" in the change,You will be prompted to restart the complete change,HereDo not restart,U disk can change it back after doing。
At this time you should be able to have a bootable startup disk,Now letManuallyAdd to it NVMe driver。
Reference great God Posts:http://www.insanelymac.com/forum/topic/312803-patch-for-using-nvme-under-macos-sierra-is-ready/
We find in the EFI partition config.plist Edit it,Remember not to use Xcode editor,Use a text editor to edit the document can be,turn up <key>KernelAndKextPatches</key> This field,In this field,You should be able to find a <key>KextsToPatch</key> Field,Here is a side <array> </array> Array,So inside each element is a <dict></dict> ,We put the following content into this <array> </array> Where you can,Note To on a </dict> after that,The element can not be nested。
|
1 2 3 4 5 6 7 8 9 10 11 12 13 14 15 16 17 18 19 20 21 22 23 24 25 26 27 28 29 30 31 32 33 34 35 36 37 38 39 40 41 42 43 44 45 46 47 48 49 50 51 52 53 54 55 56 57 58 59 60 61 62 63 64 65 66 67 68 69 70 71 72 73 74 75 76 77 78 79 80 81 82 83 84 85 86 87 88 89 90 91 92 93 94 95 96 97 98 99 100 101 102 103 104 105 106 107 108 109 110 111 112 113 114 115 116 117 118 119 120 121 122 123 124 125 126 127 128 129 130 131 132 133 134 135 136 137 138 139 140 141 142 143 144 145 146 147 148 149 150 151 152 153 154 155 156 157 158 159 160 161 162 163 164 165 166 167 168 169 170 171 172 173 174 175 176 177 178 179 180 181 182 183 184 185 186 187 188 189 190 191 192 193 194 |
<dict> <key>Comment</key> <string>IONVMeFamily IONameMatch</string> <key>Disabled</key> <false/> <key>Name</key> <string>IONVMeFamily</string> <key>InfoPlistPatch</key> <true/> <key>Find</key> <data>PHN0cmluZz5wY2kxNDRkLGE4MDQ8L3N0cmluZz4=</data> <key>Replace</key> <data>PHN0cmluZz5wY2kxNDRkLGE4MDI8L3N0cmluZz4=</data> </dict> <dict> <key>Comment</key> <string>IONVMeFamily Pike R. Alpha Patch#1</string> <key>Disabled</key> <false/> <key>Name</key> <string>IONVMeFamily</string> <key>Find</key> <data>ibPoAgAAweAMBQAQAACJgw==</data> <key>Replace</key> <data>ibPoAgAAweAJBQAQAACJgw==</data> </dict> <dict> <key>Comment</key> <string>IONVMeFamily Pike R. Alpha Patch#2</string> <key>Disabled</key> <false/> <key>Name</key> <string>IONVMeFamily</string> <key>Find</key> <data>D7aMiIIAAACD+QwPhTIBAA==</data> <key>Replace</key> <data>D7aMiIIAAACD+QkPhTIBAA==</data> </dict> <dict> <key>Comment</key> <string>IONVMeFamily Pike R. Alpha Patch#3</string> <key>Disabled</key> <false/> <key>Name</key> <string>IONVMeFamily</string> <key>Find</key> <data>AMeDpAAAAAAQAABIi0gISA==</data> <key>Replace</key> <data>AMeDpAAAAAACAABIi0gISA==</data> </dict> <dict> <key>Comment</key> <string>IONVMeFamily Pike R. Alpha Patch#4</string> <key>Disabled</key> <false/> <key>Name</key> <string>IONVMeFamily</string> <key>Find</key> <data>SYnGTYX2dGFBwecMSWP/vg==</data> <key>Replace</key> <data>SYnGTYX2dGFBwecJSWP/vg==</data> </dict> <dict> <key>Comment</key> <string>IONVMeFamily Pike R. Alpha Patch#5</string> <key>Disabled</key> <false/> <key>Name</key> <string>IONVMeFamily</string> <key>Find</key> <data>hv8PAABIwegMD7cPgeH/Dw==</data> <key>Replace</key> <data>hv8PAABIwegJD7cPgeH/Dw==</data> </dict> <dict> <key>Comment</key> <string>IONVMeFamily Pike R. Alpha Patch#6_7</string> <key>Disabled</key> <false/> <key>Name</key> <string>IONVMeFamily</string> <key>Find</key> <data>icGB4f8PAABIAdFIgfn/DwAAdzs=</data> <key>Replace</key> <data>icGB4f8BAABIAdFIgfn/AQAAdzs=</data> </dict> <dict> <key>Comment</key> <string>IONVMeFamily Pike R. Alpha Patch#8</string> <key>Disabled</key> <false/> <key>Name</key> <string>IONVMeFamily</string> <key>Find</key> <data>SYHF/w8AAEnB7QxJiwQkSA==</data> <key>Replace</key> <data>SYHF/w8AAEnB7QlJiwQkSA==</data> </dict> <dict> <key>Comment</key> <string>IONVMeFamily Pike R. Alpha Patch#9_10</string> <key>Disabled</key> <false/> <key>Name</key> <string>IONVMeFamily</string> <key>Find</key> <data>BgIAAEyNuAAQAABMiflIgeEA8P//SYmGGgEAAEmJjiIBAABBvAAQAABJKfQ=</data> <key>Replace</key> <data>BgIAAEyNuAACAABMiflIgeEA8P//SYmGGgEAAEmJjiIBAABBvAACAABJKfQ=</data> </dict> <dict> <key>Comment</key> <string>IONVMeFamily Pike R. Alpha Patch#11</string> <key>Disabled</key> <false/> <key>Name</key> <string>IONVMeFamily</string> <key>Find</key> <data>AABJiY4iAQAAugAQAABIKQ==</data> <key>Replace</key> <data>AABJiY4iAQAAugACAABIKQ==</data> </dict> <dict> <key>Comment</key> <string>IONVMeFamily Pike R. Alpha Patch#12</string> <key>Disabled</key> <false/> <key>Name</key> <string>IONVMeFamily</string> <key>Find</key> <data>yAAAAEkp17gAEAAATYskJA==</data> <key>Replace</key> <data>yAAAAEkp17gAAgAATYskJA==</data> </dict> <dict> <key>Comment</key> <string>IONVMeFamily Pike R. Alpha Patch#13</string> <key>Disabled</key> <false/> <key>Name</key> <string>IONVMeFamily</string> <key>Find</key> <data>4b+AQBUGTYnWugAQAABFMQ==</data> <key>Replace</key> <data>4b+AQBUGTYnWugACAABFMQ==</data> </dict> <dict> <key>Comment</key> <string>IONVMeFamily Pike R. Alpha Patch#14</string> <key>Disabled</key> <false/> <key>Name</key> <string>IONVMeFamily</string> <key>Find</key> <data>iWTY+EmBxAAQAABJgccA8A==</data> <key>Replace</key> <data>iWTY+EmBxAACAABJgccA8A==</data> </dict> <dict> <key>Comment</key> <string>IONVMeFamily Pike R. Alpha Patch#15</string> <key>Disabled</key> <false/> <key>Name</key> <string>IONVMeFamily</string> <key>Find</key> <data>Bf8PAABIwegMZvfB/w8PlQ==</data> <key>Replace</key> <data>Bf8PAABIwegJZvfB/w8PlQ==</data> </dict> <dict> <key>Comment</key> <string>IONVMeFamily Pike R. Alpha Patch#16</string> <key>Disabled</key> <false/> <key>Name</key> <string>IONVMeFamily</string> <key>Find</key> <data>weIIQQ+2wcHgDEQJ0EQJwA==</data> <key>Replace</key> <data>weIIQQ+2wcHgCUQJ0EQJwA==</data> </dict> <dict> <key>Comment</key> <string>IONVMeFamily Pike R. Alpha Patch#17</string> <key>Disabled</key> <false/> <key>Name</key> <string>IONVMeFamily</string> <key>Find</key> <data>RYTJD5XAD7bAweAMRAnYRA==</data> <key>Replace</key> <data>RYTJD5XAD7bAweAJRAnYRA==</data> </dict> |
then,copyDriver filesTo EFI -> CLOVER -> kexts -> Other Directory。
This time you can use it to boot black apples。
Configuration adjustment board
To adjust the board configuration to be more compatible osx,If you set a bad,Then it is surely not successfully boot (best to use the default English,Otherwise, you might not find a corresponding switch):
- In BIOS Features
- Fast Boot: Disabled
- Windows 8/10 Fatures: Windows 8/10
- CSM Support: Enabled
- In Peripherals:
- Intel Platform Trust Technology: Disabled
- Initial Display Output: PCIe 1 Slot (Or whatever slot your GFX is in)
- Legacy USB Support: Enabled
- XHCI Hand-off: Enabled
- Port 60/64 Emulation: Disabled
- In Super IO Configuration:
- Serial Port 1: Disabled
- In Chipset:
- VT-d: Disabled
- Internal Graphics: Enabled
- Audio Controller: Enabled
- PCH LAN Controller: Enabled
- IOAPIC 24-119 Entries: Enabled
Here I use the CPU integrated graphics,so Internal Graphics To enable,Can not be closed,Gone off。besidesYou can not be selected for the auto,Can not be selected for the auto lighting Oh!
This is the first I encountered a pit
install driver
After set up you can enter the installation interface,Happily install it! Once installed will restart,Do not unplug the U disk,Have relied guide,Back to Clover boot screen after you select just packed hard disk,To finish 10.12.4 The installation process。
After the installation is complete,You can put U disk in the EFI partition the whole hard disk to copy the EFI partition,You may need toThis toolTo mount the EFI partition。
After copying the past,Remember to remove the hard disk partition EFI EFI -> CLOVER -> kexts -> Other The driver files in the directory,Remember the file name? call IONVMeFamily.kext ,It is already installed on your system in the,You do not need to have here。
Everything is completed,You can start playing drives,Here we must note,Make sure your computer plugged in the network cable,Or if the driver does not,First time adjustment,Otherwise, the drive authentication fails is not driven to fight!
This is my second pit encountered
You previously used to install the driver according to the curriculum into the spare disk U MultiBeast,Do not choose Quick Start mode:
- Quick Start
- none consequently do not choose
- Drivers
- Audio
- ALC 1150
- 100 / 200 Series Audio
- Misc
- FakeSMC
- FakeSMC
- FakeSMC
- Network
- IntelMausiEthernet v2.2.0
- Audio
- Bootloaders
- And consequently do not choose
- Customize
- Graphics Configurations
- Intel HD 5xx
- System Definitions
- iMac 17,1
- Graphics Configurations
Such Select Build -> Install to。
After the installation is complete, you can unplug the U disk boot into the system!
Hardware configuration information
After entering the system,使用 clover configurator,To mount the EFI partition on your hard drive,Then open your EFI partition of config.plist use it
Select "SMBIOS" on the left,In the right point that magic wand,Choose to generate your system parameters,Be careful not to select the Mac Pro series,Select iMac,For example, I am the iMac 17,1,Because the CPU and I are the same。
Then on the right side there are two "shake" button,Press it several times,Generate a random value used to generate the sequence number you。
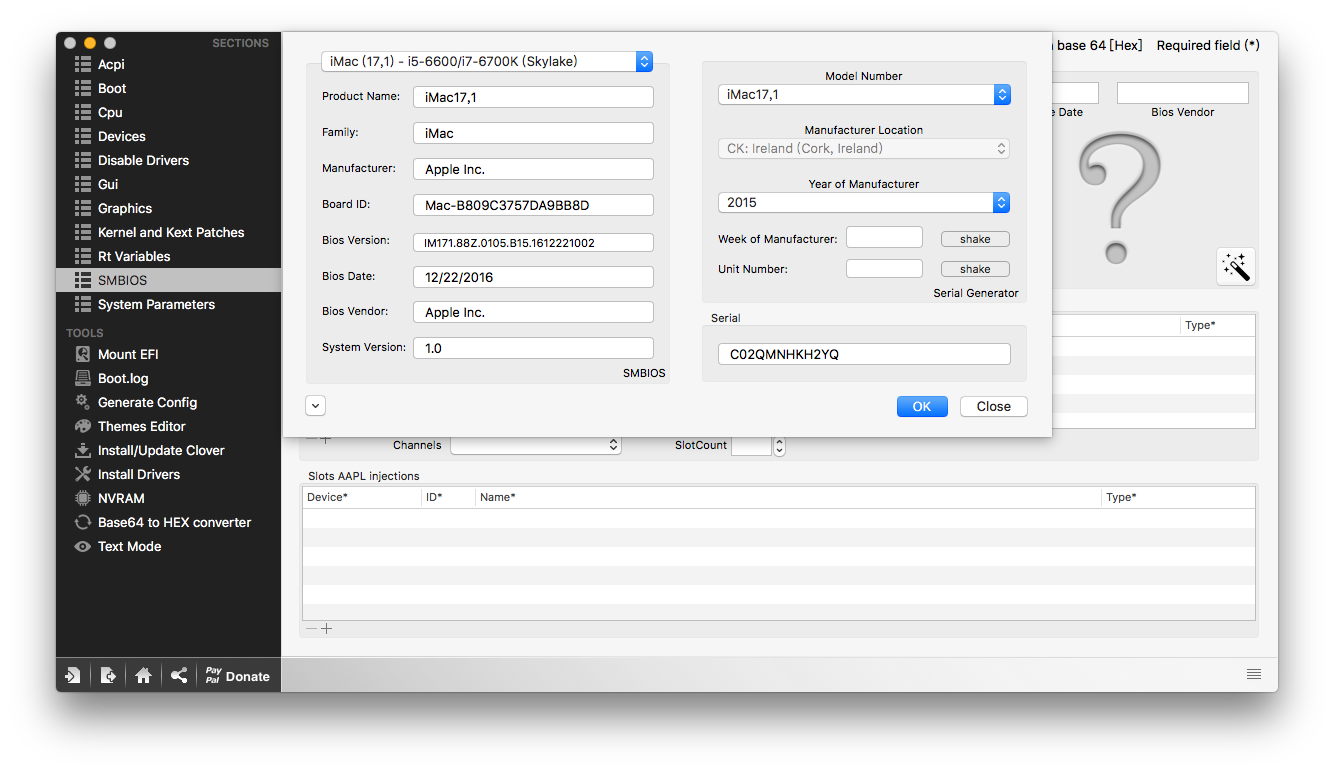
Use Clover Configurator to configure black Apple System Information
Ok then you can。
After configuring,You also need to add memory information,Modify your real data memory (without an asterisk field can be left blank),Otherwise there will be problems identifying memory。After all setup is complete Close to exit。
After rebooting,Your memory and CPU should recognize it is also normal。
At last,It is worth mentioning that,Stereo plug to be inserted behind the black hole,That is, the rear audio jack that we usually use,Output Select "Line Out",Chassis socket, then plug before,The selected output built-in speaker。Though a bit cumbersome,But at least it is usable。If you use an external sound card,Then liberties。
Another:
Internet rumors fix two problems to restart the drive (OpenHaltRestart.kextorEvOreboot.kext),Do not use,Otherwise, you do not have to pray that the launch of U disk formatting bar。
Enjoy
At this point,The successful completion of the installation of black fruit,If you have any other follow-up progress,I will continue to update this article。 :)
I wish a happy development does not bug。
Original article written by LogStudio:R0uter's Blog » Save a black apple hackintosh used for development of
Reproduced Please keep the source and description link:https://www.logcg.com/archives/2729.html
Black Apple previously quite simple,I got more trouble,Apple to buy or white after 2011,save trouble。
ps. This site has connotations,Rare good station。
Nice,great!
Preparing means into a black fruit itx,He has been climbing configuration,Hey
Many configuration on tonyx86 ah,Remember not to buy a typical new map,Otherwise very annoying experience problems。
The program is in accordance with the cycle tonymacx86,Still worried that there will sleep and volume problems。
Ah no problem here ...... Volume I,Onboard sound normal ...... microphone invalid。
I sleep, then ...... 7×24Hours a day,Haha do not need this feature。