Background account
Before everyone wrote OwnCloud build private clouds with personal Articles,Until now, network disk have been out of service for some time,Now ownCloud The team also abandoned pit,All switched to develop a new network drive”NextCloud“。
ownCloud version number has been maintained at v9.x.x ,As a newborn, however Nextcloud,The initial version is v10 。This shows Nextcloud is the follow-up version of ownCloud。The latest version is nextcloud ' 12.0.0 ’。This version is slightly more than BUG,I wanted to and so on 12 Stabilize the recurrence tutorial,However, it was put to hurry me up tutorial,So I do not,I have come today to issue Tutorial。
Some people complain that I write the article is not clear,There are a lot of things are not explained clearly,I try to detail this article it。If there is not clear what to write,Welcome to remind everyone,I will try to change。That one,besides,If someone wants to use My Drive,You can contact me,Private QQ 269015385。
Here spit bad,I am following the tutorial manual installation tutorial。Now the official website has a one-click installation,Yes,Only one command line,Command is as follows:
sudo snap install nextcloud
You need to prepare a list of
- X86 schema master:
Or a virtual machine is also OK,Configuration not very high,Recommended dual-core CPU、1GB or more of memory,
For my own use host four core i3 6100,8GB DDR4 memory; - domain name:
Recommended million net domain name purchase,Because there is a chapter will be introduced to the back if you set Dynamic DNS(DDNS); - hard disk:
Recommended prepare a separate hard drive used to store data,Even if the system fails,Your data will not be affected; - RAID card:
If you can use RAID card so much the better,I am using LSI 9266-4I,The above four 2TB drives inserted,Group raid5。
operating system
Ubuntu-server 16.04 x64
ps:I want someone tube centos tutorial,Personally, I used to use ubuntu ,In fact, that is just not the same command。
The main software
Apache2
PHP7
Mysql 5.7
Listing Tools
- VIM (a linux text tools)
- Openssh-server (remote ssh service on linux,I prefer to use xshell up remote configuration)
- Filezilla (a ssh management software can be used host file)
- unzip (decompress things with,Of course, you can use windows unzip good,Upload to linux)
Operation User
root
two、Preconfigured
Before installing the system,I would like to look at the system configuration,To adapt my habits。
- Update
apt update
- Install vim
apt install vim
- Modify the network card name eth0 (selected)
|
1 2 3 4 5 6 7 8 9 |
vim /etc/default/grub //修改以下内容 GRUB_CMDLINE_LINUX=”net.ifnames=0 biosdevname=0” sudo grub-mkconfig -o /boot/grub/grub.cfg init 6 |
ps:This is my personal habits,You can not change,You can also bind a static set via DHCP,Will do,You used to see。
- Set a static IP address (optional)
Delete the original file rm -r /etc/network/interfaces
|
1 2 3 4 5 6 7 8 9 10 11 12 13 14 15 16 17 18 19 20 21 22 23 |
vim /etc/network/interfaces //写入以下内容 source /etc/network/interfaces.d/* auto lo iface lo inet loopback auto eth0 iface eth0 inet static address 192.168.88.250 netmask 255.255.255.0 gateway 192.168.88.1 dns-nameservers 114.114.114.114 init 6 |
ps:There are many ways to set,Free to search
- Configure ssh server (optional)
|
1 |
apt install openssh-server |
|
1 2 3 4 5 |
vim /etc/ssh/sshd_config //修改以下内容 PermitRootLogin yes |
ps:This is a linux server ssh to log in to the server through Remote,Of course, you can also use the real machine terminal configuration。
- Decompression software installation
|
1 |
apt install unzip |
three、Install Apache2
First, the root account to log in
|
1 |
sudo su |
- Installation Environment
|
1 2 3 4 5 6 7 |
apt update apt-get install apache2 libapache2-mod-php7.0 apt-get install php7.0-gd php7.0-json php7.0-mysql php7.0-curl php7.0-mbstring apt-get install php7.0-intl php7.0-mcrypt php-imagick php7.0-xml php7.0-zip |
- Installation NextCloud
https://nextcloud.com/install/#instructions-server
This page to find the current Download,Download NextCloud working directory to the root
|
1 2 3 |
cd wget https://download.nextcloud.com/server/releases/nextcloud-12.0.0.zip |
unzip files
|
1 |
unzip nextcloud-11.0.1.zip |
Copied to the root directory of Apache2
|
1 |
cp -rv nextcloud /var/www/ |
- 配置 Apache2
Create a subdirectory profile
|
1 |
vim /etc/apache2/sites-available/nextcloud.conf |
Writes the following
|
1 2 3 4 5 6 7 8 9 10 11 12 13 14 15 16 17 18 19 20 21 |
Alias /nextcloud "/var/www/nextcloud/" <Directory /var/www/nextcloud/> Options +FollowSymlinks AllowOverride All Satisfy Any <IfModule mod_dav.c> Dav off </IfModule> SetEnv HOME /var/www/nextcloud SetEnv HTTP_HOME /var/www/nextcloud </Directory> |
Links subdirectory profile
|
1 |
ln -s /etc/apache2/sites-available/nextcloud.conf /etc/apache2/sites-enabled/nextcloud.conf |
Change the default directory website
|
1 |
vim /etc/apache2/sites-available/000-default.conf |
Modify the following
|
1 |
DocumentRoot /var/www/nextcloud |
Add Module
|
1 2 3 4 5 6 7 8 9 |
a2enmod rewrite a2enmod headers a2enmod env a2enmod dir a2enmod mime |
To configure root privileges
|
1 |
chown -R www-data:www-data /var/www/nextcloud/ |
Create a detailed configuration script
|
1 |
vim script |
Writes the following
|
1 2 3 4 5 6 7 8 9 10 11 12 13 14 15 16 17 18 19 20 21 22 23 24 25 26 27 28 29 30 31 32 33 34 35 36 37 38 39 40 41 42 43 44 45 46 47 48 49 50 51 52 53 54 55 56 57 58 59 |
#!/bin/bash ocpath='/var/www/nextcloud' htuser='www-data' htgroup='www-data' rootuser='root' printf "Creating possible missing Directories\n" mkdir -p $ocpath/data mkdir -p $ocpath/updater printf "chmod Files and Directories\n" find ${ocpath}/ -type f -print0 | xargs -0 chmod 0640 find ${ocpath}/ -type d -print0 | xargs -0 chmod 0750 printf "chown Directories\n" chown -R ${rootuser}:${htgroup} ${ocpath}/ chown -R ${htuser}:${htgroup} ${ocpath}/apps/ chown -R ${htuser}:${htgroup} ${ocpath}/config/ chown -R ${htuser}:${htgroup} ${ocpath}/data/ chown -R ${htuser}:${htgroup} ${ocpath}/themes/ chown -R ${htuser}:${htgroup} ${ocpath}/updater/ chmod +x ${ocpath}/occ printf "chmod/chown .htaccess\n" if [ -f ${ocpath}/.htaccess ] then chmod 0644 ${ocpath}/.htaccess chown ${rootuser}:${htgroup} ${ocpath}/.htaccess fi if [ -f ${ocpath}/data/.htaccess ] then chmod 0644 ${ocpath}/data/.htaccess chown ${rootuser}:${htgroup} ${ocpath}/data/.htaccess fi |
Run the script
|
1 2 3 |
chmod +x script ./script |
Restart Service
|
1 |
service apache2 restart |
four、Install Database
- Installing MySQL
|
1 |
apt-get install mysql-server mysql-client |
ps:Password is blank on the line,The following will be to set up a password
- Initialization Security Configuration
|
1 |
mysql_secure_installation |
After execution will proceed as follows
- Set a password for the root user
- Delete anonymous accounts
- Cancel root user remote login
- Delete test libraries and access test libraries
- Refresh grant tables changes to take effect
|
1 2 3 4 5 6 7 8 9 10 11 12 13 14 15 16 17 18 19 20 21 22 23 24 25 26 27 28 29 30 31 32 33 34 35 36 37 38 39 40 41 42 43 44 45 46 47 48 49 50 51 52 53 54 55 56 57 58 59 60 61 62 63 64 65 66 67 68 69 70 71 72 73 74 75 76 77 78 79 80 81 82 83 84 85 86 87 |
[root@server1 ~]# mysql_secure_installation NOTE: RUNNING ALL PARTS OF THIS SCRIPT IS RECOMMENDED FOR ALL MySQL SERVERS IN PRODUCTION USE! PLEASE READ EACH STEP CAREFULLY! In order to log into MySQL to secure it, we'll need the current password for the root user. If you've just installed MySQL, and you haven't set the root password yet, the password will be blank, so you should just press enter here. Enter current password for root (enter for none):<–初次运行直接回车 OK, successfully used password, moving on… Setting the root password ensures that nobody can log into the MySQL root user without the proper authorisation. Set root password? [Y/n] <– 是否设置root用户密码,输入y并回车或直接回车 New password: <– 设置root用户的密码 Re-enter new password: <– 再输入一次你设置的密码 Password updated successfully! Reloading privilege tables.. … Success! By default, a MySQL installation has an anonymous user, allowing anyone to log into MySQL without having to have a user account created for them. This is intended only for testing, and to make the installation go a bit smoother. You should remove them before moving into a production environment. Remove anonymous users? [Y/n] <– 是否删除匿名用户,生产环境建议删除,所以直接回车 … Success! Normally, root should only be allowed to connect from 'localhost'. This ensures that someone cannot guess at the root password from the network. Disallow root login remotely? [Y/n] <–是否禁止root远程登录,根据自己的需求选择Y/n并回车,建议禁止 … Success! By default, MySQL comes with a database named 'test' that anyone can access. This is also intended only for testing, and should be removed before moving into a production environment. Remove test database and access to it? [Y/n] <– 是否删除test数据库,直接回车 - Dropping test database… … Success! - Removing privileges on test database… … Success! Reloading the privilege tables will ensure that all changes made so far will take effect immediately. Reload privilege tables now? [Y/n] <– 是否重新加载权限表,直接回车 … Success! Cleaning up… All done! If you've completed all of the above steps, your MySQL installation should now be secure. Thanks for using MySQL! |
- Set up remote access
Unbind IP address
|
1 |
vim /etc/mysql/my.cnf |
turn up 'bind-address = 127.0.0.1' ,By deleting this line。
If you do not find this line of code,It:
|
1 |
vim /etc/mysql/mysql.conf.d/mysqld.cnf |
turn up 'bind-address = 127.0.0.1' ,By deleting this line。
|
1 |
/etc/init.d/mysql restart |
Authorized users to connect remotely
First enter the mysql client
|
1 |
mysql -u root -p |
Enter the root password
Replace the password to the root user password
|
1 2 3 |
grant all privileges on *.* to root@"%" identified by "password" with grant option; flush privileges; |
- Create a database
|
1 2 3 4 5 |
mysql -u root -p create database nextcloud; quit; |
ps:Creating a database,Name is nextcloud,Will be used later
- Database Backup (Option)
|
1 |
mysqldump -u 用户名 -p 数据库名 > 导出的文件名 |
Example: mysqldump -in dbadmin -p nextcloud> /where/database_bak.sql;
ps:This is not a necessary step for installation,This is the future you want for database backup used,The same below
- Restore Database (optional)
|
1 2 3 4 5 6 7 |
mysql -u dbadmin -p use nextcloud; set names utf8; #这里的字符集根你的将要导入的数据库的字符集一致。 source /var/database_bak.sql; |
ps:This is not a necessary step for installation
Fives、Initialization NextCloud
- Complete initialization
In the browser input
• Complete initialization
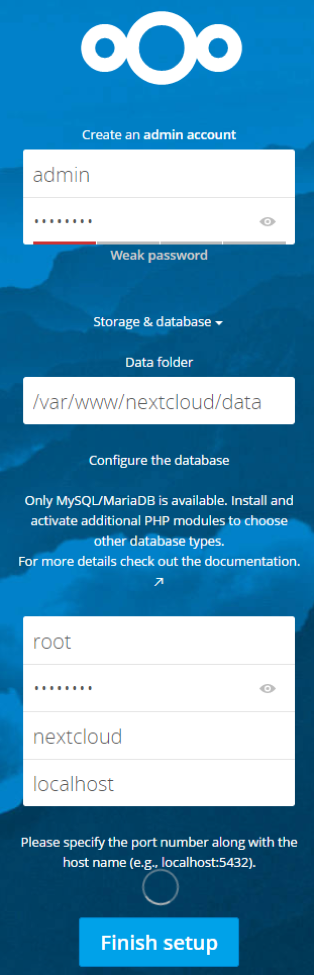
- Setting administrator account
In the first line of the administrator's account
In the second line sets the administrator's password
- Storage and database settings
Data folder settings saved all network disk file locations,The default is like,Articles will be behind the changes;
In turn enter it below:
- Database user name (root)
- Database password (you just set)
- Database name (nextcloud,Just write that this,Unless you changed)
- Database address (IP database,If the machine,You can write 127.0.0.1,You can also write localhost)
Storage and database settings
Click Finish,Wait 2 minutes
six、Modify the storage path (optional)
- Stop web service
|
1 |
service apache2 stop |
- Modify the configuration file
|
1 |
vim /var/www/nextcloud/config/config.php |
turn up datadirectory item,The back '/var/www/nextcloud/data' Modify the path you want to set,Example:
|
1 |
'/var/data/' |
- Data transfer
will /where/www/nextcloud/data All files in a directory to a new /where/data/ Directory。
- Modify permissions
modify /where/data/ Contents of the original group and user /where/www/nextcloud/data In the same directory,For example, the groups and users to modify www 。
|
1 2 3 |
chown -R www-data:www-data /var/data chmod 755 data |
If you encounter "HTTP ERROR CODE 500" is a description of the problem chmod
- Start web service
|
1 |
service apache2 start |
Seven、Modify the apache port (optional)
- Edit apache2 configuration file
|
1 2 3 |
vim /etc/apache2/sites-available/000-default.conf 把<VirtualHost *:80>改成<VirtualHost *:88> |
- Edit apache2 port configuration file
|
1 2 3 |
vim /etc/apache2/ports.conf 把Listen 80改成Listen 88 |
- Restart apache service
|
1 |
service apache2 restart |
Eight、I use HTTPS encrypted traffic
- Installation signature tool
|
1 2 3 4 5 |
apt install git git clone https://github.com/Neilpang/acme.sh.git cd ./acme.sh ./acme.sh --install |
- Generating a Certificate
Because the provisions of the State Ministry of Communications now,Operators all the 80 ports ban dropped。So we can not apply for a certificate using the normal port 80 to request a certificate,Certificates can only be obtained by the method of DNS resolution。
./acme.sh --issue --dns -d Your domain name.with
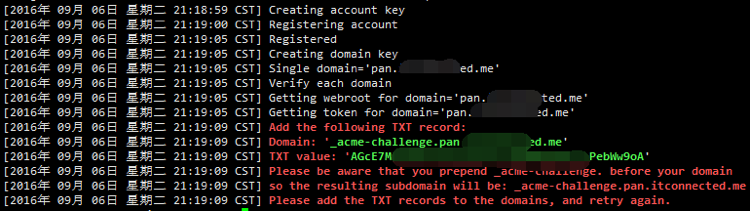
Then get this picture,You need to go to your domain operator control panel,To your domain name with your secondary domain,If there is no second-level domain,Then directly add a txt type of record,Host records to fill in the value of the Domain,Then TXT value where value is written in the record value。
Example is shown below:

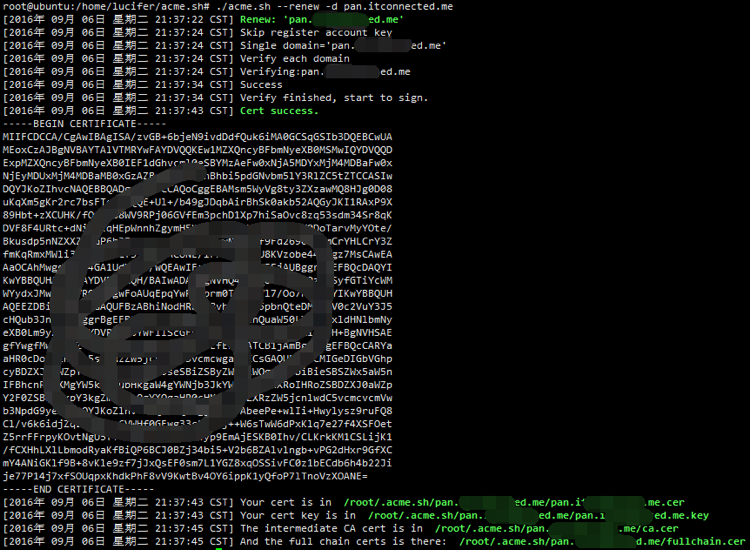
- Request a certificate
|
1 |
./acme.sh --renew -d 你的域名.com |
You will see this message after a successful
- Install Certificate
Let's go now then configure the certificate on a site certificate store folder,And it needs to correct the name of the name
We must first look at the certificate store folder somewhere,Then copy over certificate
|
1 |
vim /etc/apache2/sites-available/default-ssl.conf |
Find the line 2
|
1 2 3 |
SSLCertificateFile /etc/ssl/certs/ssl-cert-snakeoil.pem SSLCertificateKeyFile /etc/ssl/private/ssl-cert-snakeoil.key |
Then the certificate and private key into the cp
|
1 2 3 |
cp /root/.acme.sh/pan.********ed.me/pan.********ed.me.cer /etc/ssl/certs/ssl-cert-snakeoil.pem cp /root/.acme.sh/pan.********ed.me/pan.********ed.me.key /etc/ssl/private/ssl-cert-snakeoil.key |
- Install openssl
|
1 |
apt install openssl |
- Open SSL module
|
1 |
a2enmod ssl |
- Modify the default path of https
|
1 |
vim /etc/apache2/sites-available/default-ssl.conf |
Into the following values
|
1 |
DocumentRoot /var/www/nextcloud |
- Save
Press ESC
:wq
Enter
Enable https
After installation above,Will be at /etc/apache2/sites-available/ Generate a default directory default-ssl file。The default web directory is still /where/www/ 。We can create a link to site-enabled table of Contents。
|
1 |
ln -s /etc/apache2/sites-available/default-ssl.conf /etc/apache2/sites-enabled/default-ssl.conf |
Restart apache service:
|
1 |
service apache2 restart |
nine、Million net dynamic domain name resolution
- Install python
|
1 2 3 4 5 |
apt-get update apt-get install python-pip pip install requests |
- Download million net DDNS client
|
1 |
git clone https://github.com/rfancn/aliyun-ddns-client.git |
- Copy Path
|
1 |
mv ./aliyun-ddns-client /opt/ |
- Modify the configuration file
|
1 2 3 |
mv ddns.conf.example ddns.conf vim ddns.conf |
Profile content
|
1 2 3 4 5 6 7 8 9 10 11 12 13 14 15 16 17 18 19 20 21 22 23 24 25 26 27 28 29 30 31 32 33 |
[DEFAULT] # access id obtains from aliyun access_id=xxxxxxxxx【填写Access Key ID】 # access key obtains from aliyun access_key=xxxxxxxxxxx【填写Access Key Secret】 # it is not used at this moment, you can just ignore it interval=600 # turn on debug mode or not debug=true [DomainRecord1] # domain name, like google.com domain=iioog.com【填写根域名】 # subdomain name, like www, blog, bbs, *, @, ... sub_domain=pan【填写子域名】 # resolve type, 'A', 'AAAA'..., currently it only supports 'A' type=A |
- Execution time
|
1 |
python ddns.py |
- Setting cycle execution
|
1 2 3 |
crontab -e */5 * * * * cd /opt/aliyun-ddns-client && /usr/bin/python ddns.py |
Original article written by LogStudio:R0uter's Blog » NextCloud to build private clouds with personal
Reproduced Please keep the source and description link:https://www.logcg.com/archives/2750.html
I’ve learn some just right stuff here. Definitely value bookmarking for revisiting. I wonder how so much attempt you put to create one of these magnificent informative site.
Thanks for the tutorial blogger,Detailed understand,Operating've followed good,There is a small problem ssl certificate expires three months,The inclination of how to automatically request a certificate and complete the installation of the certificate copy it
If no public IP network if dynamic DNS is not it also can not use ///
Yes,You must have a public IP,if you do not have,Then call the operator,Say you want to install webcam or something,They will give the (also possible to add money)
This is a page layout templates wordpress,The same section template to leave a claw
6,This is the latest theme 2019
Coincidence,I am also the same theme。
Search engine over the,Just finished building nextcloud,We encountered a problem between different users can not share files。Now installation method (15.0) has been simplified a lot better than a year ago
Will bloggers,About SSL certificate on github written can be automatically updated (automatically register every 60 days),But Godaddy TXT record is added manually,That is, you can only re-register within three months of SSL add TXT yet? Is there any way to automatically update SSL?
Bloggers,Database address changed,How to reset the database of addresses nextCloud。I was mysql
I do not have a domain certificate how to get it?
https://www.logcg.com/archives/1709.html
Collabora Online can be installed on the same nextcloud and above it? Still have to run a separate way with docker。
You can be on a single server,You can refer to this article:
Nextcloud + Collabora Office documents online collaboration
This tutorial seen,Openssl certificate to be here, do not know how to get,You can not use it SignSis
Buy a domain name,To apply for a certificate on the line。I have not tried their certificate
Bloggers know how the offline download it?
know,Give me a tutorial to write it,Been busy