Background account
According to regulations of the country,All network disk must be reviewed! (Probably because too much goddess,You know = _ =),Then have stopped most of the network disk service,Now only some of the big manufacturers still operating in the cloud。but,You keep to a certain degree in the cloud all the information must be subject to review (the goddess of the film becomes 15 seconds educational films,It is light;If you say dang good,Or to save the file to a similar degree in the cloud,Tomorrow someone will come to your courier delivery…)and so,Against this background environment,I need to own a network disk (whatever you need to do not need,At least I need ......),As long as you have an X86 architecture host,You will be able to do its own network drive。
Do you think it a x86 host enough? you are too naive,still need:
- Money to buy a domain name
- Buy Hard money
- Buy Raid card money
advantage
- Folder Sync (I just ran this come);
- Not be reviewed (you do not want to own the whole artistic photos by others read it, right?)
- Full platform client! (Web、ios、android、wendows、mac os、linux)
- Open Source! FREE! FREE! FREE! (A degree of cloud folder synchronization feature to charge VIP;TM really will make money)
- Offline download function (even if not at home,It will help you download goddess orz you know。stand by:Straight、bt、ftp、youtube。Note:This feature requires a third-party plug-ins "ocdownload",But because owncloud by the author abandoned pit,So this tutorial I'll hold out,I'm going to write a tutorial nextcloud,There will be described in detail in the tutorial)
- Resource sharing (share a key to the goddessFriends shot舍友 barley)
- Mobile Client Auto Backup album (mobile phone to take a picture,Without any artificial interference,5Seconds,On the computer will be able to see this picture)
Shortcoming
- money! money! ! money! ! ! TM is all the money! (Buy server、Buy Domain、Buy Bandwidth、Buy Disk Group、Buy a raid card;Do not say,I went to the instant noodles)
it is good,Since there are so many advantages,I have no reason to pay other people to appreciate my artistic photos、Then we have to use something like feces as a client of the cloud it? !
Then,Into the topic ...
one、Preconfigured
First, we need a static address,Then there are some tools,In fact, these things are dispensable,But according to my habit of using these tools,Feel with them the effect Bang Bang da ~
1、Static IP address
slightly
Static network address or a static address outside the network can,If you will not even this configuration,Then do not force yourself ...
2、Install ssh server
|
1 2 3 |
apt update apt install openssh-server |
After the installation is complete,You can use ssh Connect to your server,very convenient,Do not operate the console (if you insist on using the console:Go ahead)
3、Install vim editor
|
1 |
apt install vim |
How do you say,Himself watching the run,If you do not install it,That's all behind” vim “Please replace the command” we ”
two、installationownCloud
1、Open URL:
https://download.owncloud.org/download/repositories/stable/owncloud/
2、Select the operating system
My operating system I chose ubuntu。
3、Enter the command
Select the files without title,Enter the CLI in this line 2,Then ownCloud is now installed。
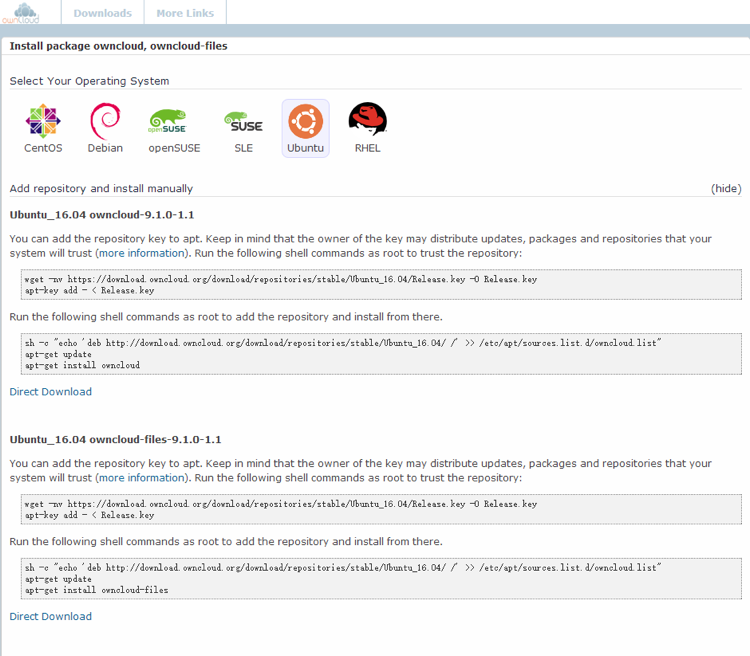
Lazy welfare,Command is as follows:
|
1 2 3 4 5 6 7 8 |
wget -nv https://download.owncloud.org/download/repositories/stable/Ubuntu_16.04/Release.key -O Release.key apt-key add - < Release.key sh -c "echo 'deb http://download.owncloud.org/download/repositories/stable/Ubuntu_16.04/ /' >> /etc/apt/sources.list.d/owncloud.list" apt-get update apt-get install owncloud |
three、initializationownCloud
1、Open the browser and enter:
|
1 |
http://服务器IP/owncloud |
2、Create an administrator account and password
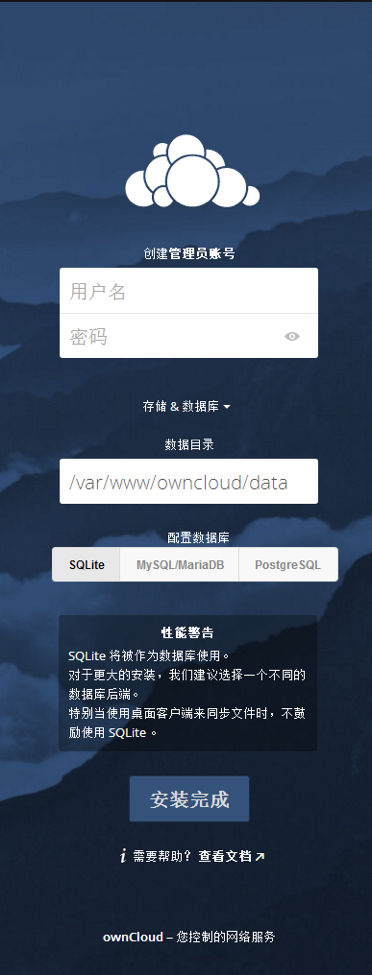
3、Data Directory
If you have special needs can change the data directory,Click the Data Directory,Enter the directory you want to set on it;Or in the next section will explain how to change the data storage path。
4、Click the installation is complete
four、Modify the upload file size limit
OwnCloudThe default upload files smaller,Only 513M,Inconvenient for everyday use。
1、Open the configuration file
|
1 |
vim /var/www/owncloud/.htaccess |
2、To find two lines of code
|
1 2 3 |
php_value upload_max_filesize 513M php_value post_max_size 513M |
3、You need to change the size
|
1 2 3 |
php_value upload_max_filesize 10240M php_value post_max_size 10240M |
Note:Which is divided into php5 and php7,You need to have two modified,A total of four places。
Fives、OwnCloud modify the default Web site
1、Edit apache2 configuration file
|
1 |
vim /etc/apache2/sites-available/000-default.conf |
2、The DocumentRoot path behind the path set owncloud
|
1 |
DocumentRoot /var/www/ownclou |
3、Restart apache service
|
1 |
service apache2 restart |
six、Modify ownCloud storage path
1、Stop web service:
|
1 |
service apache2 stop |
2、Open the configuration file
|
1 |
vim /var/www/owncloud/config/config.php |
3、Modify the path
turn up datadirectory item,Put the back' /where/www/owncloud/data 'Modify the path you want to set,
Example:' /where/data/ ‘
4、Data transfer
will /where/www/owncloud/data All files in a directory to a new /where/data/ Directory。
5、Modify permissions
modify /where/data/ Contents of the original group and user /where/www/owncloud/data In the same directory,For example, the groups and users to modify www 。
|
1 2 3 |
chown -R www-data:www-data /var/data chmod 755 data |
6、Start web service
|
1 |
service apache2 start |
Advanced Tutorial
If you need to use your own on the InternetownCloud,Then you need a static public IP address,Suppose you do not have a public IP address of,Then you can chooseuseDDNS(Dynamic DNS)。80 port mapping and the internal network server to the external network port 80。
Digression:National Communications Authority now requires operators to shut down 80 ports,So even if the above steps are done,You also find out that you do not have access to your web site,Then how to do it? 3 ways to solve:
1、Record your site: After filing your success will naturally 80 Port open (to the local carriers operating room);
2、Do not use 80 port: For a port on the line,For example, the use of port 88;. Please refer to the following article;
3、Use https: https is used 443 port,But also can achieve data encryption;. Please refer to the following article。
Seven、Modify apache port
1、Edit apache2 configuration file
|
1 |
vim /etc/apache2/sites-available/000-default.conf |
The<VirtualHost *:80>Changed<VirtualHost *:88>
2、Edit apache2 port configuration file
|
1 |
vim /etc/apache2/ports.conf |
The change Listen Listen 80 88
3、Restart apache service
|
1 |
service apache2 restart |
Eight、I use HTTPS encrypted traffic
1、Installation signature tool
|
1 2 3 4 5 |
apt install git git clone https://github.com/Neilpang/acme.sh.git cd ./acme.sh ./acme.sh --install |
2、Generating a Certificate
Because the provisions of the State Ministry of Communications now,Operators all the 80 ports ban dropped。So we can not apply for a certificate using the normal port 80 to request a certificate,Only throughDNSAnalytical method to obtain a certificate。
|
1 |
./acme.sh --issue --dns -d 你的域名.com |
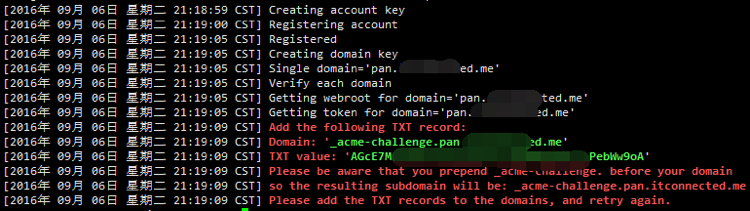
Then get this picture,You need to go to your domain operator control panel,To your domain name with your secondary domain,If there is no second-level domain,Then directly add a txt type of record,Host records to fill in the value of the Domain,Then TXT value where value is written in the record value。
Example is shown below:

3、Request a certificate
|
1 |
./acme.sh --renew -d 你的域名.com |
You will see this message after a successful
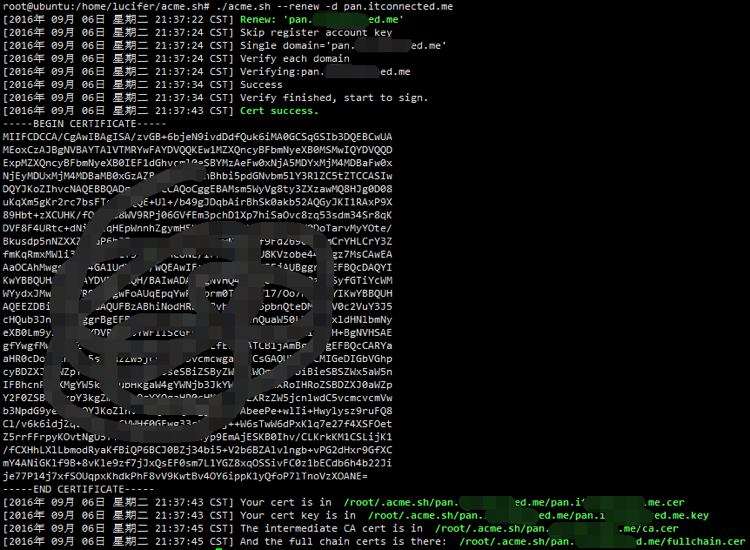
4、Install Certificate
Let's go now then configure the certificate on a site certificate store folder,And it needs to correct the name of the name
We must first look at the certificate store folder somewhere,Then copy over certificate
|
1 |
vim /etc/apache2/sites-available/default-ssl.conf |
Find the line 2
|
1 2 3 |
SSLCertificateFile /etc/ssl/certs/ssl-cert-snakeoil.pem SSLCertificateKeyFile /etc/ssl/private/ssl-cert-snakeoil.key |
Then the certificate and private key into the cp
|
1 2 3 |
cp /root/.acme.sh/pan.********ed.me/pan.********ed.me.cer /etc/ssl/certs/ssl-cert-snakeoil.pem cp /root/.acme.sh/pan.********ed.me/pan.********ed.me.key /etc/ssl/private/ssl-cert-snakeoil.key |
5、Install openssl
|
1 |
apt install openssl |
6、Open SSL module
|
1 |
a2enmod ssl |
7、Modify the default path of https
|
1 2 3 4 5 |
vim /etc/apache2/sites-available/default-ssl.conf // 改成下面值的 DocumentRoot /var/www/owncloud |
8、Enable https
After installation above,Will be at /etc/apache2/sites-available/ Generate a default directory default-ssl file。The default web directory is still /where/www/ 。We can create a link to site-enabled table of Contents。
|
1 |
ln -s /etc/apache2/sites-available/default-ssl.conf /etc/apache2/sites-enabled/default-ssl.conf |
9、Restart apache service
|
1 |
service apache2 restart |
Original article written by LogStudio:R0uter's Blog » OwnCloud build private clouds with personal
Reproduced Please keep the source and description link:https://www.logcg.com/archives/2007.html
404 how do appear
We have considered or tried nextcloud
Not clear,This is to help a friend get,My own words do not have these recent demand haha。
have,nextcloud tutorial I have written。But nextcloud 11.0.1 version bug,It will affect the use,So I did not put out the tutorial,Etc. nextcloud 11 or nextcloud 12 When the stable version released,I re-test,No problem, then,I put the release out the tutorial
nextcloud,12,We have a,When put Tutorial?besides,There centos6,64Well bit tutorial?
https://github.com/nextcloud/server/issues?q=is%3Aopen+is%3Aissue+milestone%3A%22Nextcloud+12.0%22
There are still a lot of BUG,And so little talk about it a little stability,The current version is 12.0.0
1Within weeks to give you tutorials
On my next test cheap vps,swap free immediately the zero,why?
Okami,They ask how to make owncloud stored into the host Windows directory it?
You can use the smb share,Want to know how to operate it? ?
I will not tell you -
What you need is NAS。
I try to use a virtual machine installed ~