iOS9 brings many new features to make our life easier development,Stack Views profile is a good example. Before you give a brief introduction of the auto layout. Let us work together in this example is simple, but,With your app UI becomes more complex,You will find all the iOS devices to provide the perfect interface constraints become more difficult. This is Apple introduced Stack views in the latest version of Xcode and Ios a reason.
This chapter,We will continue to discuss the interface editor UI design. I will teach you how to build a more comprehensive interface,Application you may encounter in practice. You will learn how to:
- View to using the stack layout of the user interface.
- Use picture view to display pictures.
- Use the built-in directory to manage pictures.
- Use Size to adjust the stack view class.
We will. You might be scared According to the above discussion of the automatic layout of content more,Because you did not write a line of code, but can do so many things.
Stack view(Stack Views)What
Let me talk about important,What is the stack view?Stack view provides a streamlined interface to the view of the collection is placed in a row or a column. In the PPT or Keynote,You can put a lot of objects grouped together,That way they can move as a single object or group. Stack view provides a very similar characteristics. You can view a lot of UI stack objects into one. The best is,View embedded in a stack view later,You no longer need to define automatic layout constraints.
Embedding a view in the stack view when,They are usually seen as a good view scheduled.
Stack view layout management of its child views,Then automatically provide you with layout constraints. This means that the applet is ready to adapt to different screen sizes. Further,You can embed a stack to another stack view view to build more complex user interface. Sounds cool,right?
Do not misunderstand me. It does not mean you do not need to deal with automatic row layout. You still need to define the layout of the stack view. It is only you can save each UI element in the creative constraints of time,Then easily come from the layout in the Add / Remove View.
Xcode7 provides two to use the stack view. You can grab a stack view from the object library(Horizontal and vertical),And then into the storyboard in. Then you can drag and drop view objects such as labels,buttons,image views to the stack view. Another way,You can use the automatic layout of Stack column option to use this method,You can simply select two or more view objects,Stack then select Options. Interface Editor will embed these objects into a stack view,Then automatically resized. If you are for how to use a stack view no clue,Do not worry. We will continue this chapter explains these two methods. Continue reading,For a while you'll know what I mean.
Simple app
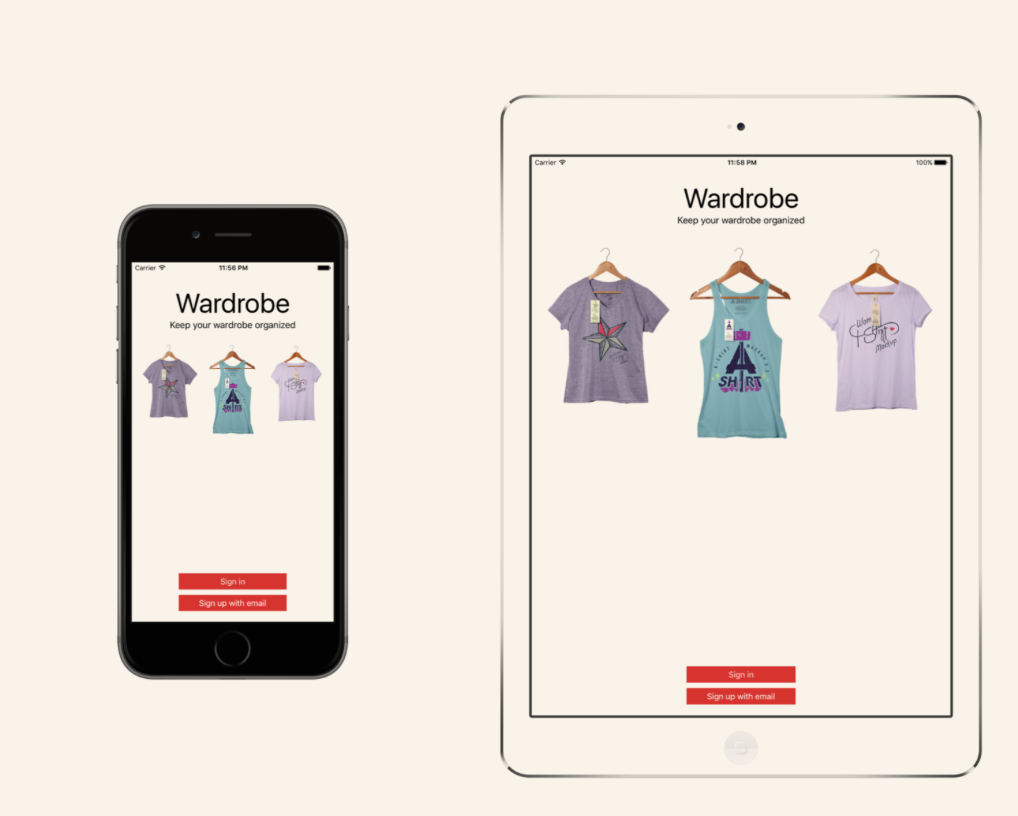
To see if we're going to build a demo app. I'll show you how to use the stack to view the layout of a user interface such as the following:
If you do not stack view,You can also make the same UI. But as you want to see as,Stack view completely changes the way you approach the layout of the user interface. Again,This chapter is no code.
Create a new project
Now turn off Xcode and create a new Xcode project. Select Application(Under iOS)>”Single View Application”Click”Next”.You can be as simple as this to fill in information engineering:
- Product Name:StackViewDemo – This is your project name.
- Organization Name:AppCoda – This is your company's name
- Organization Identifier: com.appcoda – In fact, this domain name written backwards. If you have a domain name,You can use your own domain name *. Otherwise,You can use”com.appcoda”Or to fill in”edu.self”.
- Bundle Identifier: com.appcoda.StackViewDemo – This is the only sign your app,For submitting app. You do not need to fill this option will automatically help you generate .Xcode.
- language:Swift – We will use Swift to develop this project.
- Devices: Universal – Choose”Universal”.Universal app for iPhone,iPod touch,And optimized device ipad separate app. In this demo,We will design a user interface that can run on all devices.
- Use Core Data:[unchecked] – Do not choose this. This simple construction with less than Core Data.
- Include Unit Tests:[unchecked] – Do not choose this. This simple unit test project in less than.
- Include UI Tests:[unchecked] – Do not choose this. This simple test project in less than UI.
Click”Next”.Xcode will ask you to prepare engineering StackViewDemo where to save in your mac select a folder. Click”Create”.
Add image to Xcode project
As you can see,The sample app contains three pictures. The question is,How can you bind pictures Xcode project in?
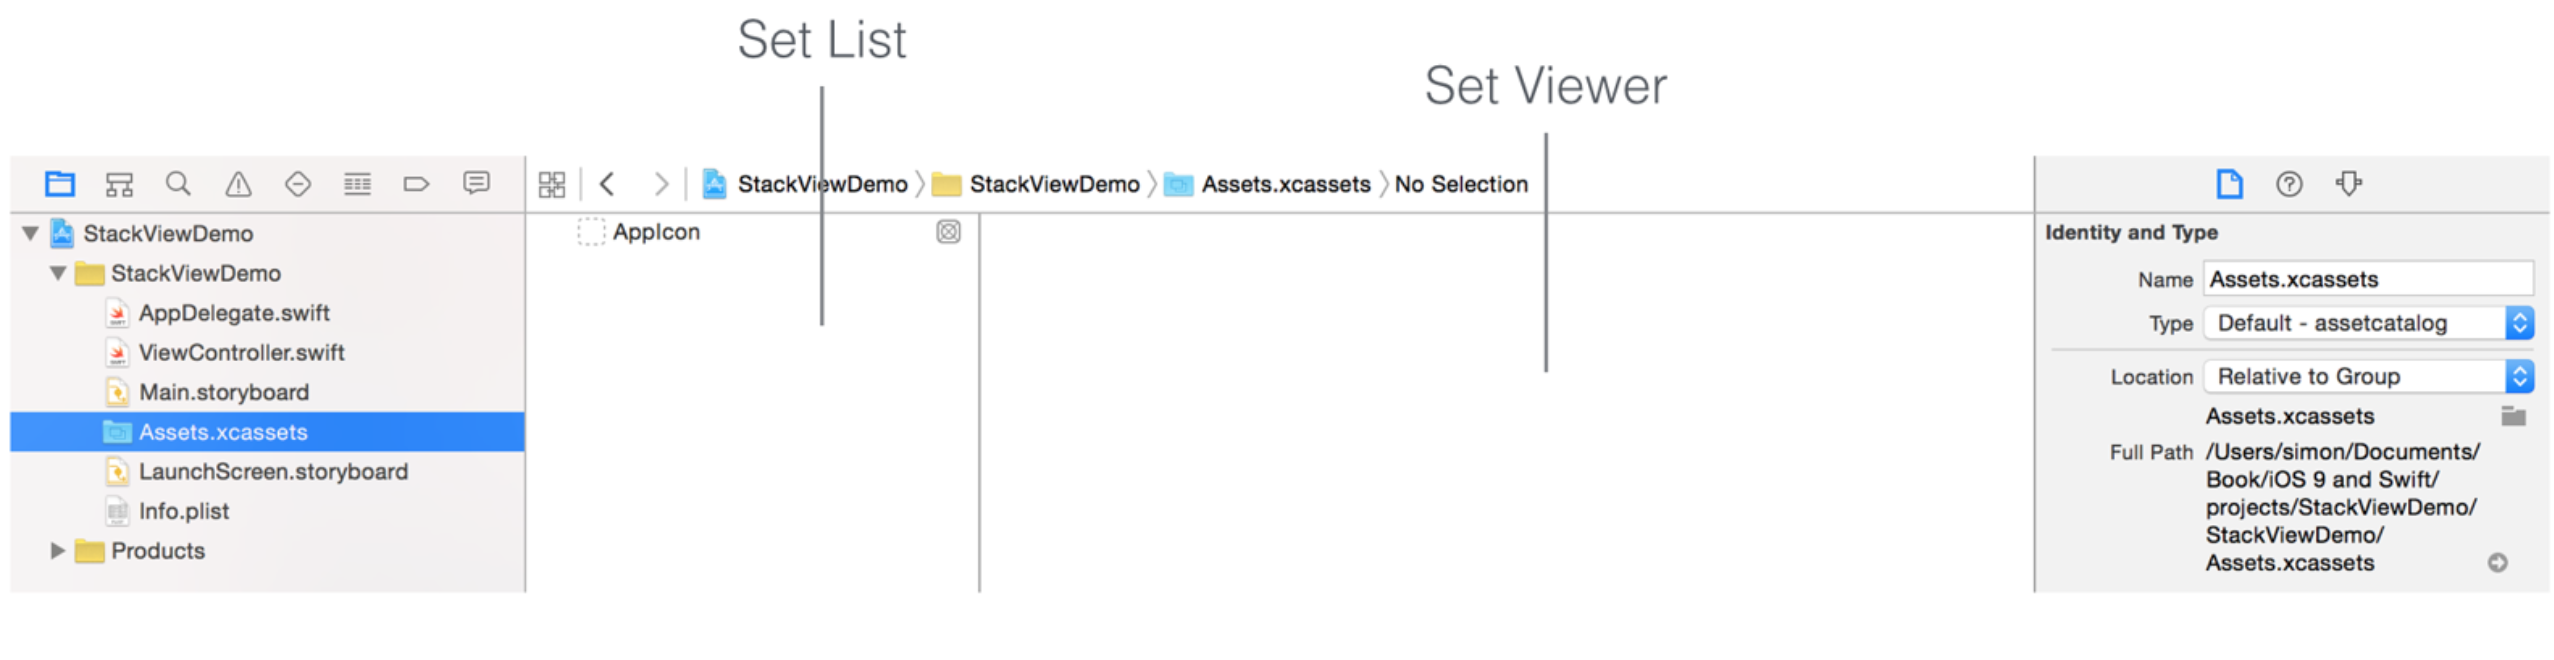
In each Xcode project,It includes an asset catalog(As Assets.xcassets)To manage images and icons,These will be used in your app in Select Assets.xcassets folder. By default,,It was empty,Only a blank AppIcon settings. In this chapter we are not prepared to discuss the app icon,But we built a real app in the future we will talk it.
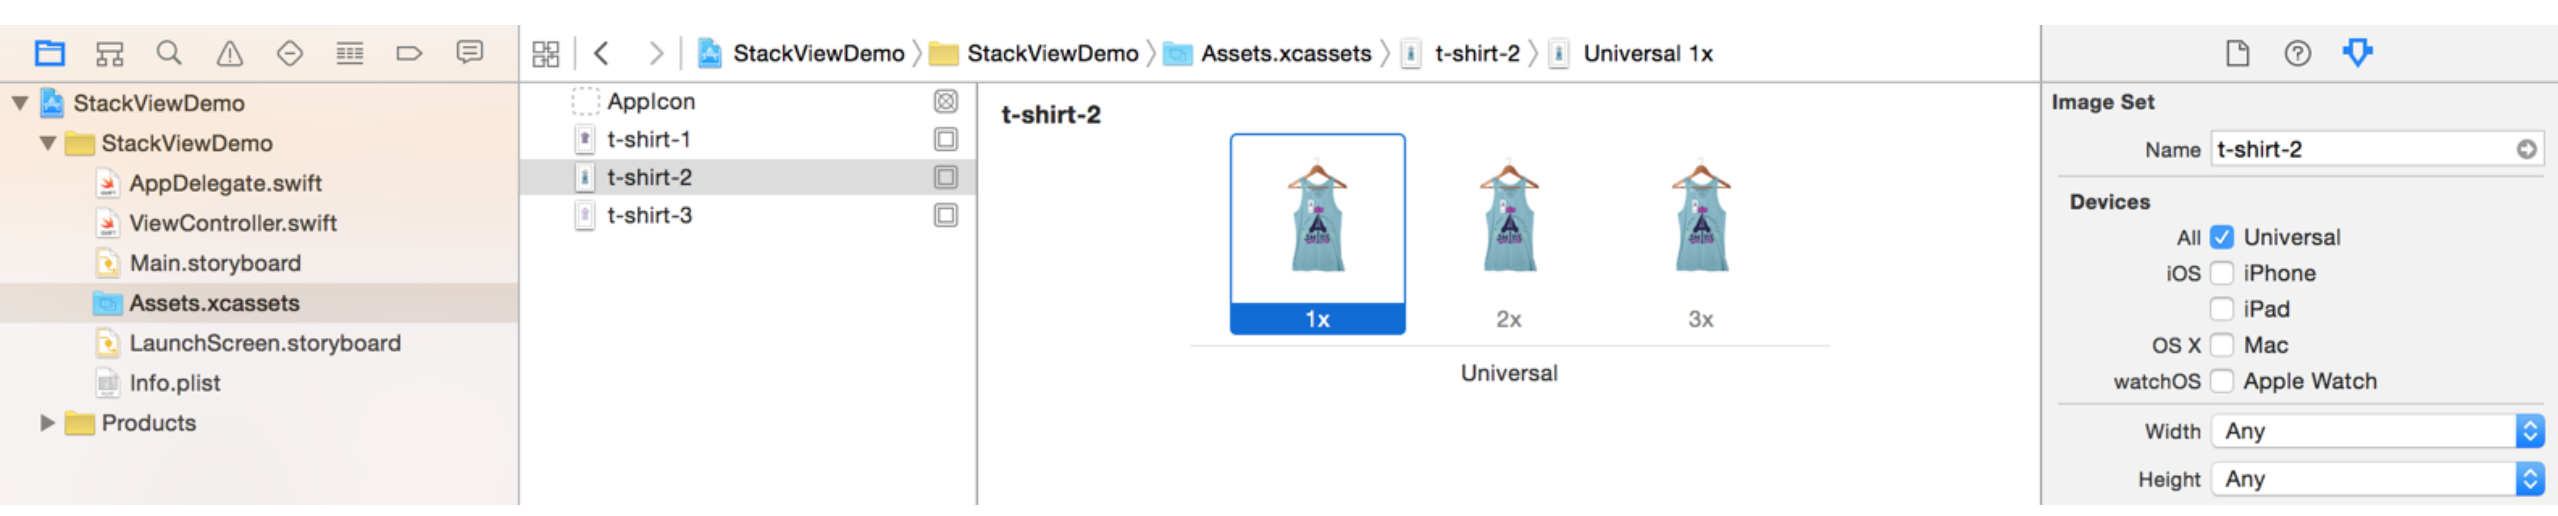
Download Now these images and then extract the settings on your Mac. Compression bag containing a total of nine image files,But it actually contains three different t-shirt image. They each have three different resolutions. Here is an example:
- t-shirt-1.png
- t-shirt-1@2x.png
- t-shirt-1@3x.png
When developing an iOS app when,Suggestions of pictures ready 3 version with a suffix @ 3x,The highest resolution,For iPhone 6 Plus. @ 2x suffix with a,For iPhone4 / 4s / 5 / 5s / 6, no! Suffix is used for non-Retina screen.
Add these pictures to the asset directory,You have to do is drag the image from the Finder to the list of settings
Once you add a picture to the asset directory,Photos will be set automatically. After,If you want these pictures,As long as you use a special name(Such as t-shirt-1).You do not need to worry about which version to use(@ 2x / 3x @).These will help you deal with iOS.
Stack Views layout with title tags
Now that you have a good binding in the project the necessary image,Let's look at the stack view. First,,Open Main.storyboard. We start from two words.
Stack view view layout can be arranged in a plurality of vertical and horizontal directions. So first,You need to decide whether you want to use a horizontal or vertical view. The title and subtitle are arranged vertically Clearly,We will use a vertical stack view.
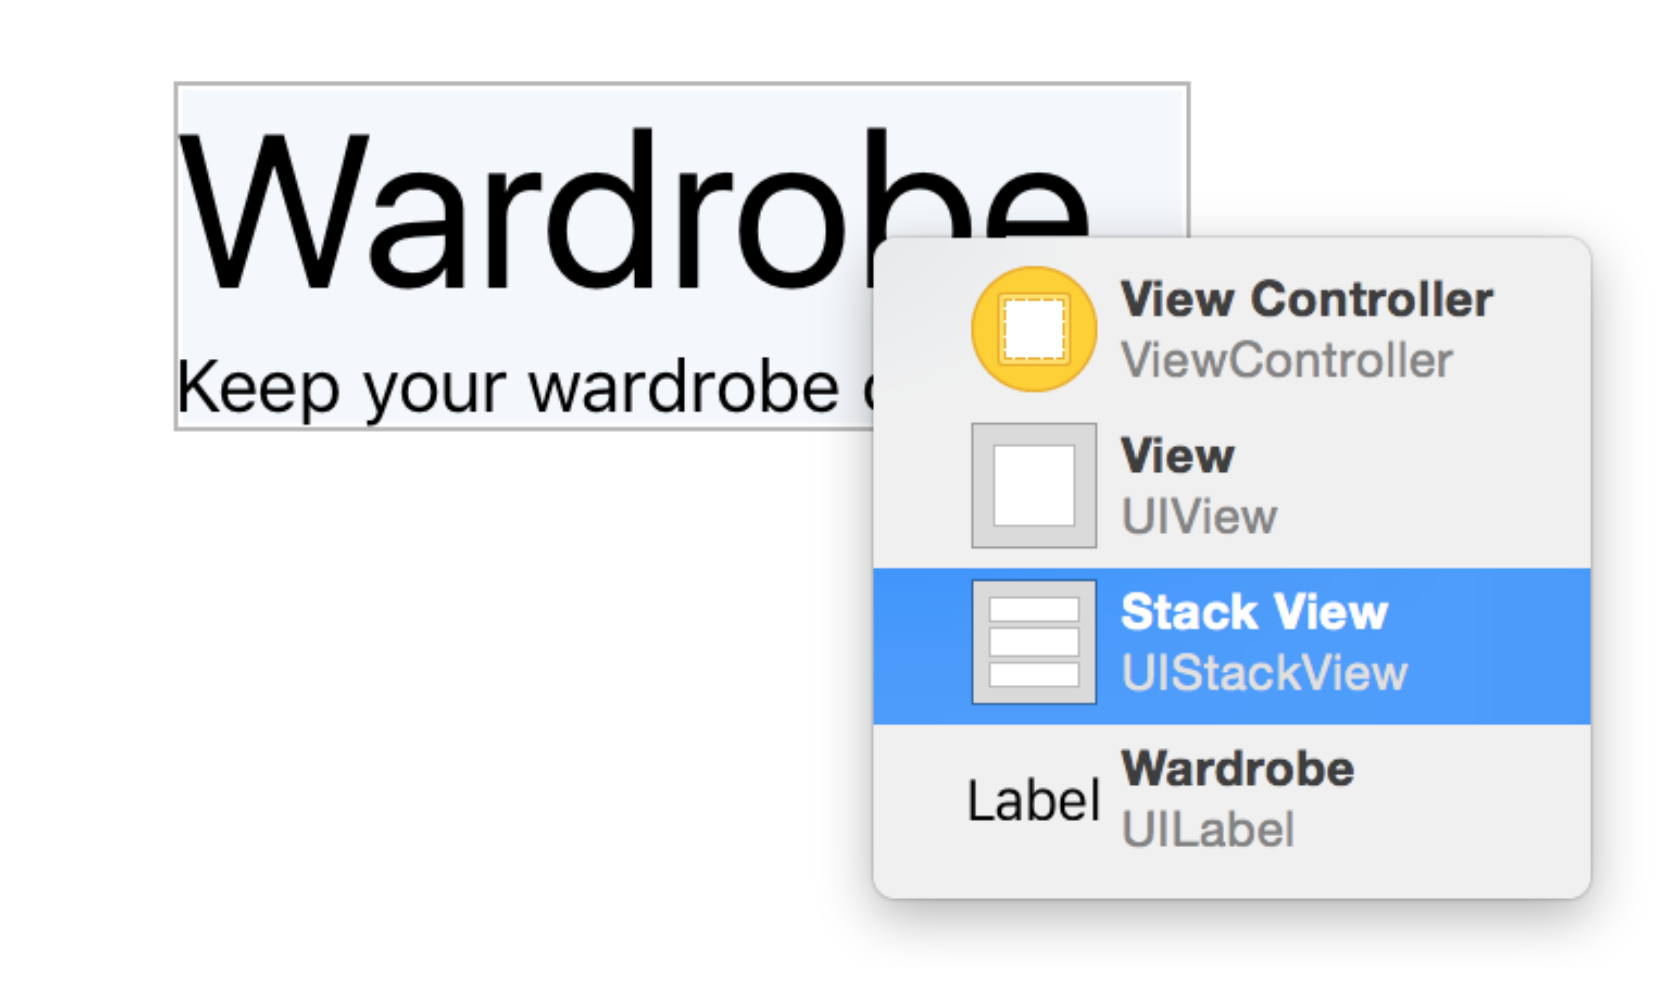
Pull a Vertical Stack View object from the library to the storyboard in the view controller.
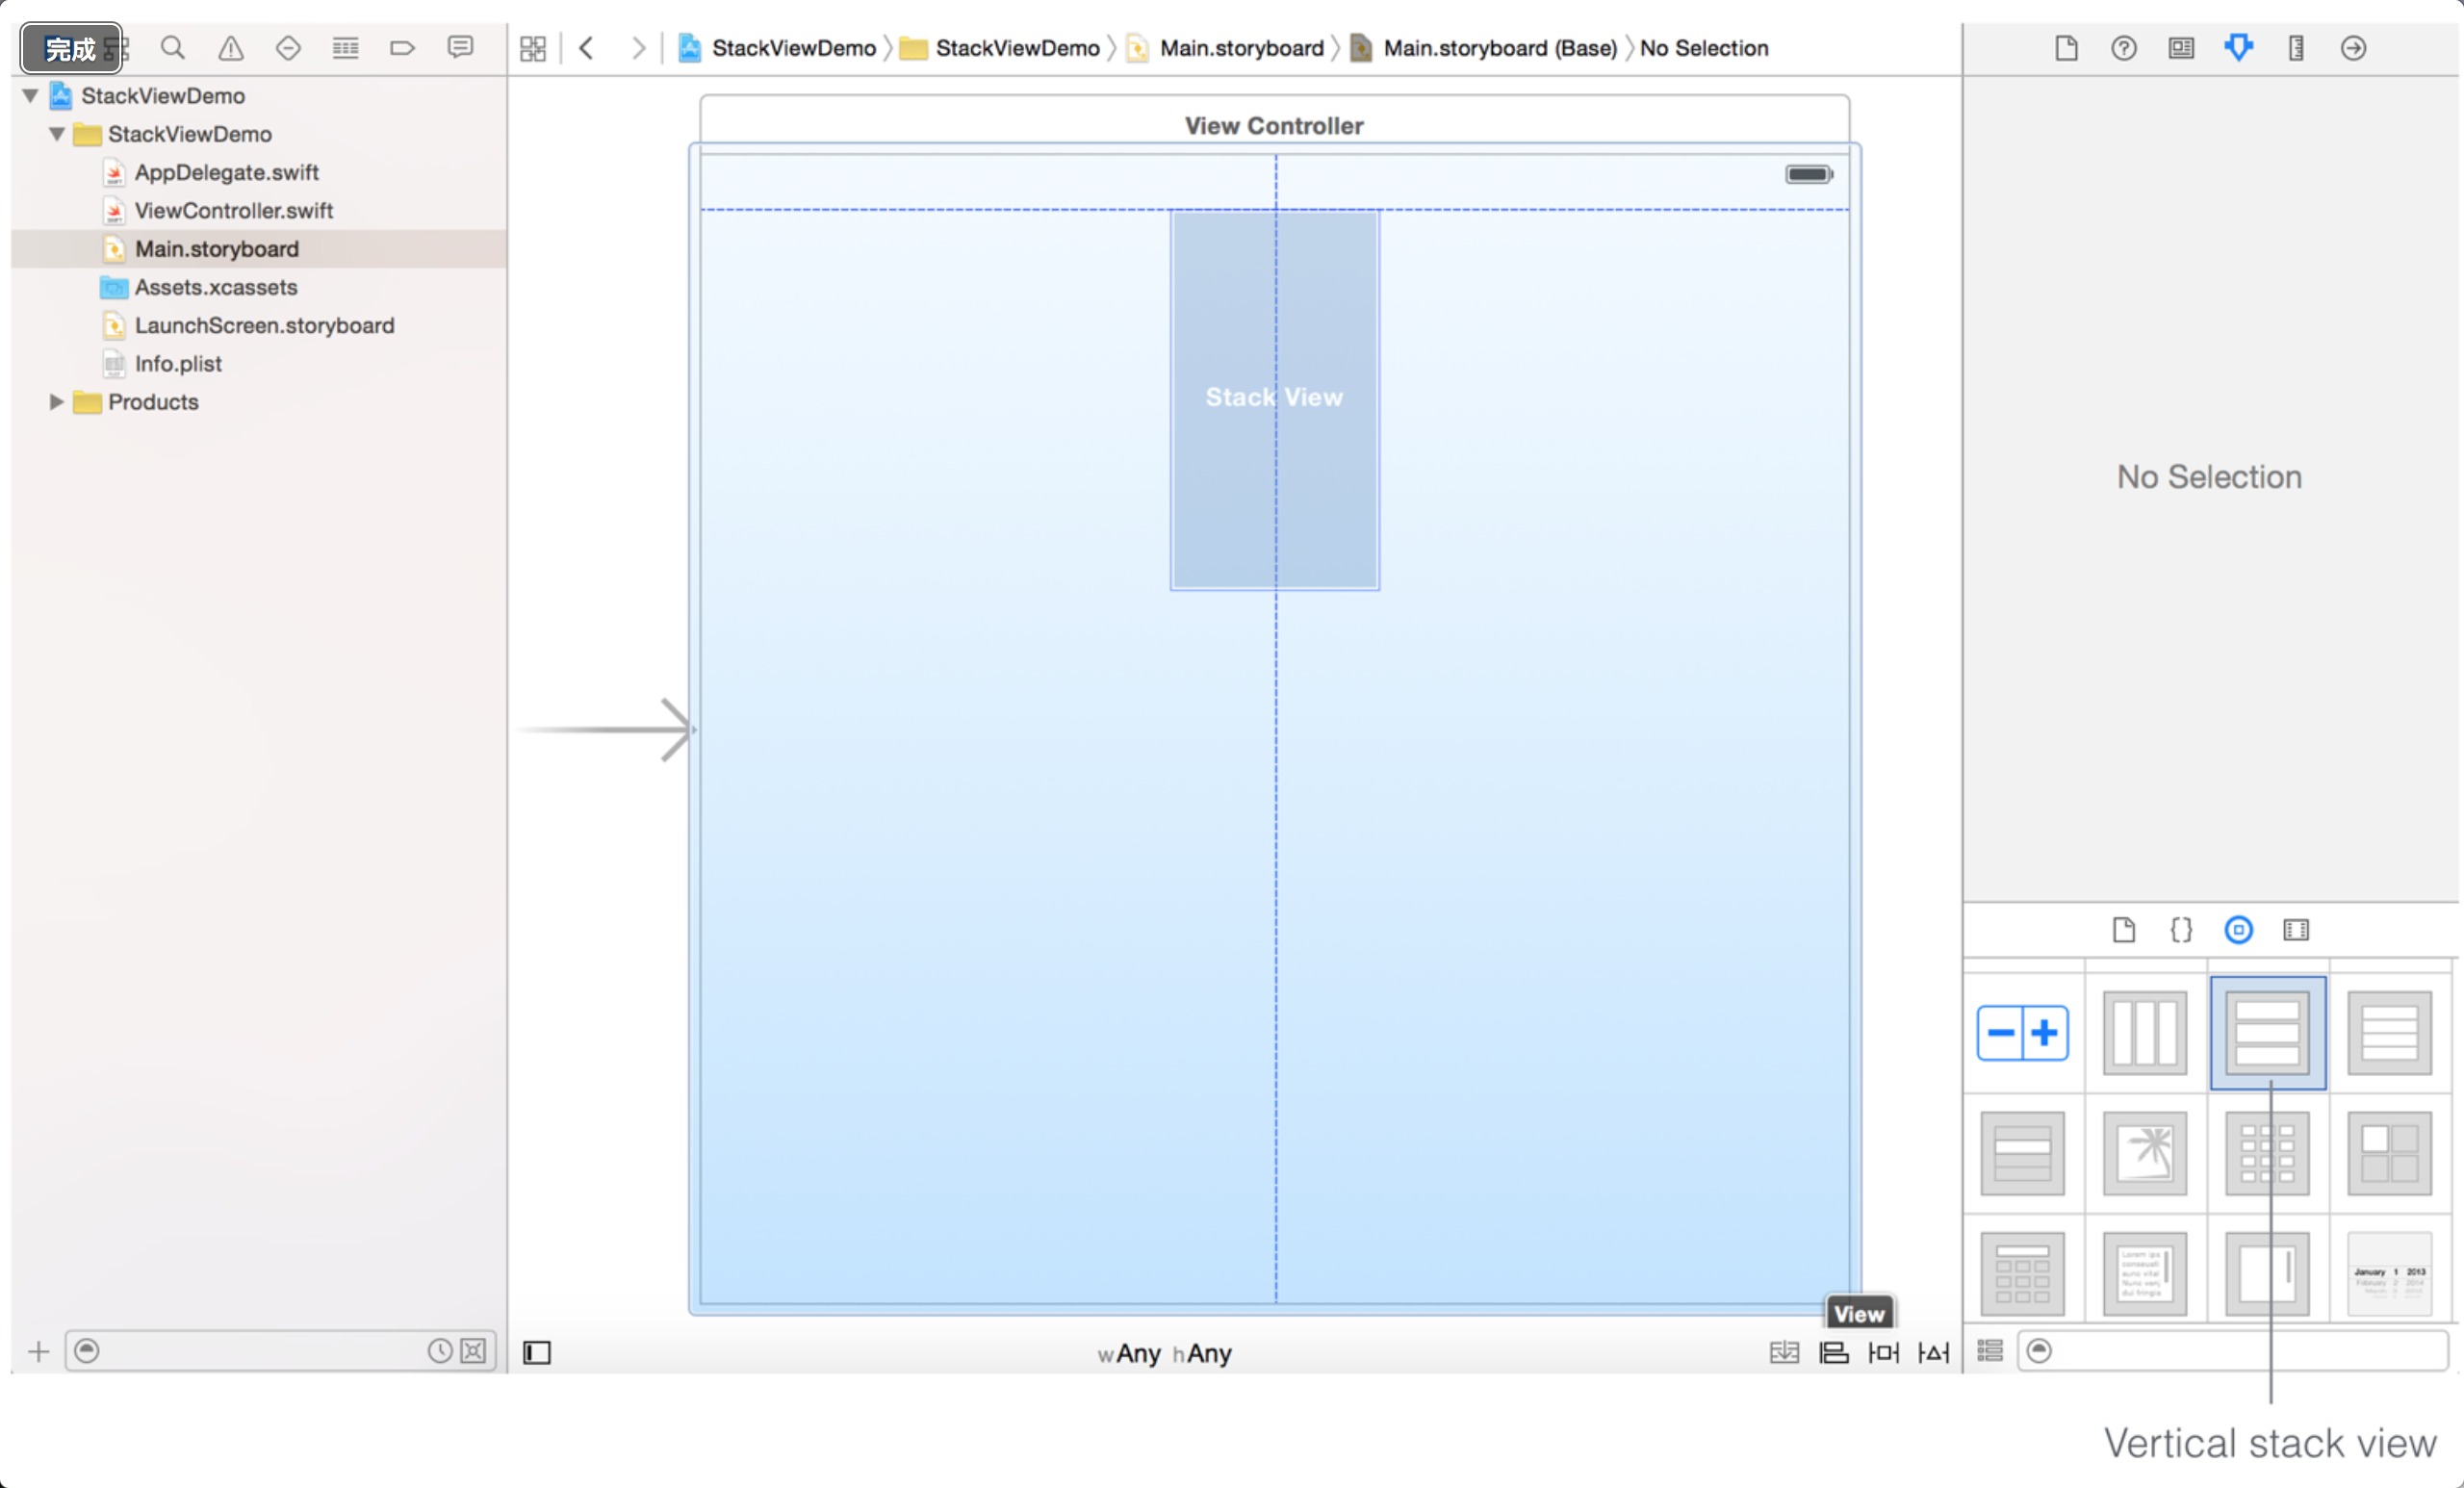
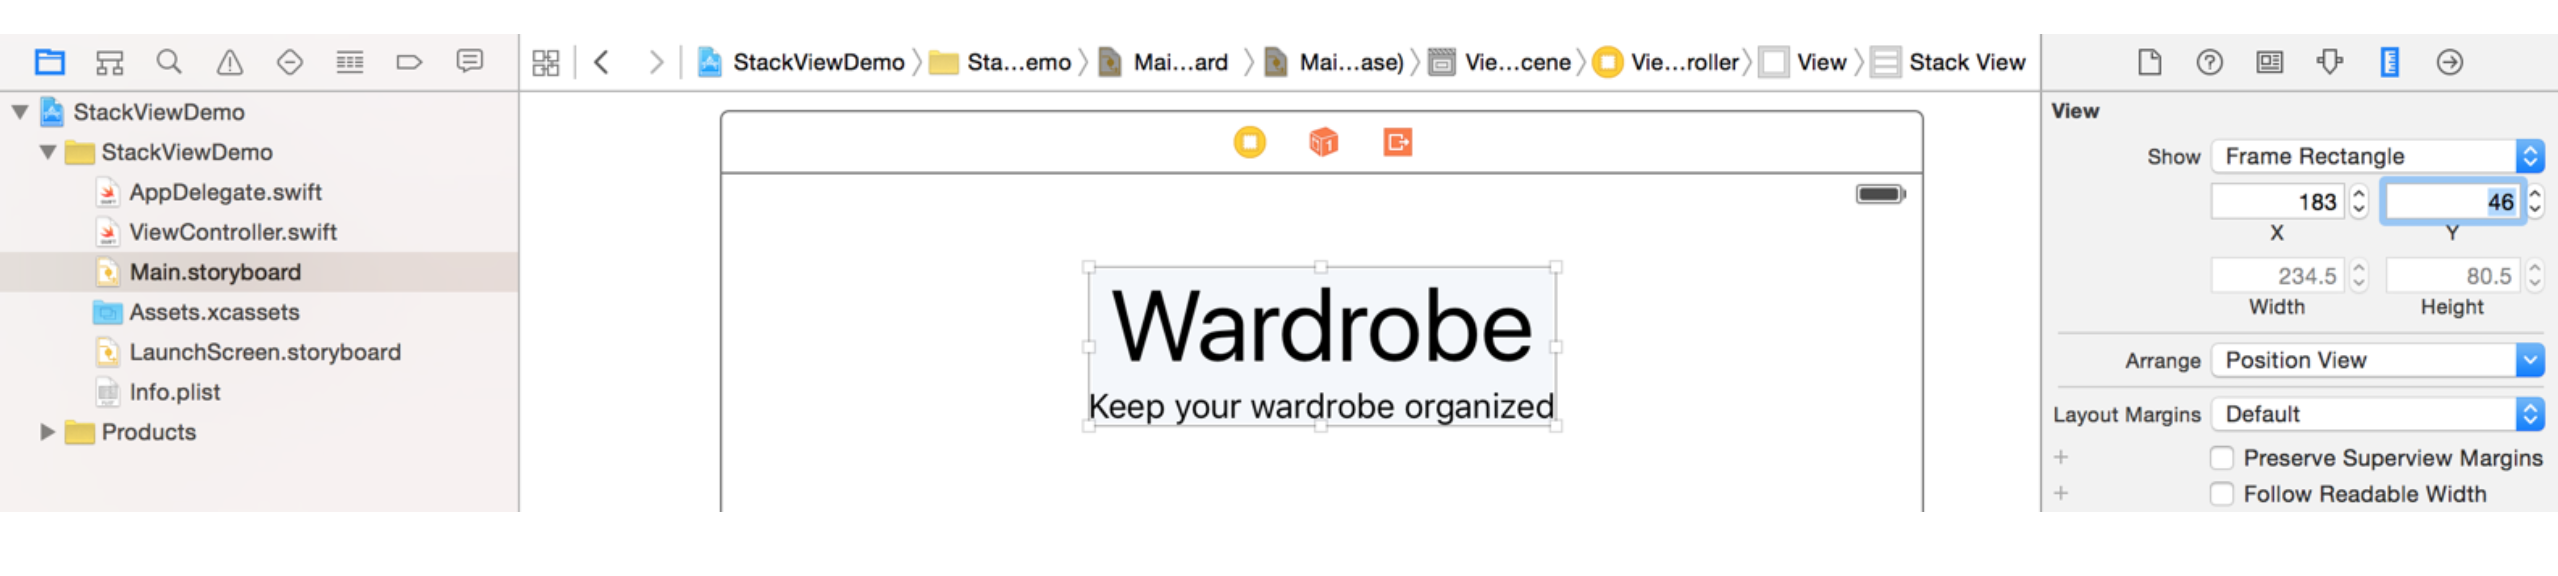
Then,Pull a label from the object library into the stack view. Stack view will automatically embed label,Resize it. Double-click the label and then retitle”Wardrobe”.In the Attributes inspector in,Change the font size 50.

Edit the new label and the title changed”Keep your wardrobe organized”.

In General,”Wardrobe”Labels are left-aligned. Once the stack view,You can batch change many stack view property to change its display format. Select the stack view then you will find it in the properties in the Attributes inspector.
By the way,If you have a problem, select the stack view,You can hold down the shift key and right-click the stack view. Interface Editor displays a shortcut menu to let you choose.
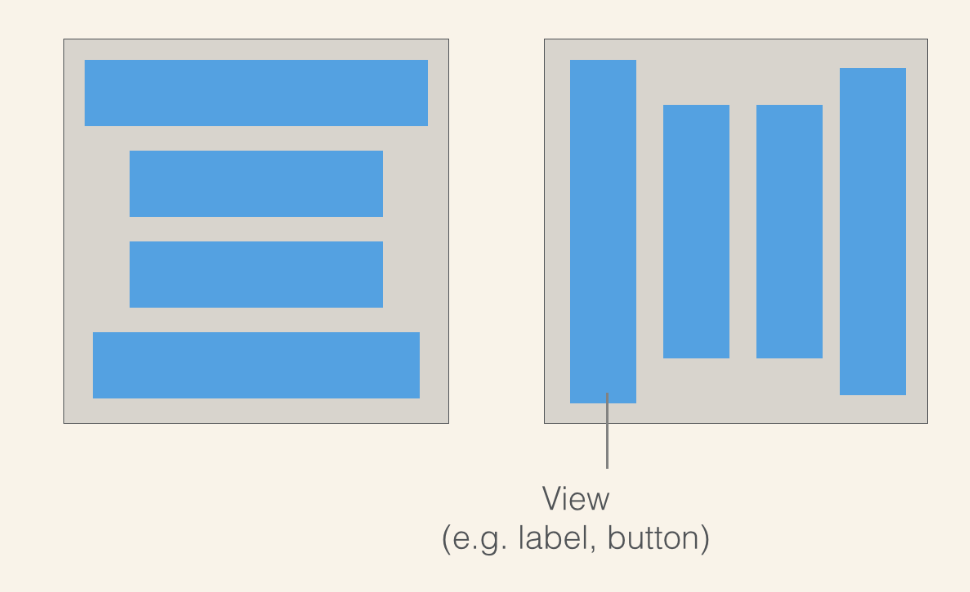
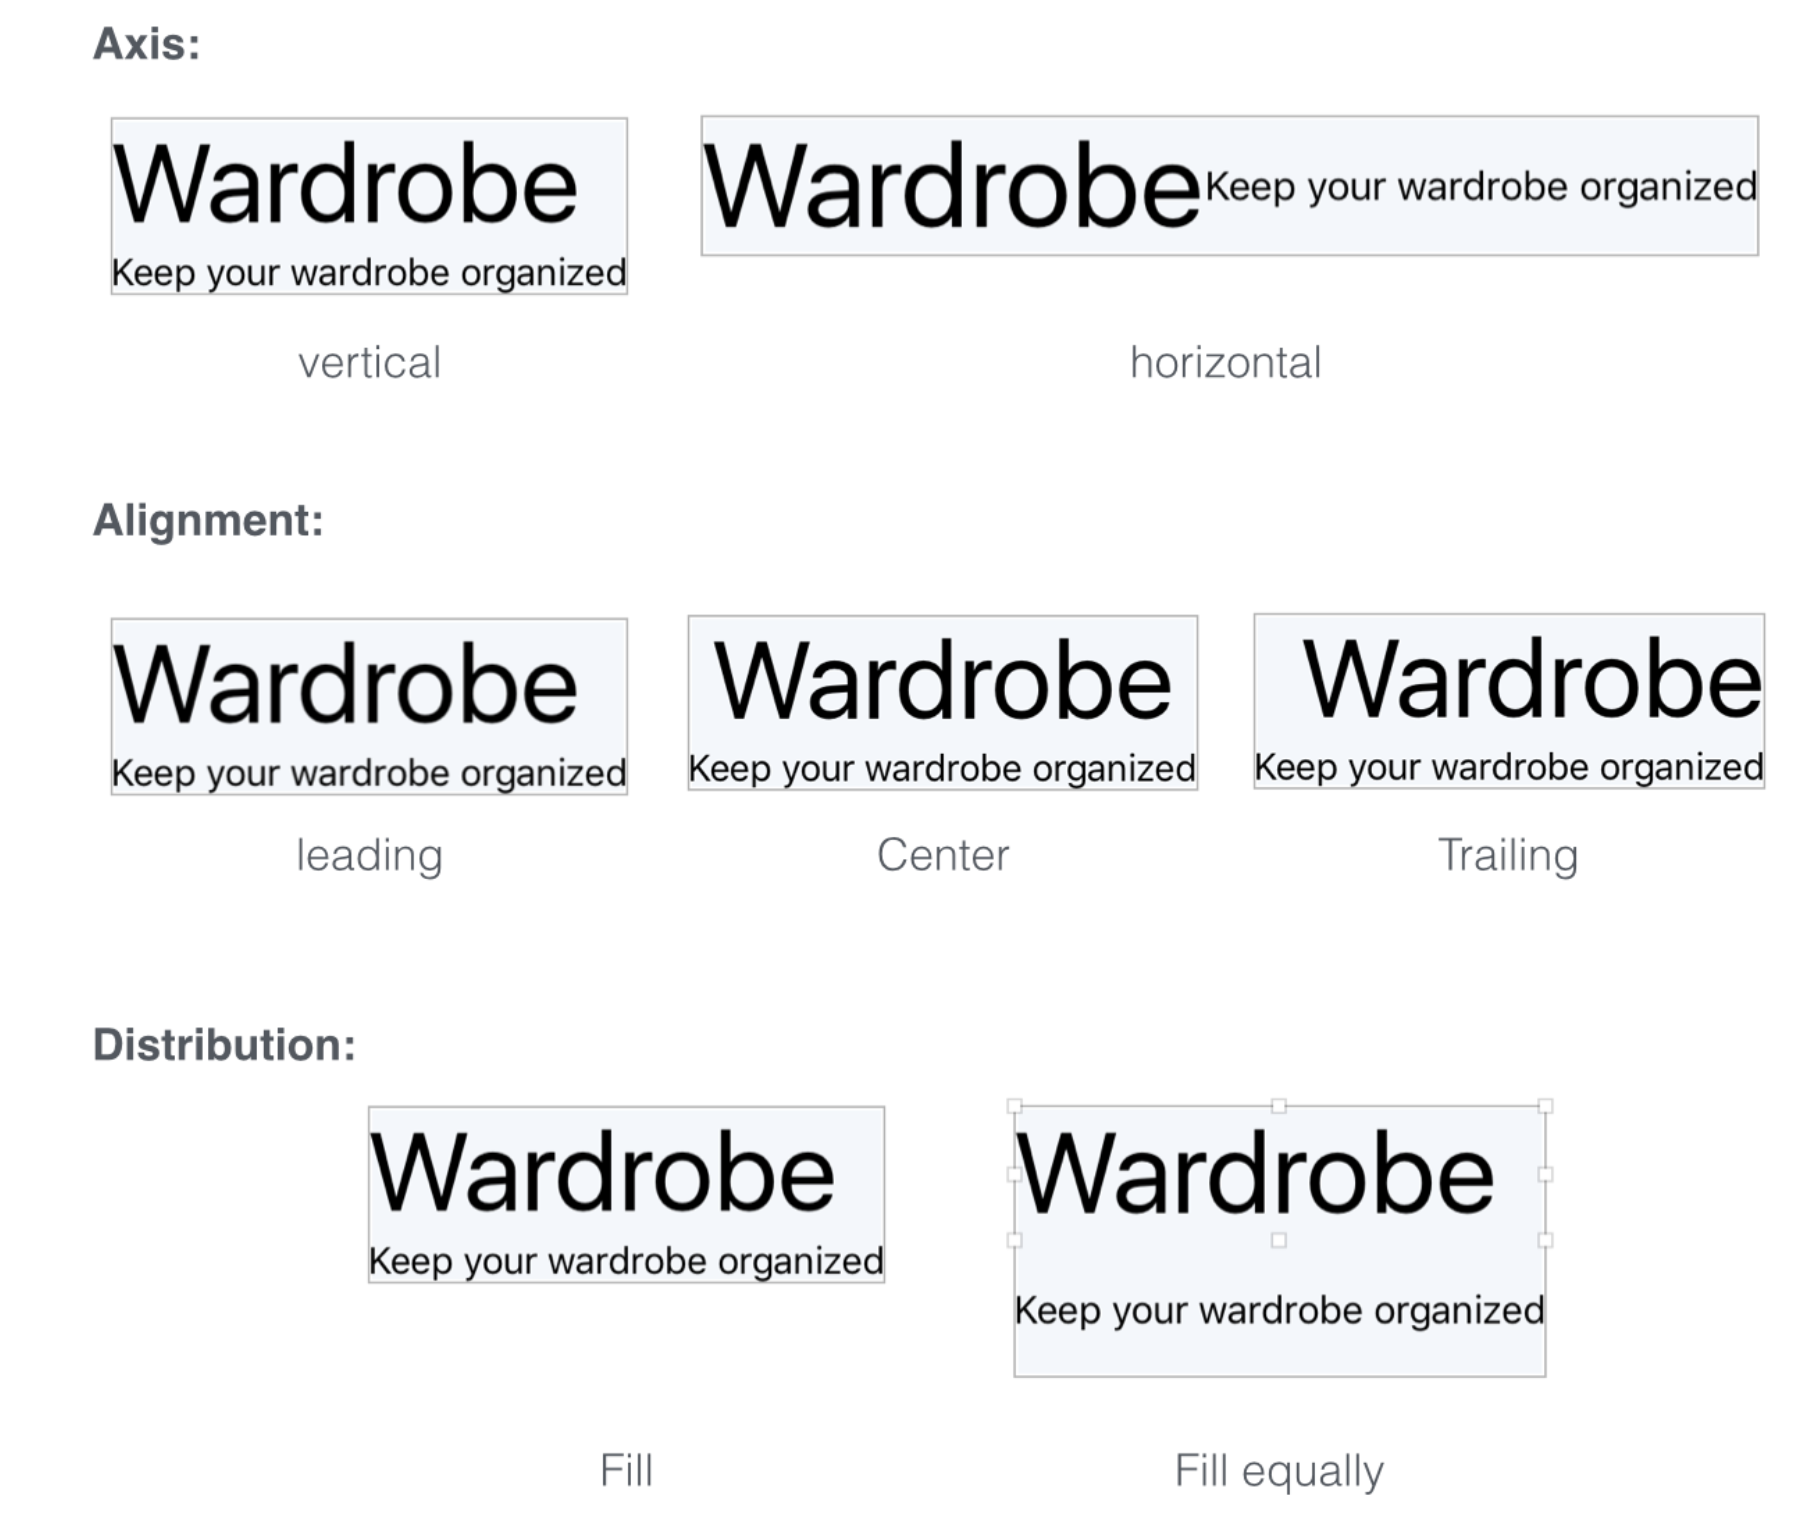
We briefly discuss each property .axis stack view options show view to horizontal or vertical layout. It becomes horizontal from vertical,You can put an existing stack view into a vertical stack view.alignment view option controls how the alignment example,If it is set to Leading,stack view will align the edges(As left-aligned).The size and location of distribution options define the view. By default set to Fill. In this example,All available space stack view child view fills the view. If set to Fill Equally,Vertical stack view will split two labels along the vertical axis. The figure below shows some examples of the different properties of the layout.
In our demo,Only need to change the alignment options from the Fill to Center,The two labels centered. Prior to the next section,Make sure that your stack view of the location is correct. You can choose to go to the stack view Size inspector. Make sure you set the value of X 183, Y value of 46.
Horizontal stack view layout image
Now we continue T-shirt image. The image is horizontal,We replaced by horizontal stack views. Drag from the object library into a horizontal stack view in the storyboard in iOS,We use the image views to display the picture. Looking image view objects from the object library,It dragged us just added stack view. Repeat this step to add two more image views. If you add more to the stack view in image views,It will automatically level arrangement image views.
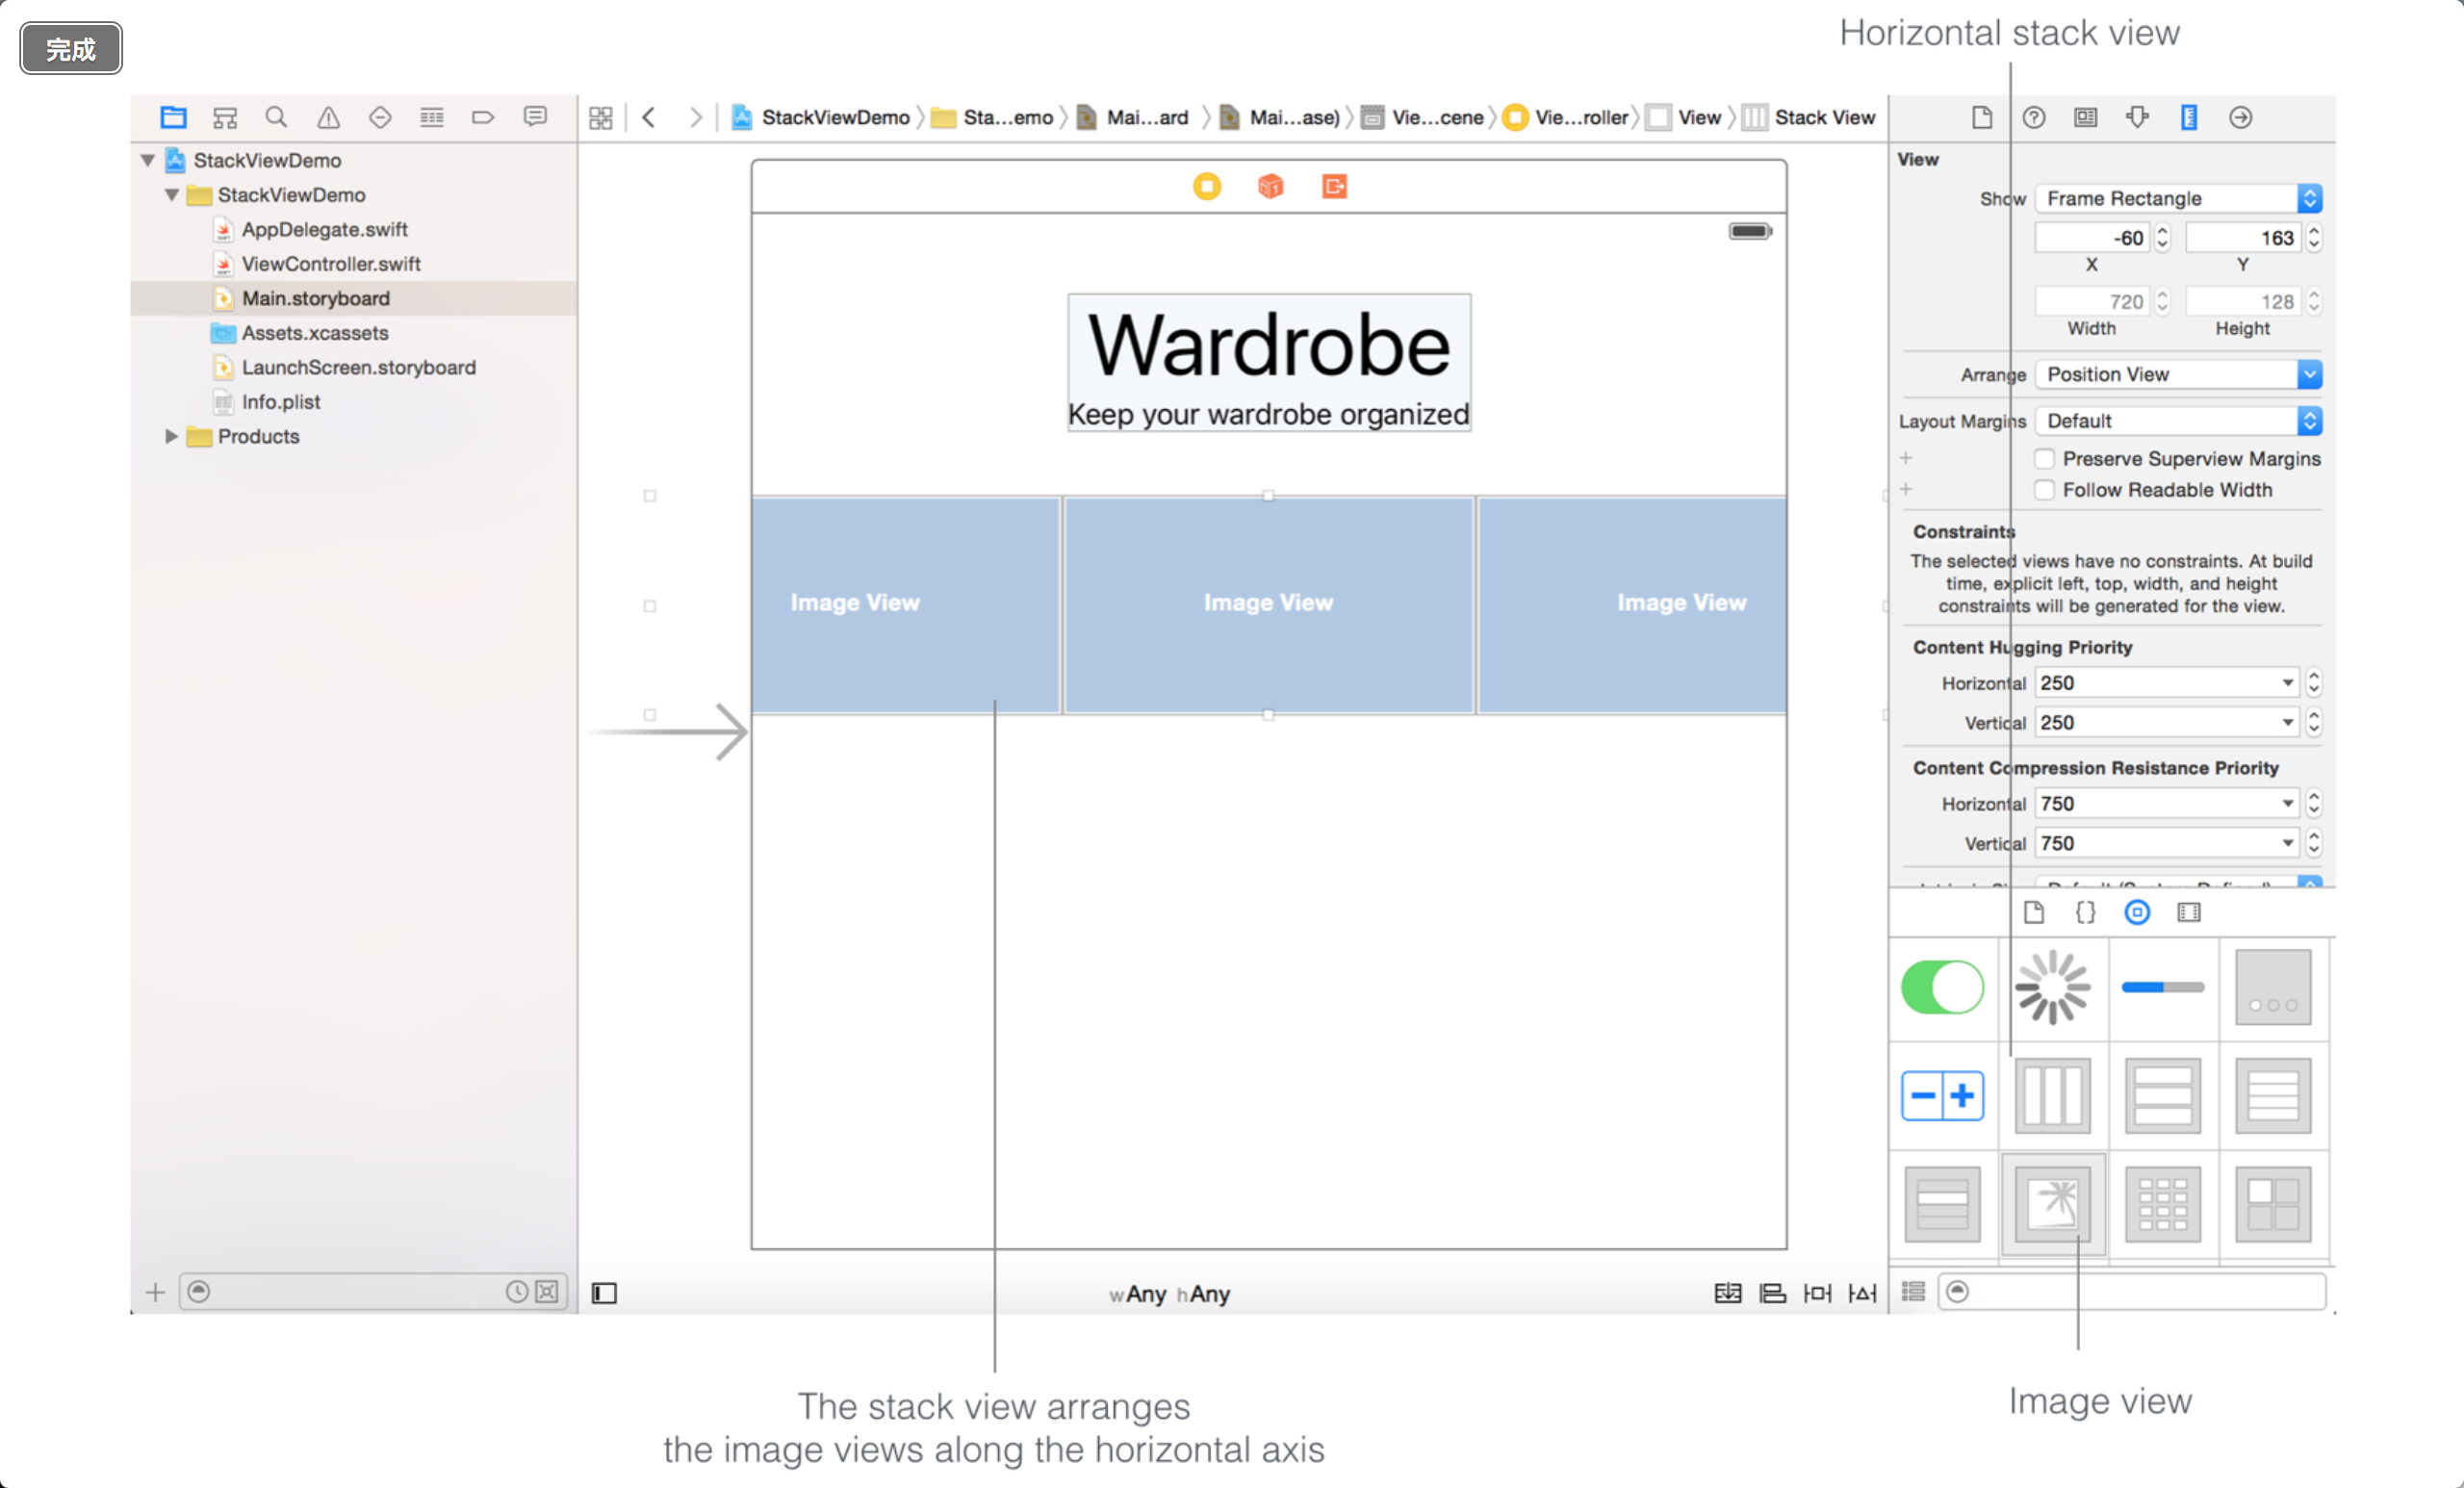
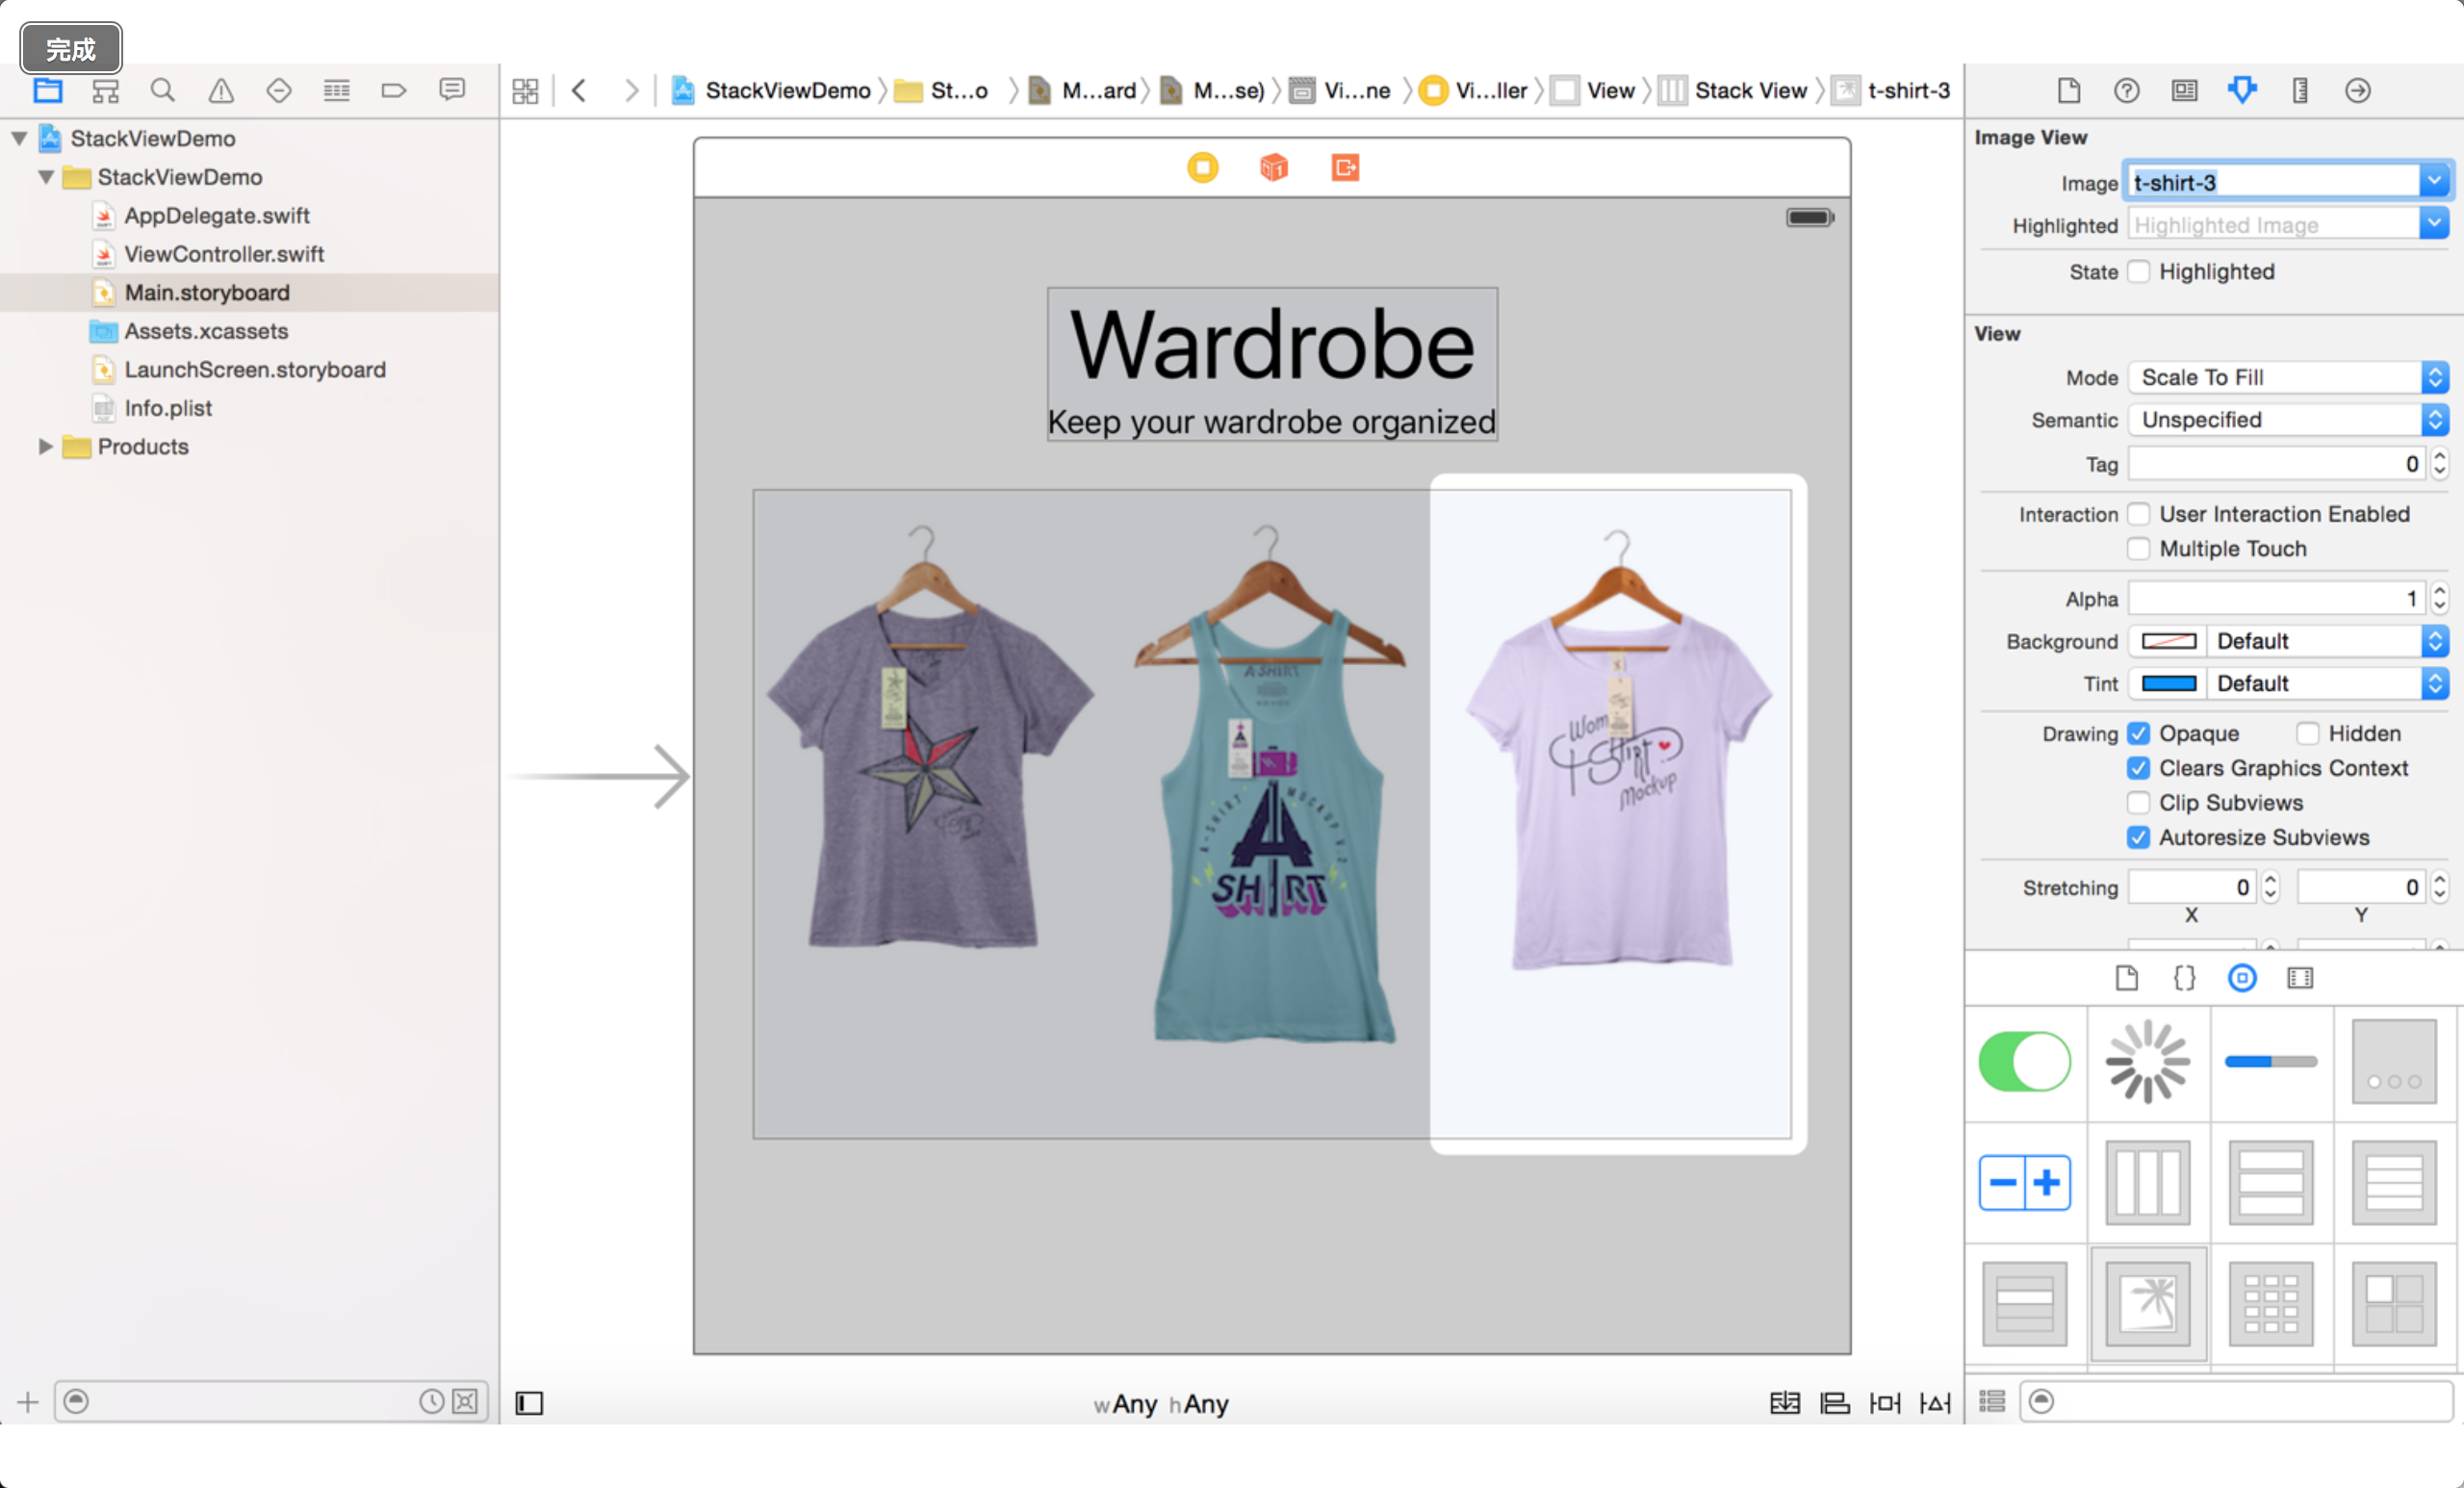
image view was not assigned any images. Select the left image view and then go Attributes inspector. We have added the T-shirt picture to the project,image option automatically read the image from the asset directory Select Options drop-down menu click on image”t-shirt-1″.Repeat the same steps to add other image views. Your screen should look like this:
Make sure you stack view of the position X = 20 Y = 142. Select the stack view and change the description,Fill to change from Fill Equally. 10. This interval is set to increase in the image to add some space before views.
Quick note:Stack view seems to have split the image view. Why do we want to change the properties Fill Equally?Remember you are now on a free canvas design UI. If you do not explicitly set the property to Fill Equally,iOS will use the Fill distribution plan layout image views. It may be on the screen, other equipment does not look so good
UI looks good now,right?If you run the app or Preview UI interface editor,It does not look like might expect because we have not given stack views define layout constraints. You still need to create layout constraints stack views.
Add layout constraints to stack views
We will define the following interface bound to stack view title:
- Between it and the top layout guide set off a constraint.
- It is the center level.
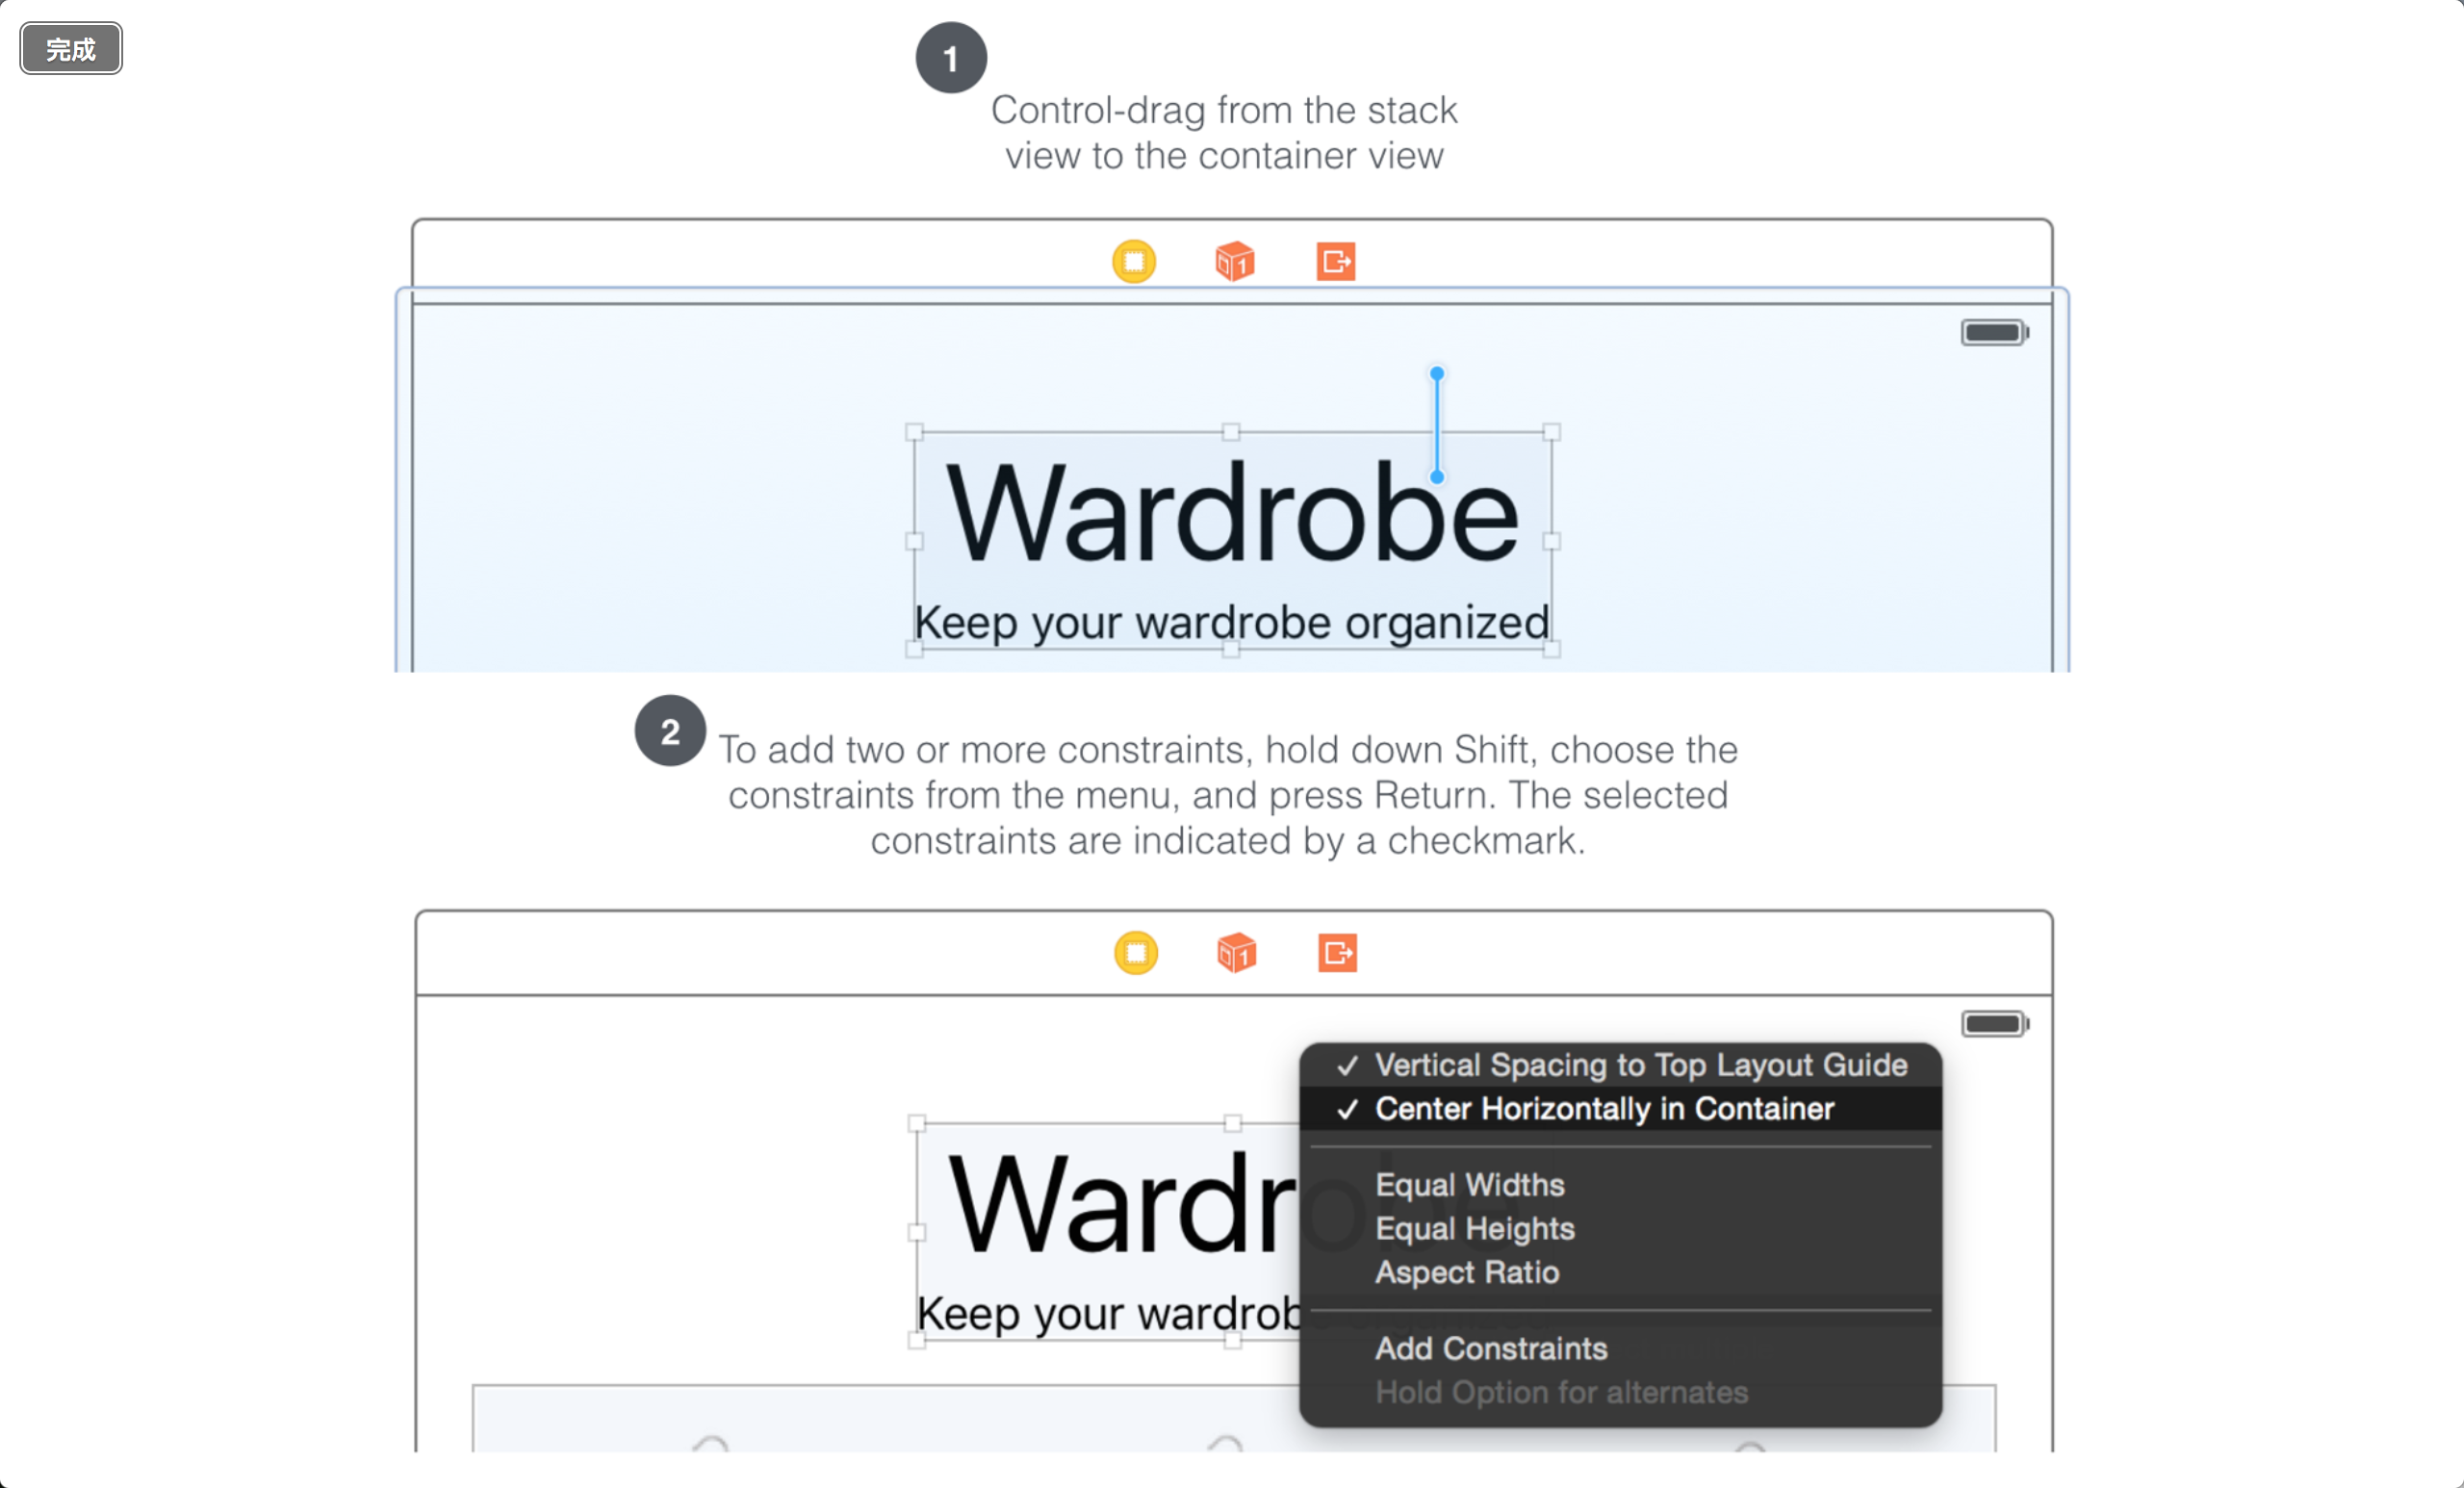
Hold down the control and drag it to the stack view in container view. Hold down the shift key,Choose”Vertical Spacing to Top Layout Guide”and””Center Horizontally in Container”.Click Return to add constraints.
When the stack view contains image view,We will define the following layout constraints:
- Between it and the other set up a margin constraint stack view,Therefore, there is a margin between them.
- Setting a margin constraint between the left border and the left stack view view,No space between them(That 0:00).
- Setting a margin constraint between the right and the right border stack view view,No space between them(That 0:00).
Now click on the Layout button in the Pin button. Settings at the top,Constraints on the right and left margins and 0 respectively 15.5,0
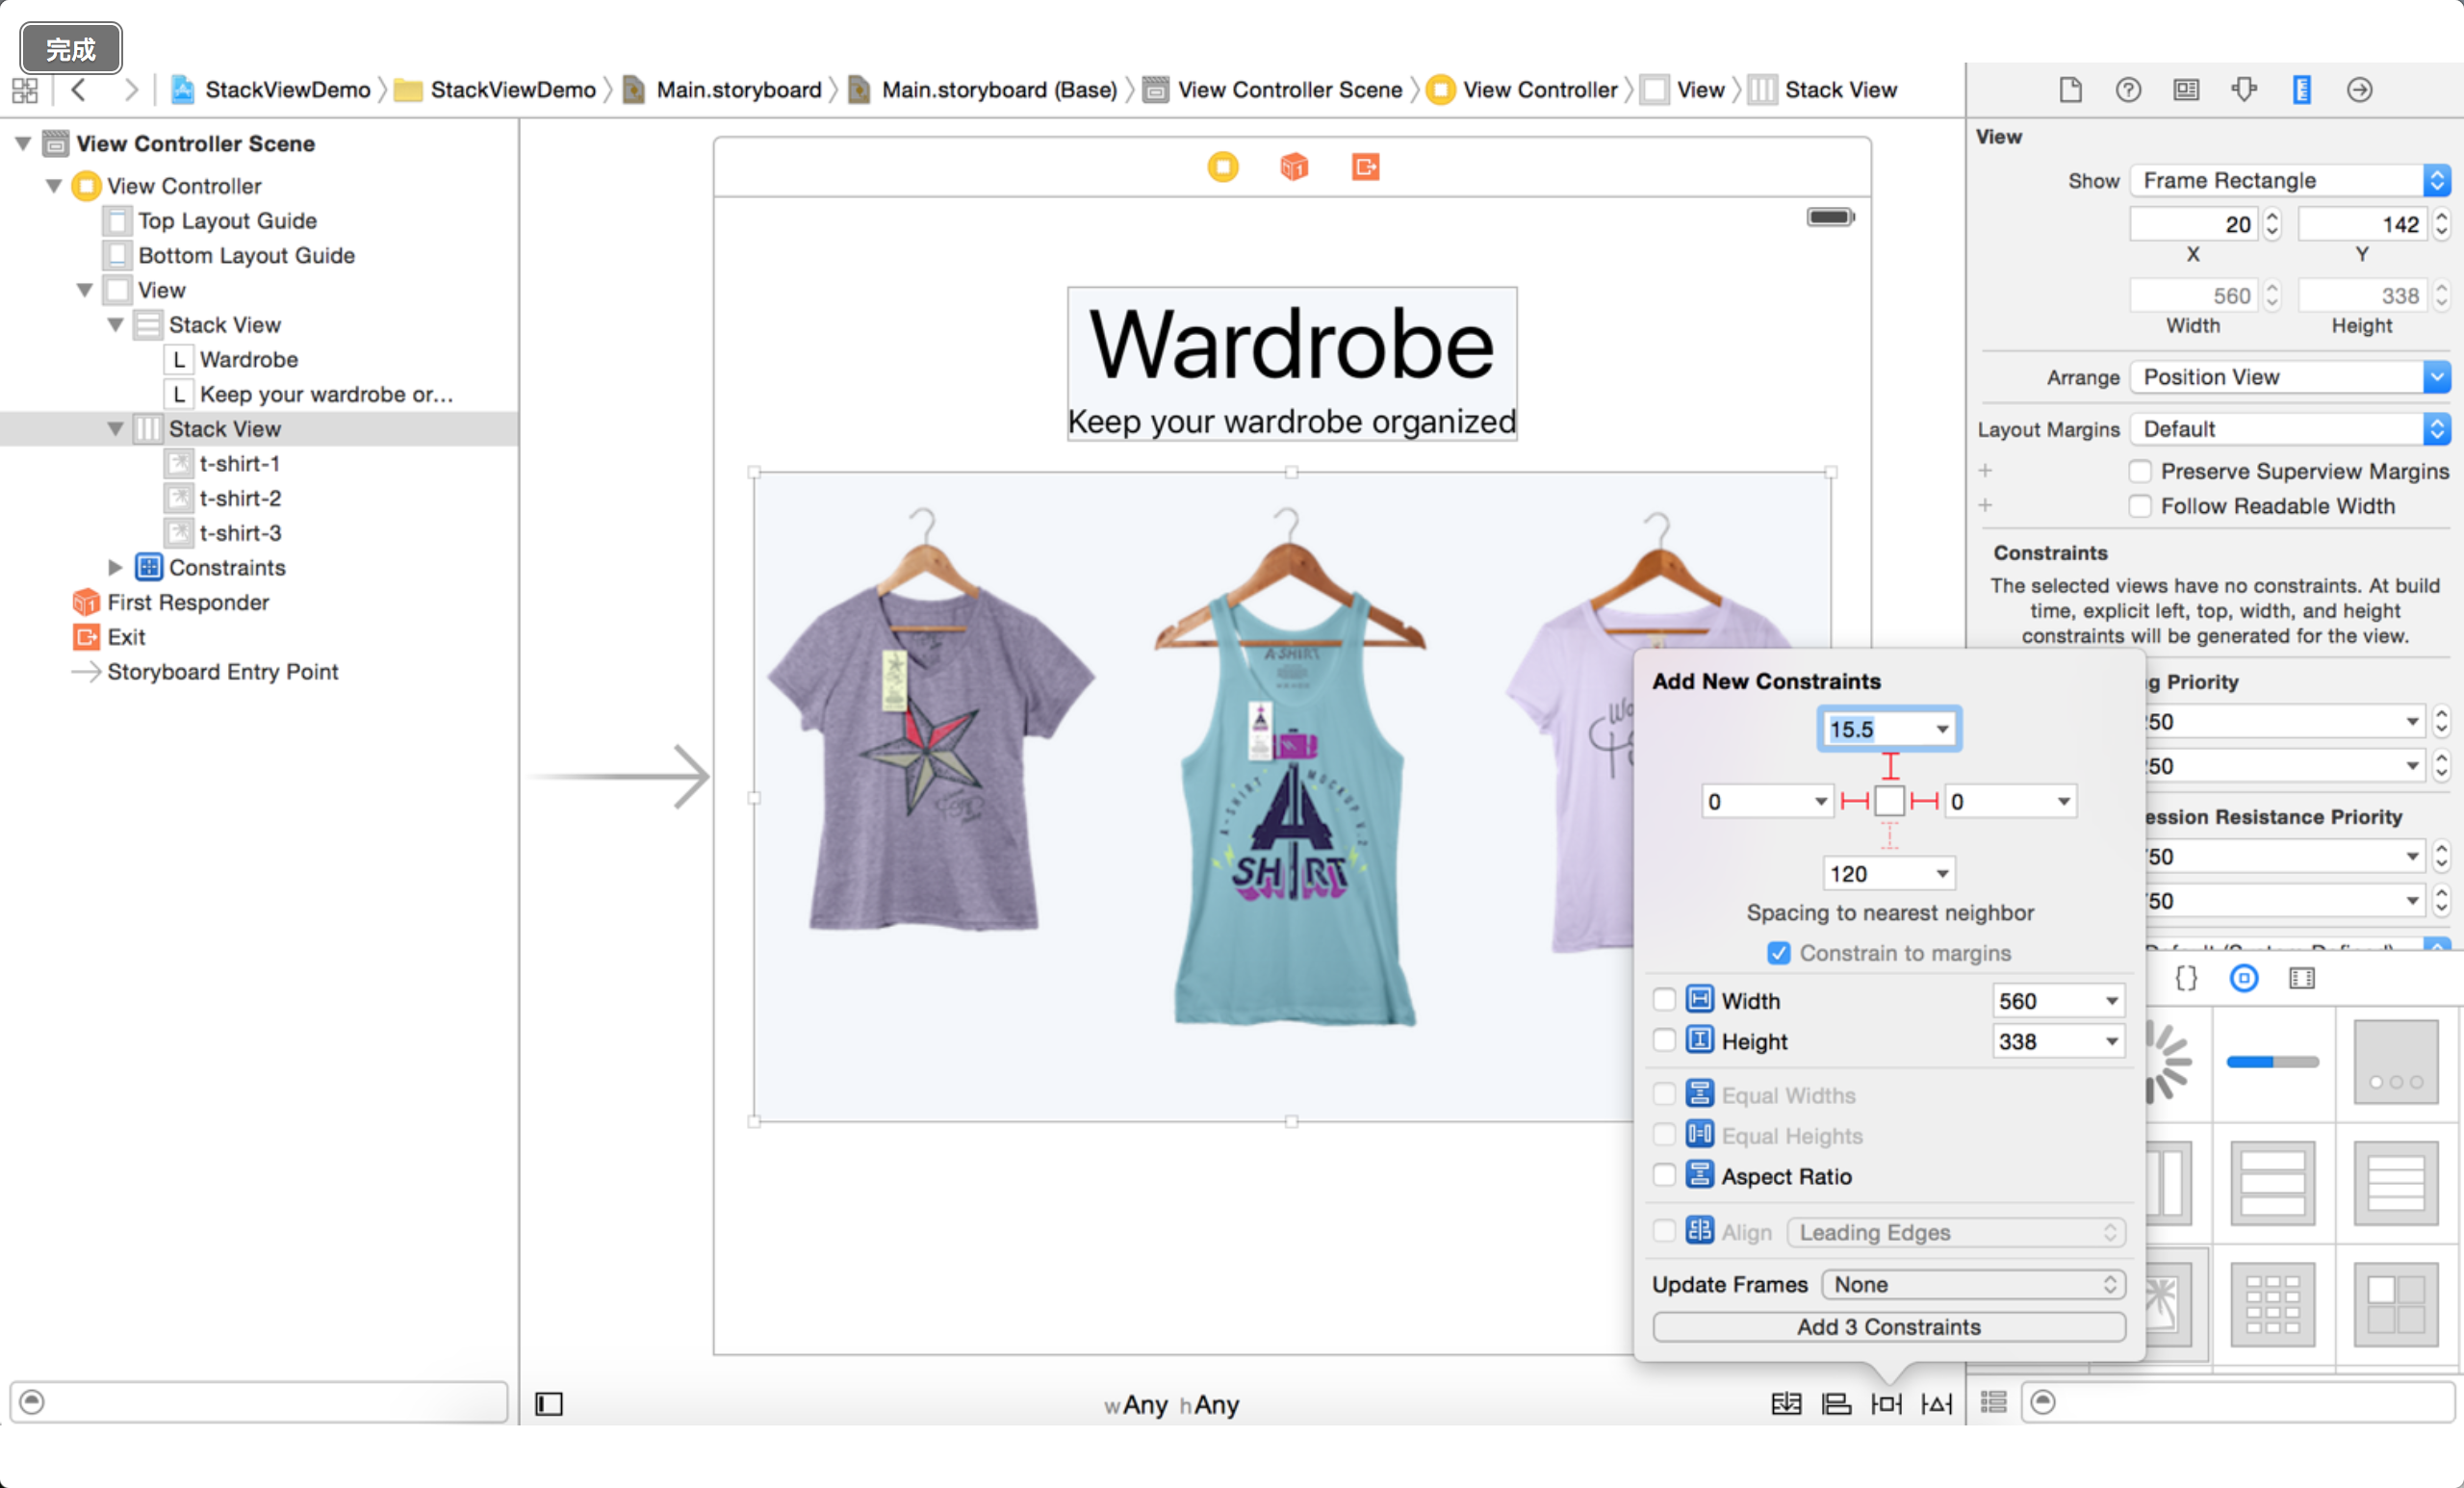
Run app in simulator,Layout better than the previous version to be looked at, but all the pictures are displayed stretched.
Actually,Height of the stack view is repaired,While the width has changed because the real iPhone screen width smaller than the width of the canvas,This is why the image appears to be stretched.
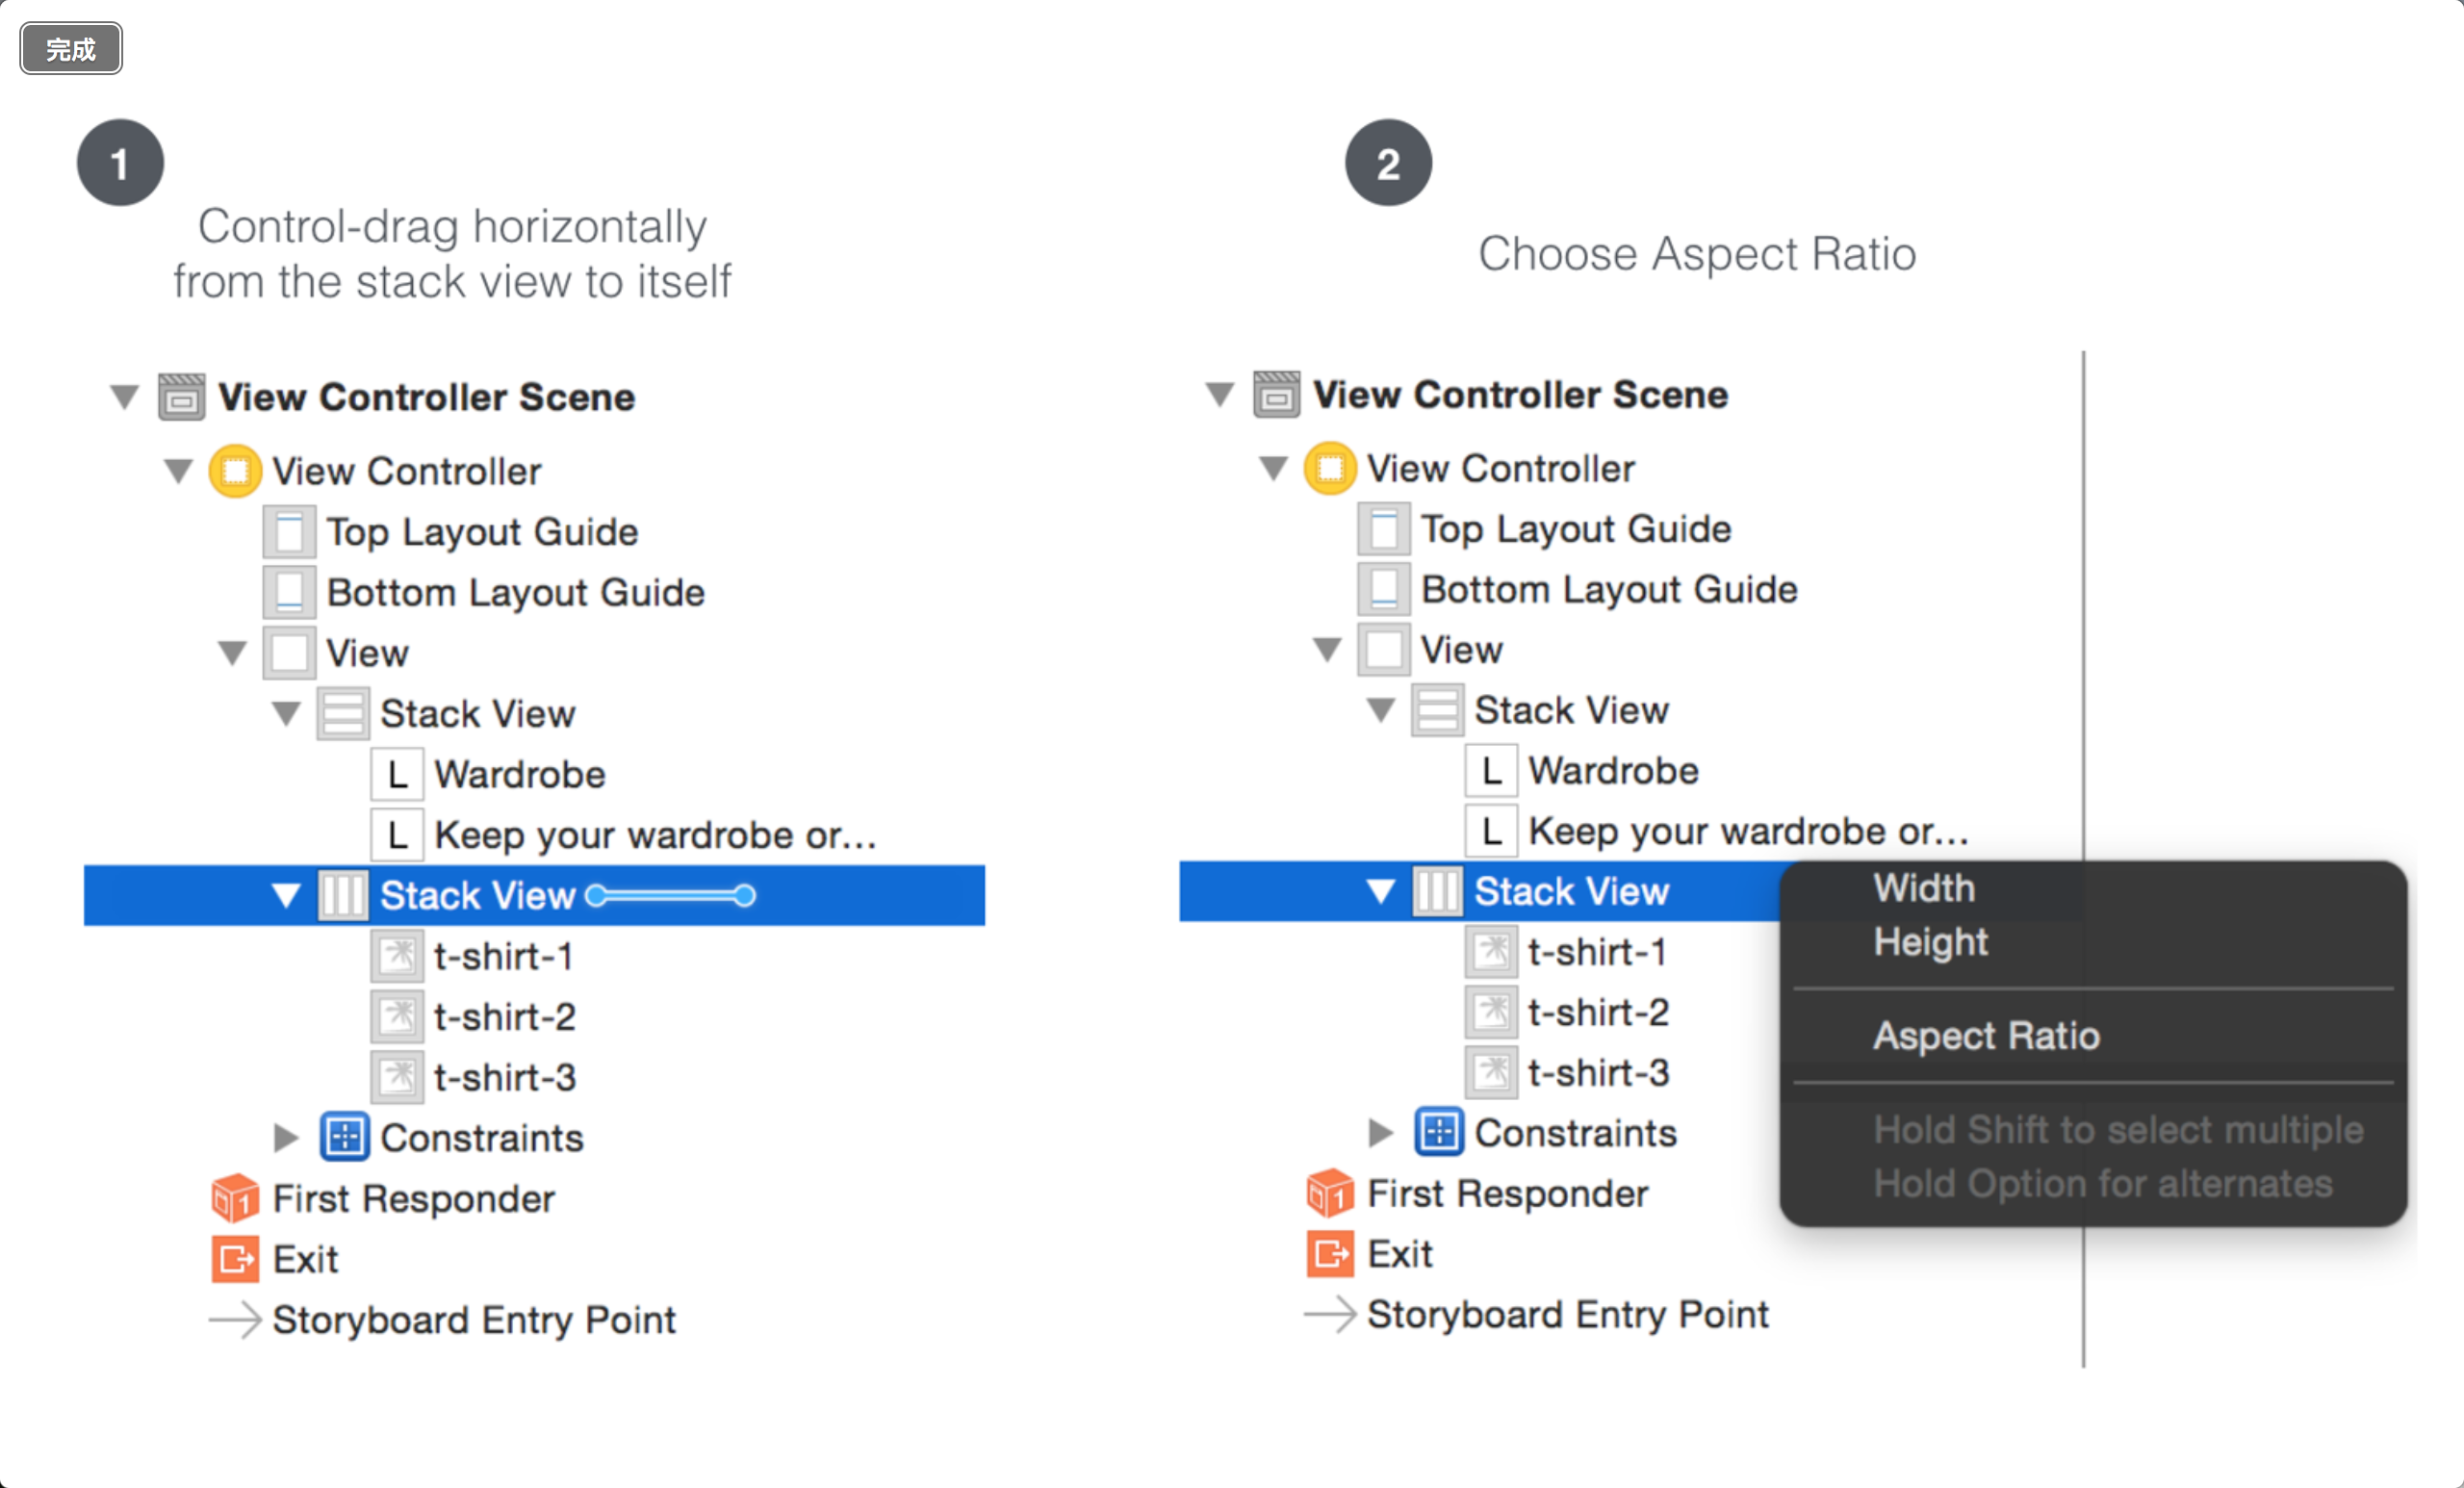
To fix this problem,We should define more constraints and told stack view Maintain aspect ratio,Not the size of the tube screen in outline view in the document,Hold down the control boxes to stack view(包含image views).Shortcut menu,Choose”Aspect Ratio”.
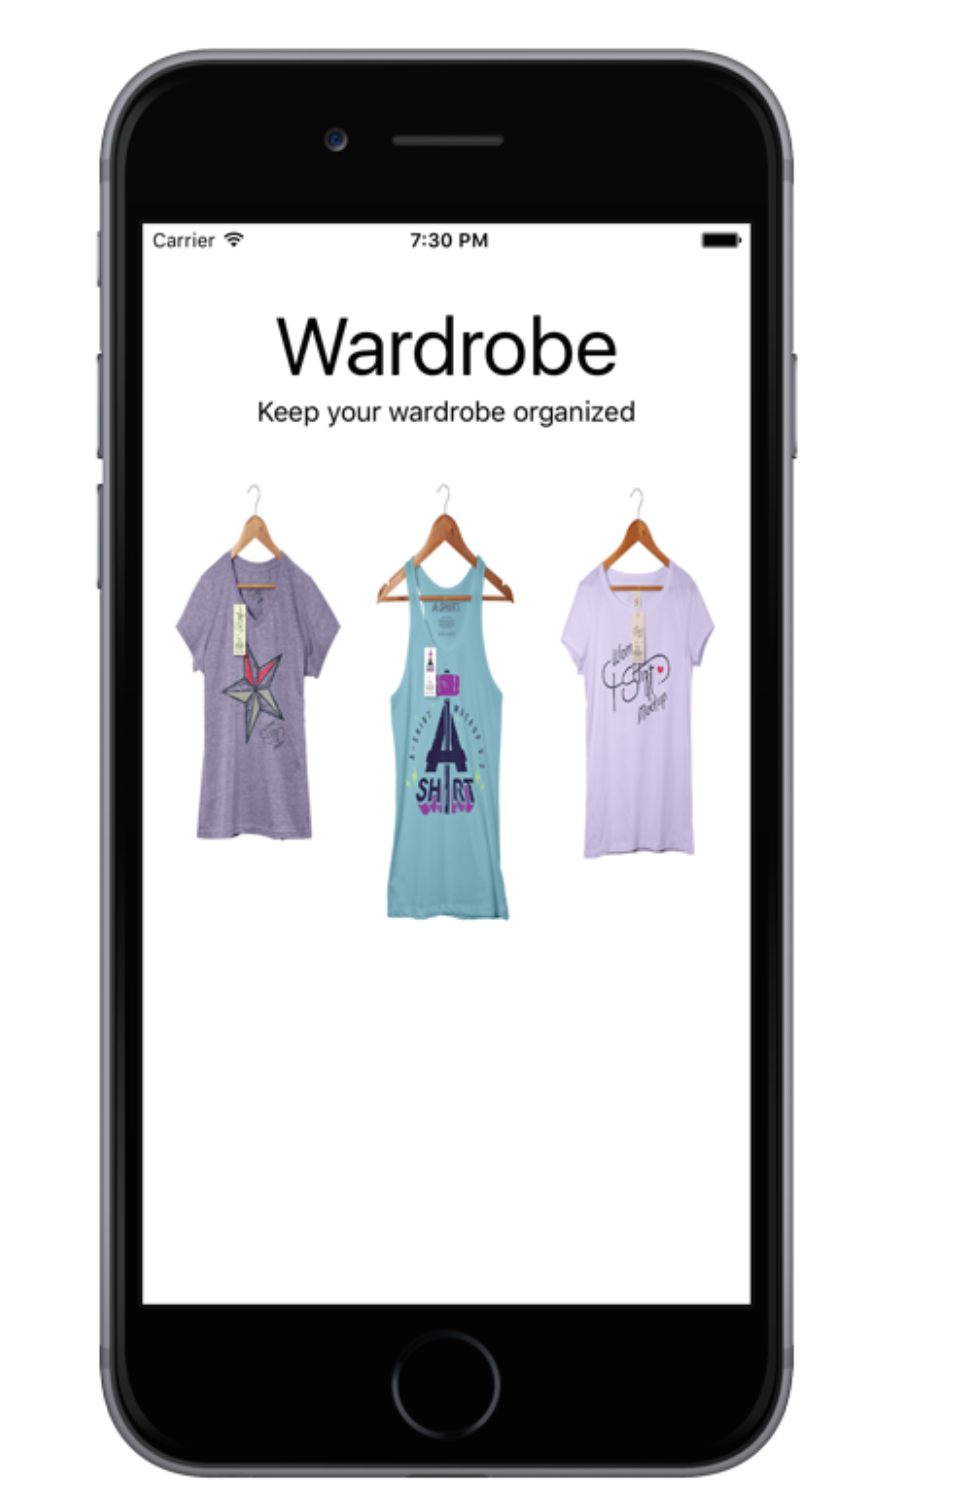
Run the project again. Layout should look pretty good.
With the stack view layout button
Let us continue the layout of the two buttons at the bottom of the screen. In the beginning of this program,I mentioned that there are two ways to use the stack views. Front,You add a stack view from the object library. Now I'll show you another way.
First of all,Drag a button from the object library to view. Double-click the button named it”Sign in”.In the Attributes inspector in,It's background color to red,Text color to white. In the Size inspector in,Set width(width)200.
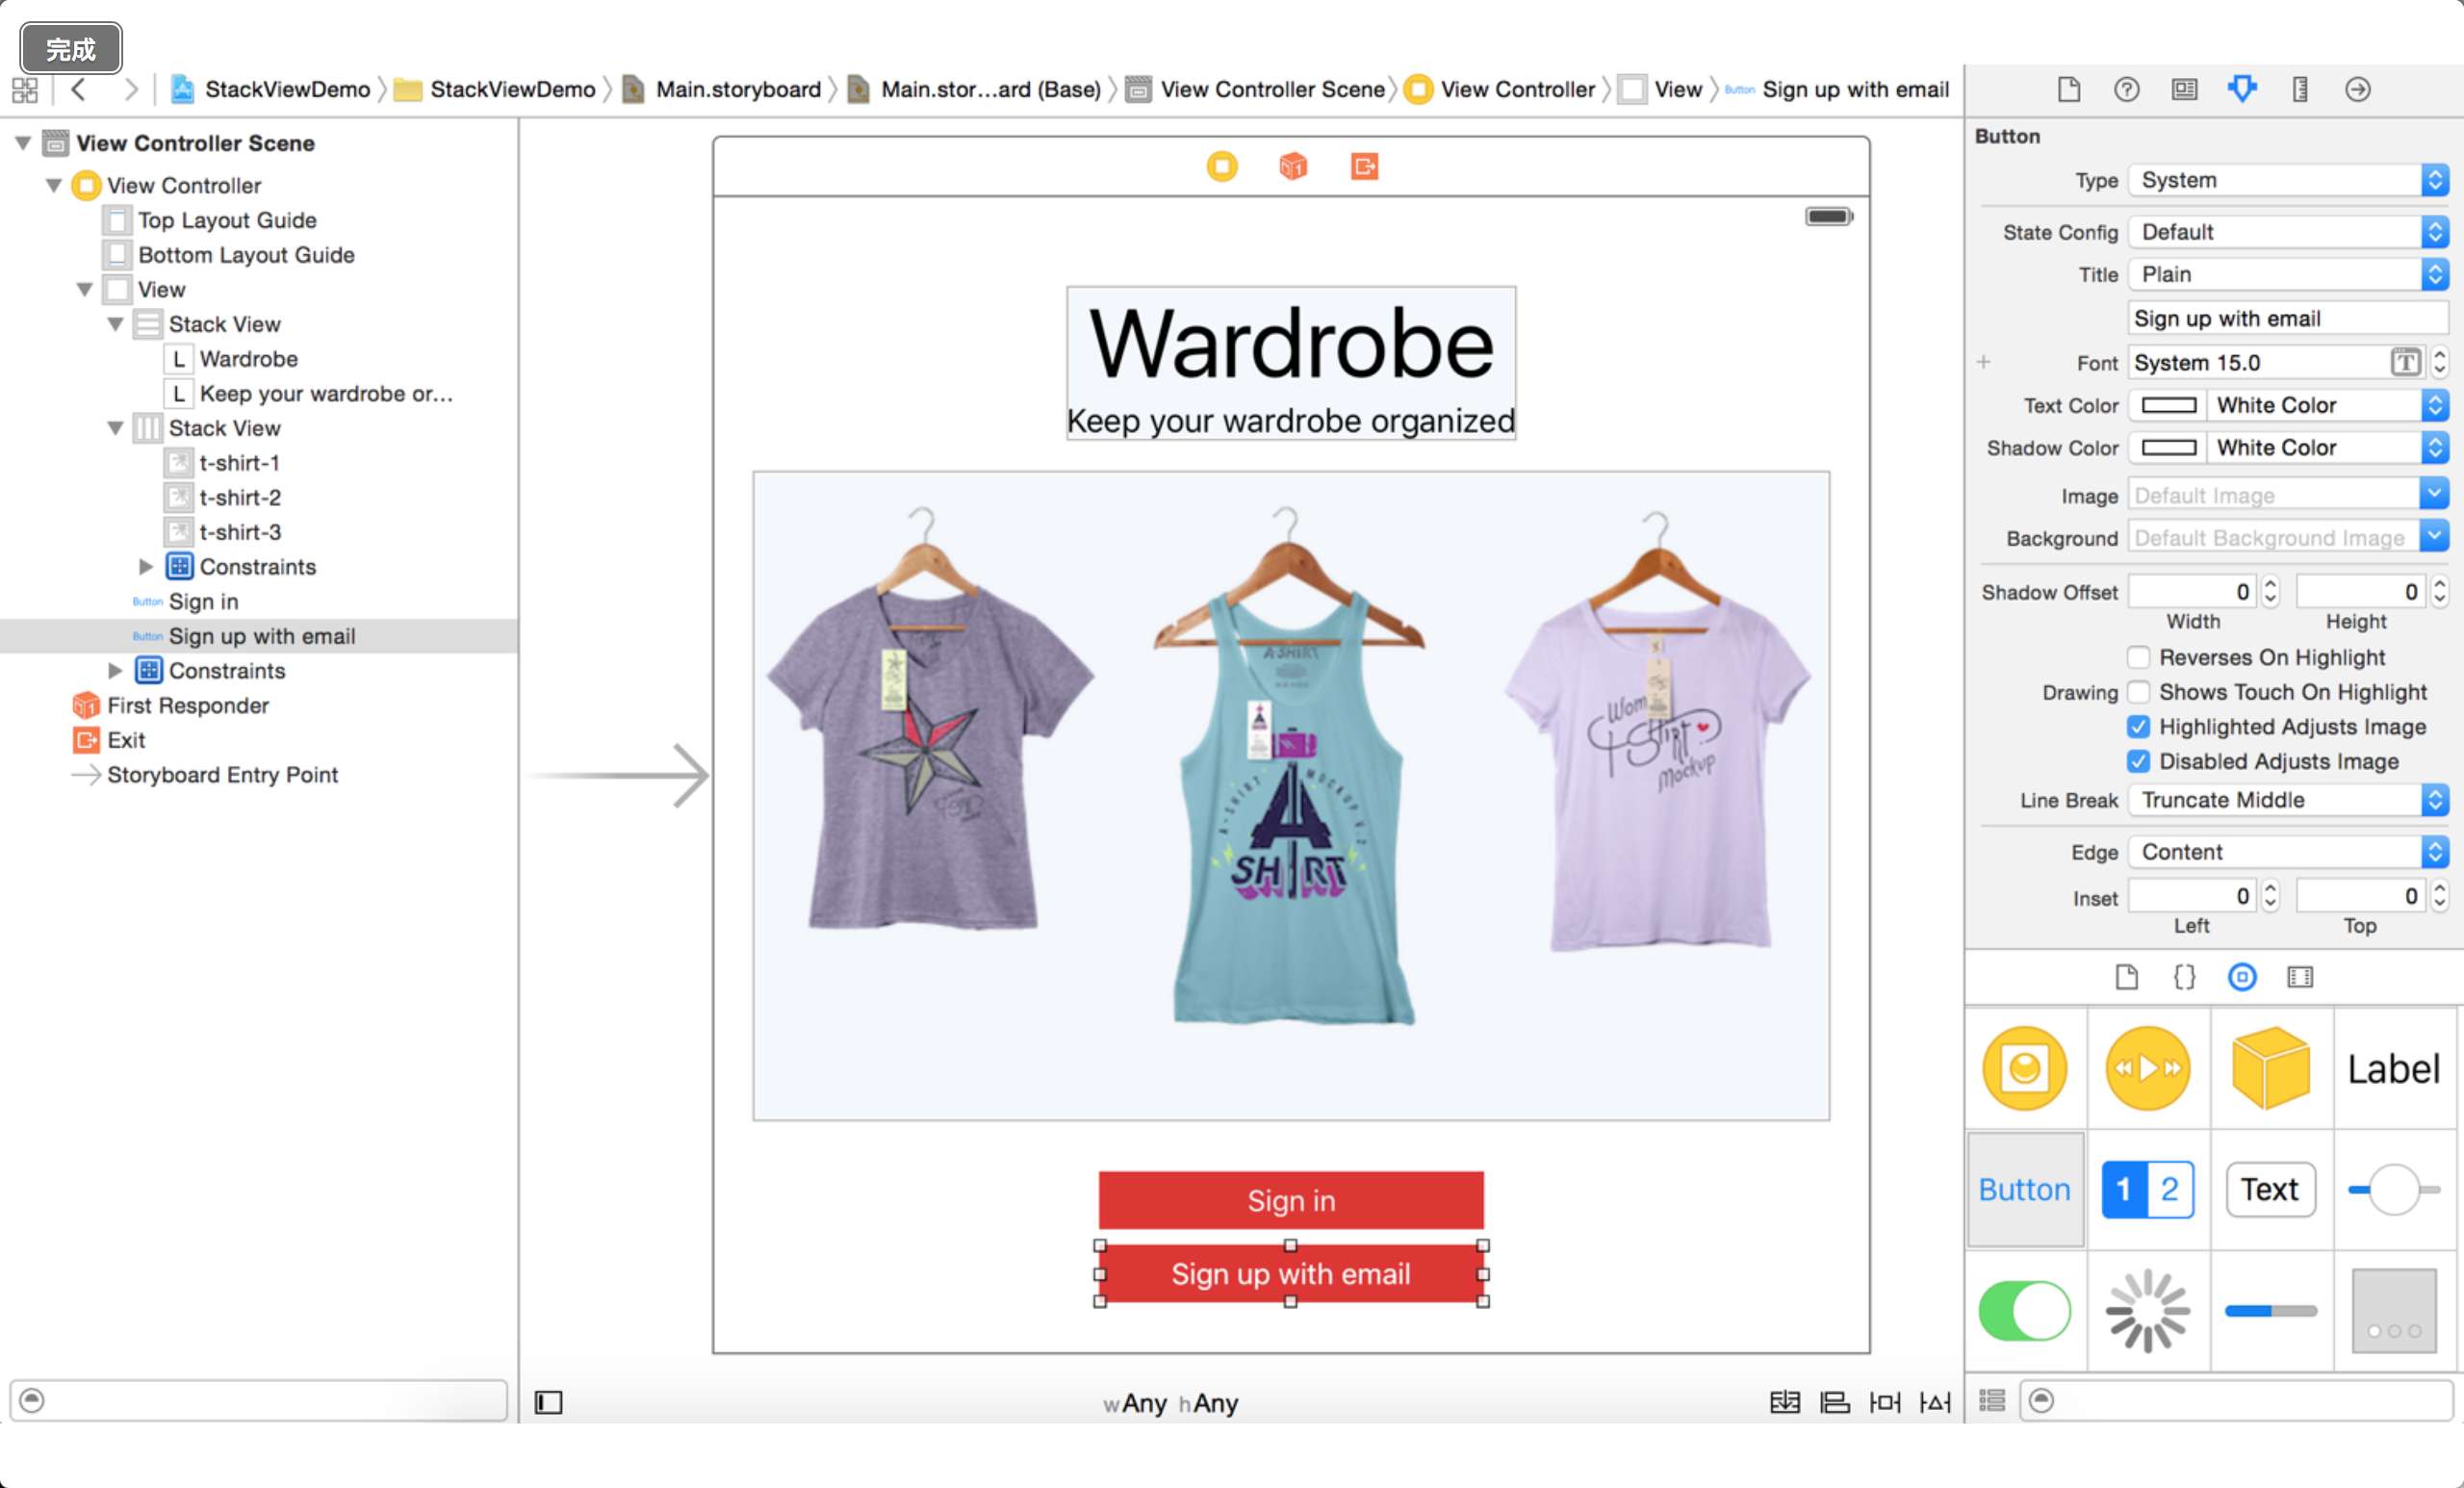
Next,Another button onto the view and named it”Sign up with email”.In the Attributes inspector in,It's background color to red,Text color to white. In the Size inspector in,Set width(width)200. set up after the,It will show solid red.
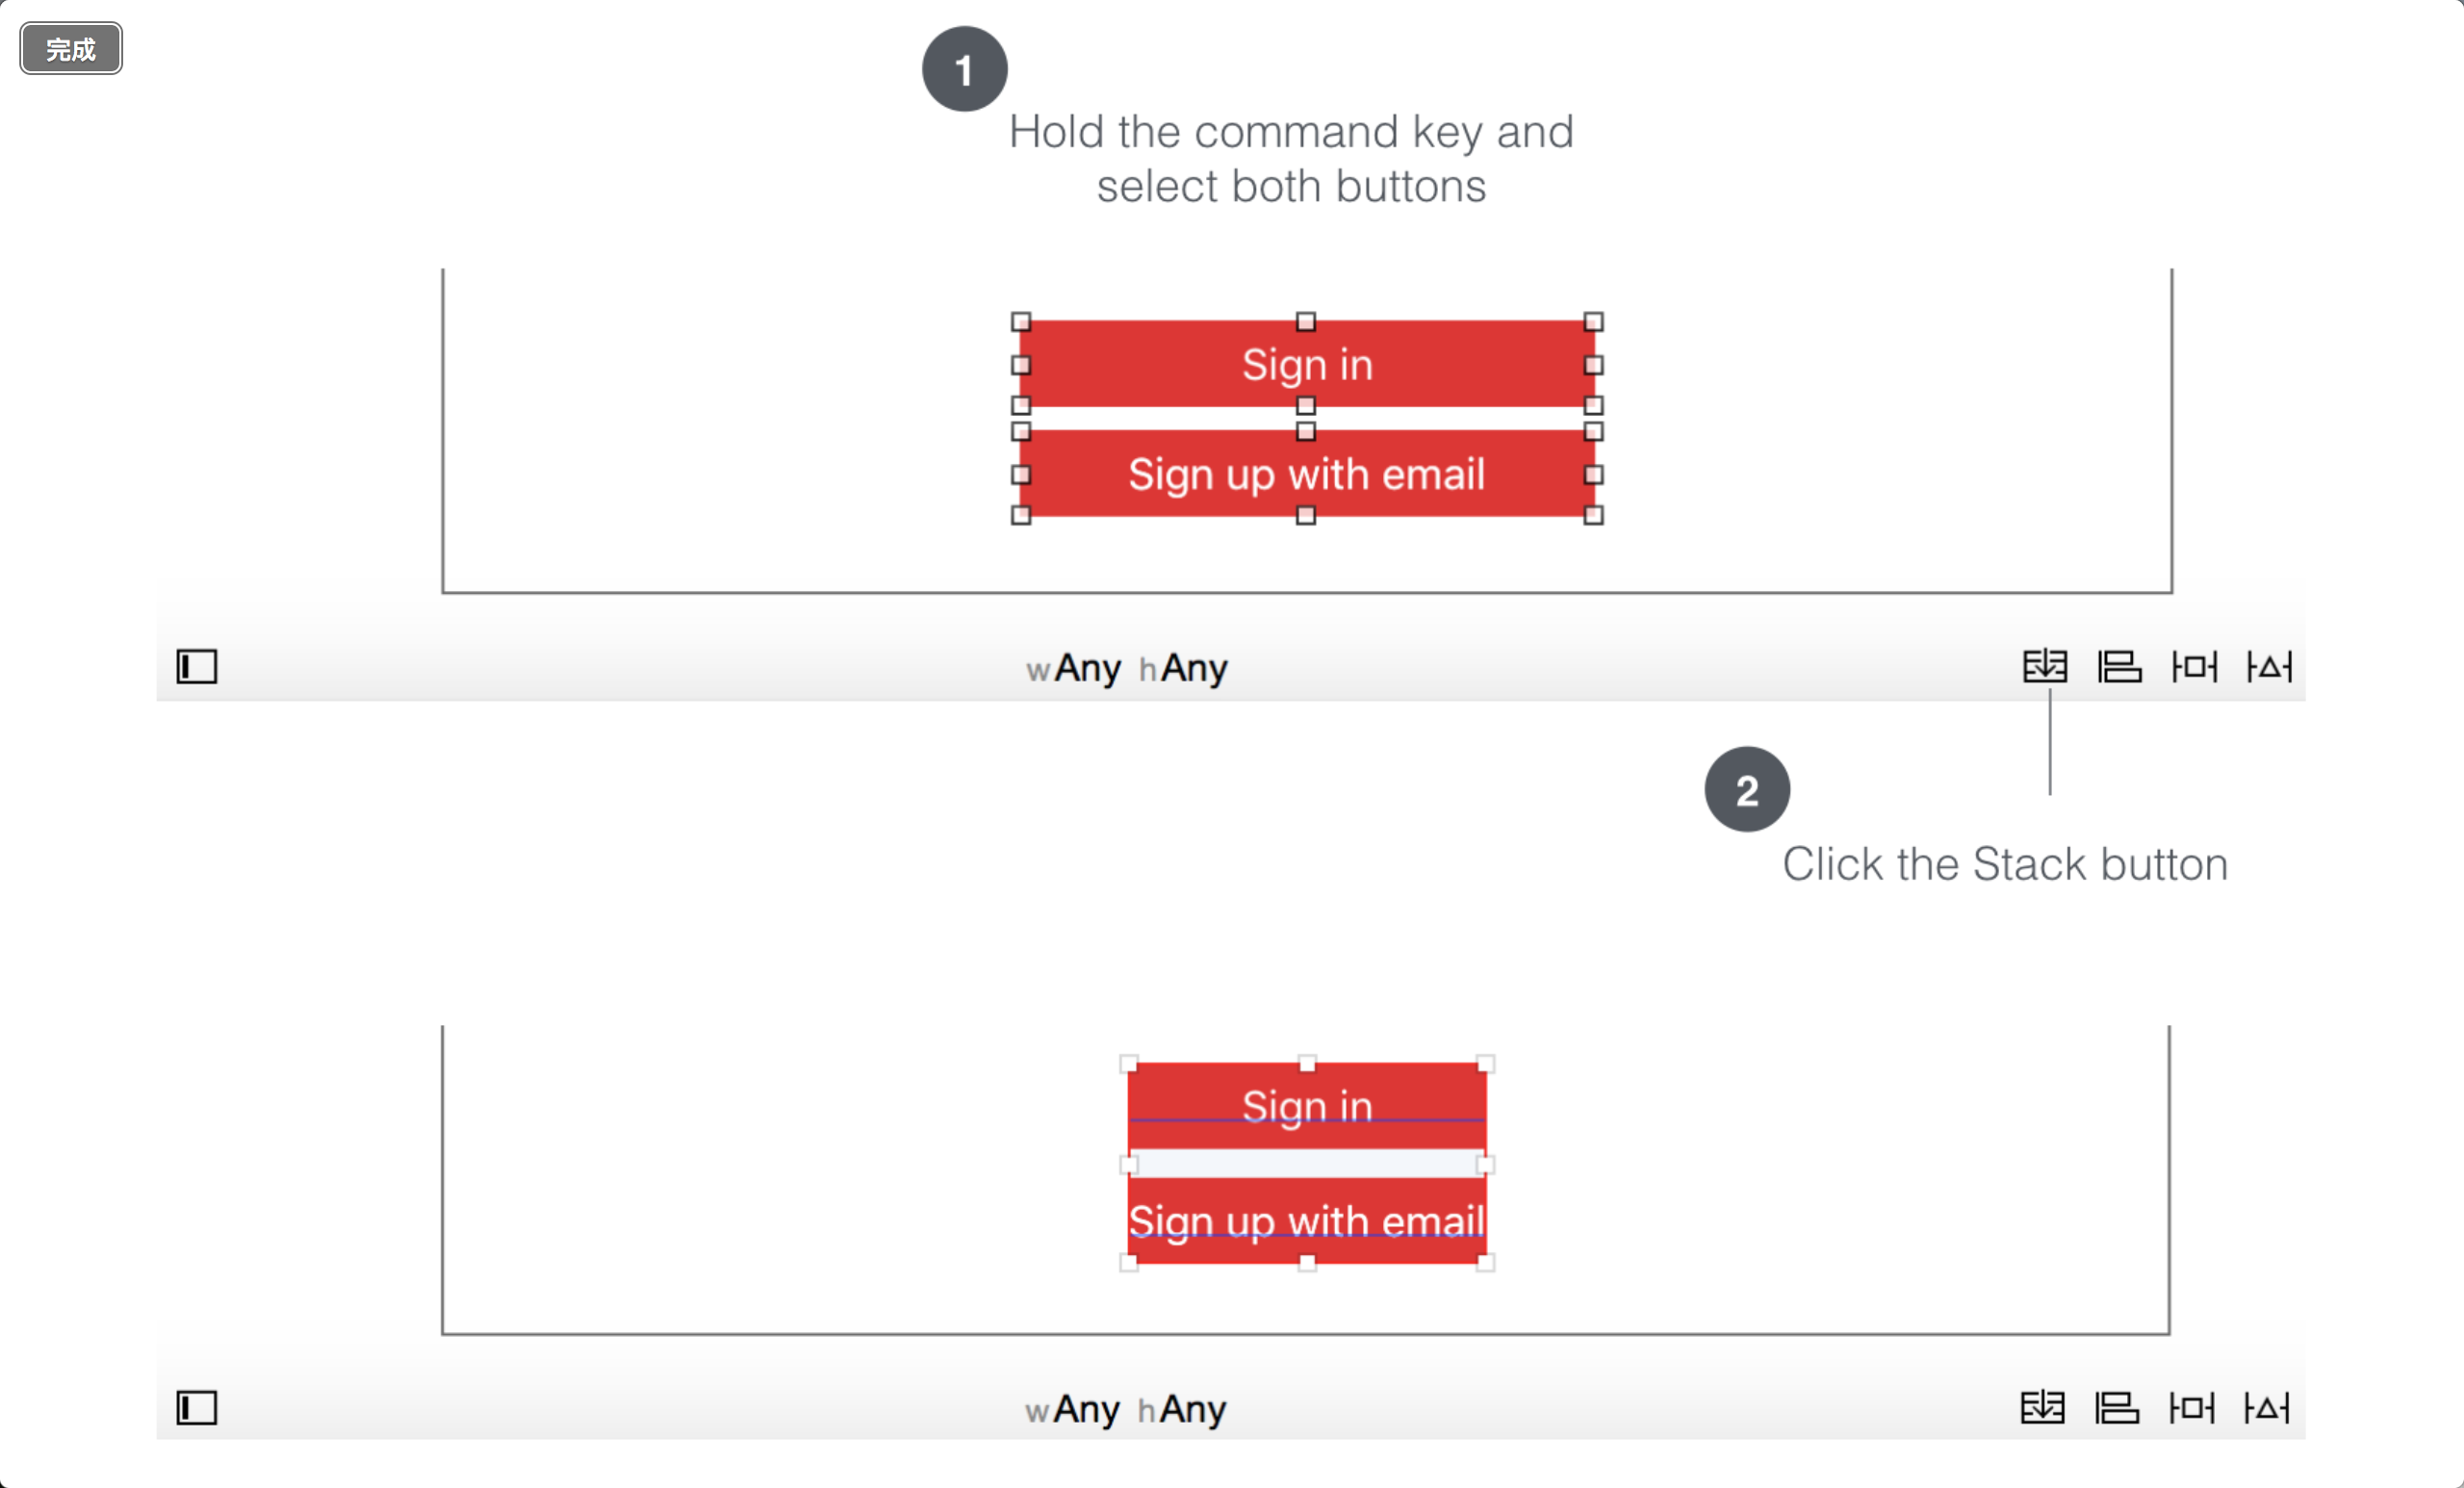
say it again,You do not need to set the layout constraints of these tags let you stack view becomes magic. Hold down the command key to select the two buttons,Then click the Stack button layout bar. Interface Editor automatically embed them into a vertical stack view in the Select button to increase the stack view to a two intervals. Under the Attributes inspector,Set Interval is 10. Try to make the vertical and horizontal center stack view.
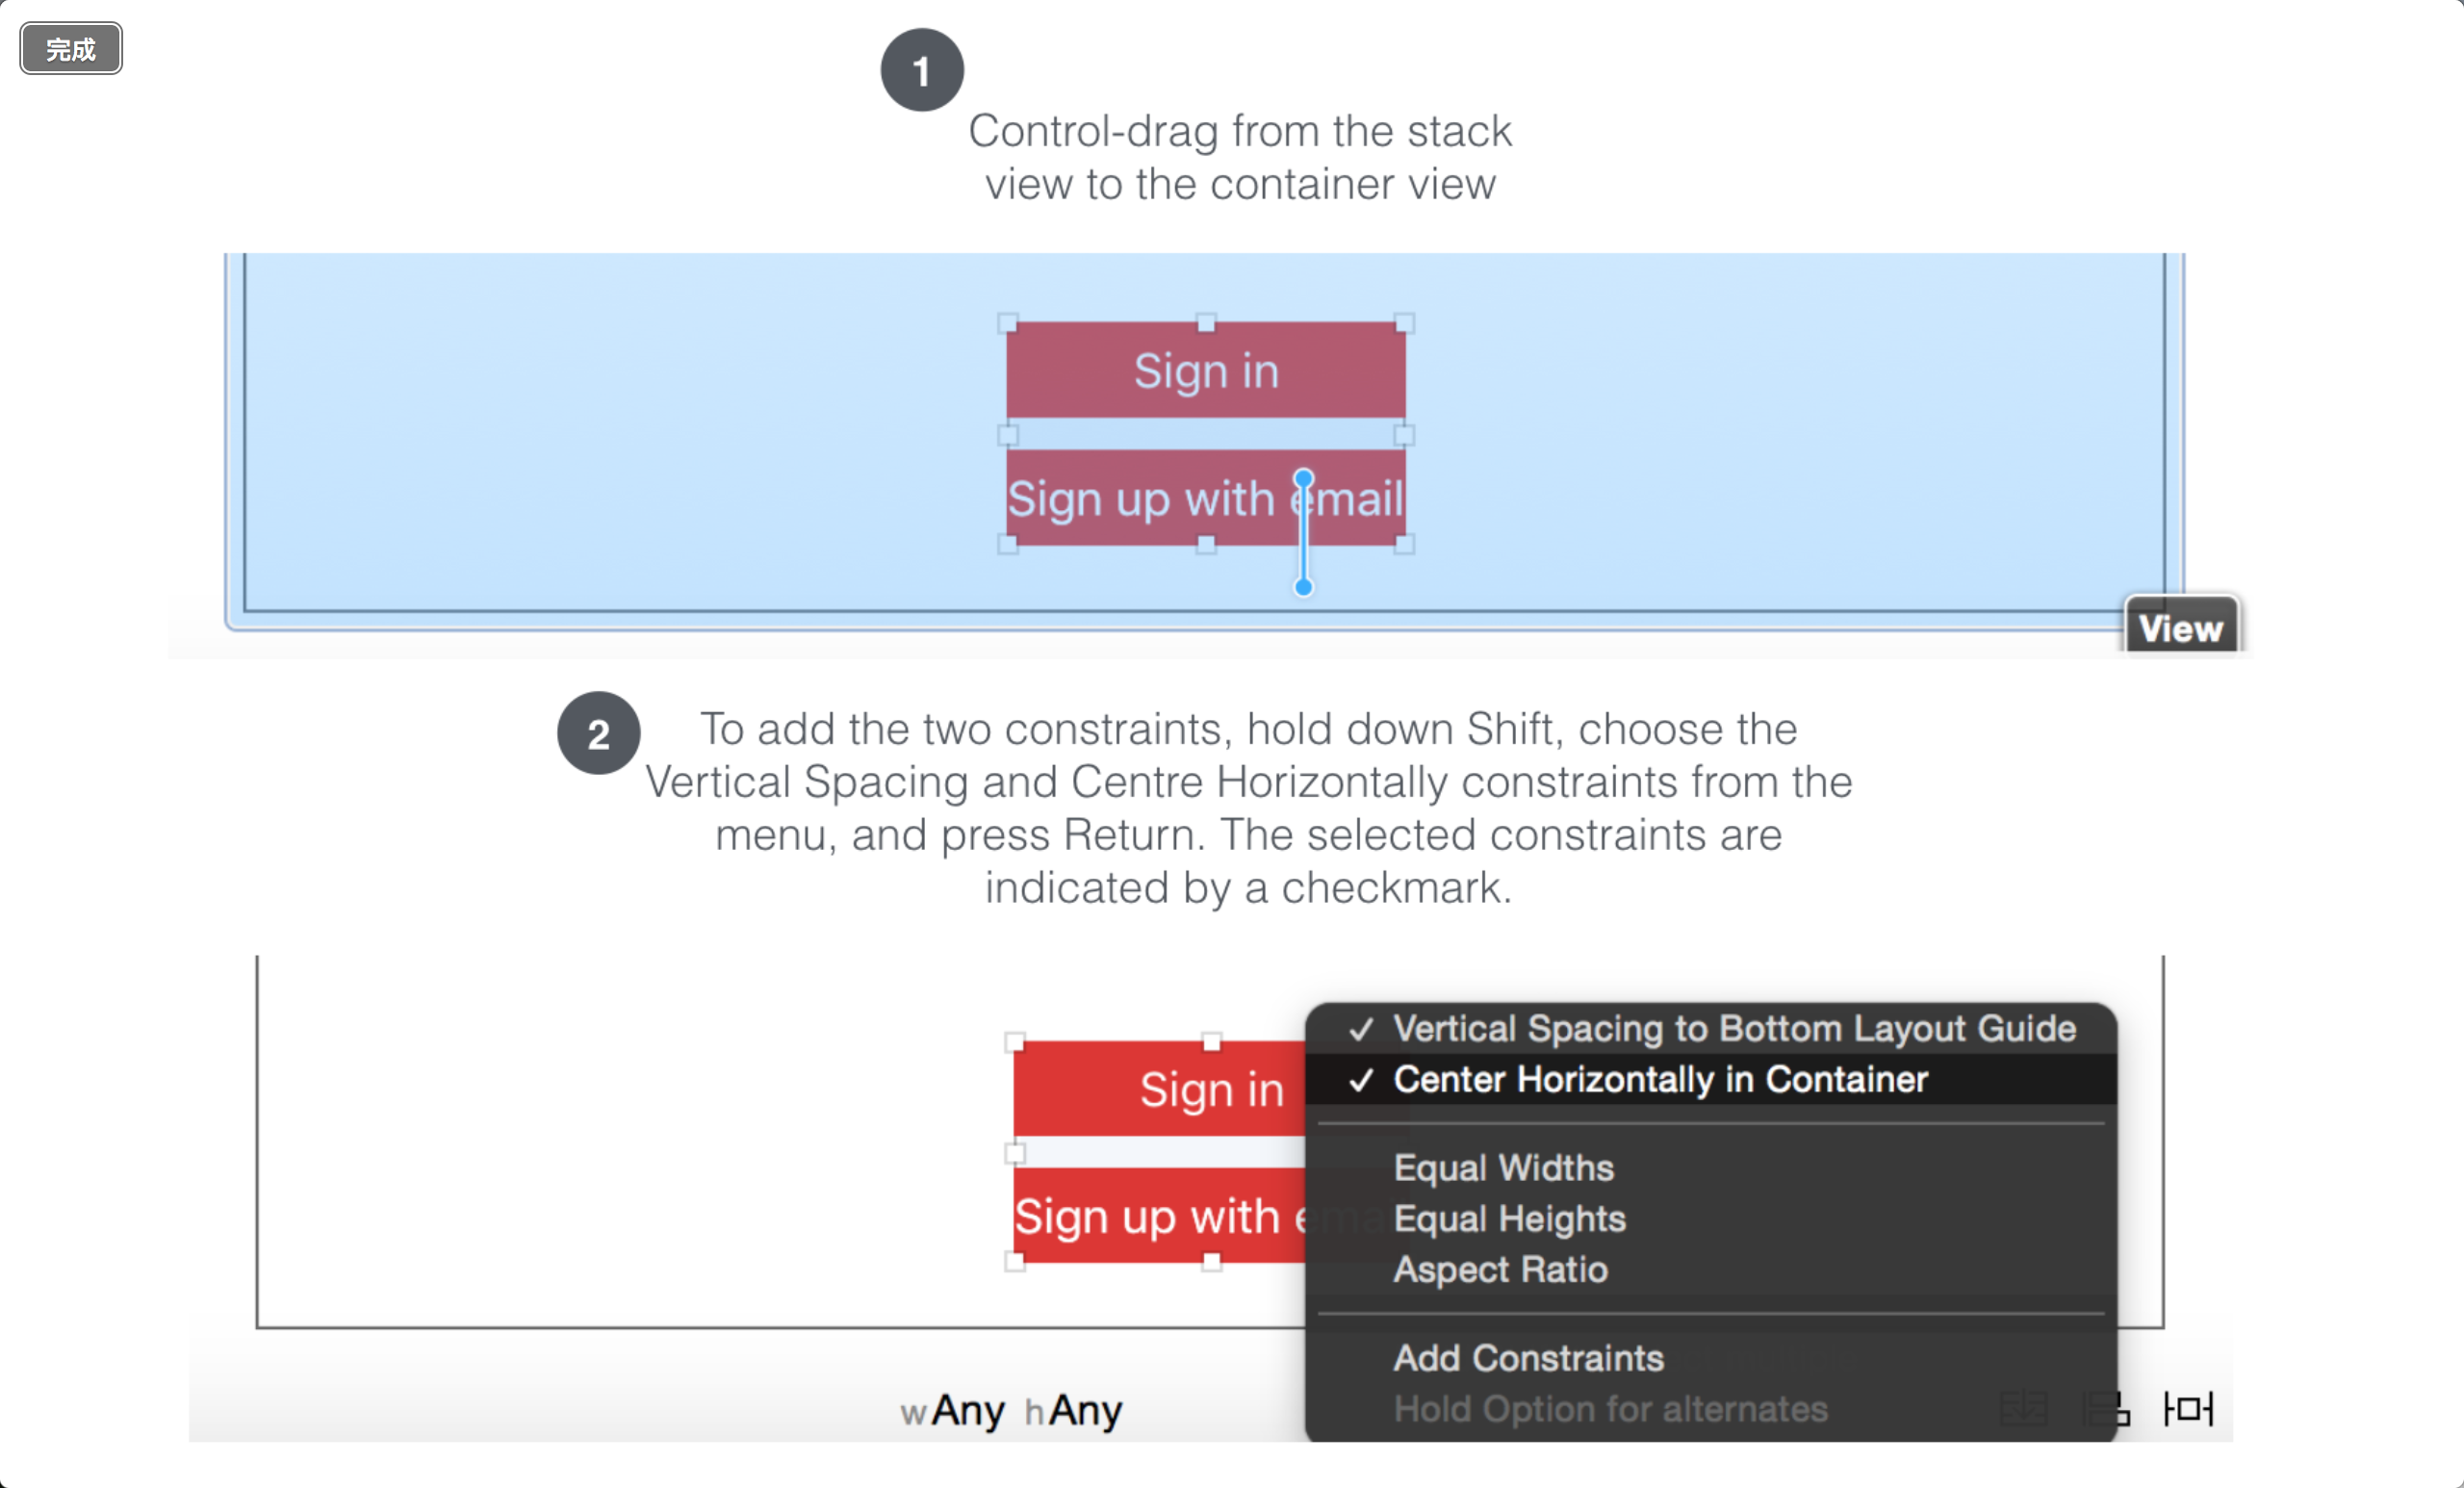
Similarly,To the bottom of this stack view we define the layout constraints to position it closer view. These are our preparation to define layout constraints:
- Let stack view is centered horizontally,
- There is a spaced interval constraint to make stack view and between Bottom Layout Guide.
You can follow the illustrations below to add constraints.
One thing you may have noticed,Button smaller than we hoped for. When you embed button to stack view,They are resized. If you like set the width to 200, you need to add a constraint to the width of the stack view. In the view of the document in,Hold down the control and drag it to its own stack view and then choose to increase the width constraints.
To change the width to 200 points,In the outline view, select a document width constraint. Then the Size inspector,The constant change 200.stack view width now restored to 200 points.
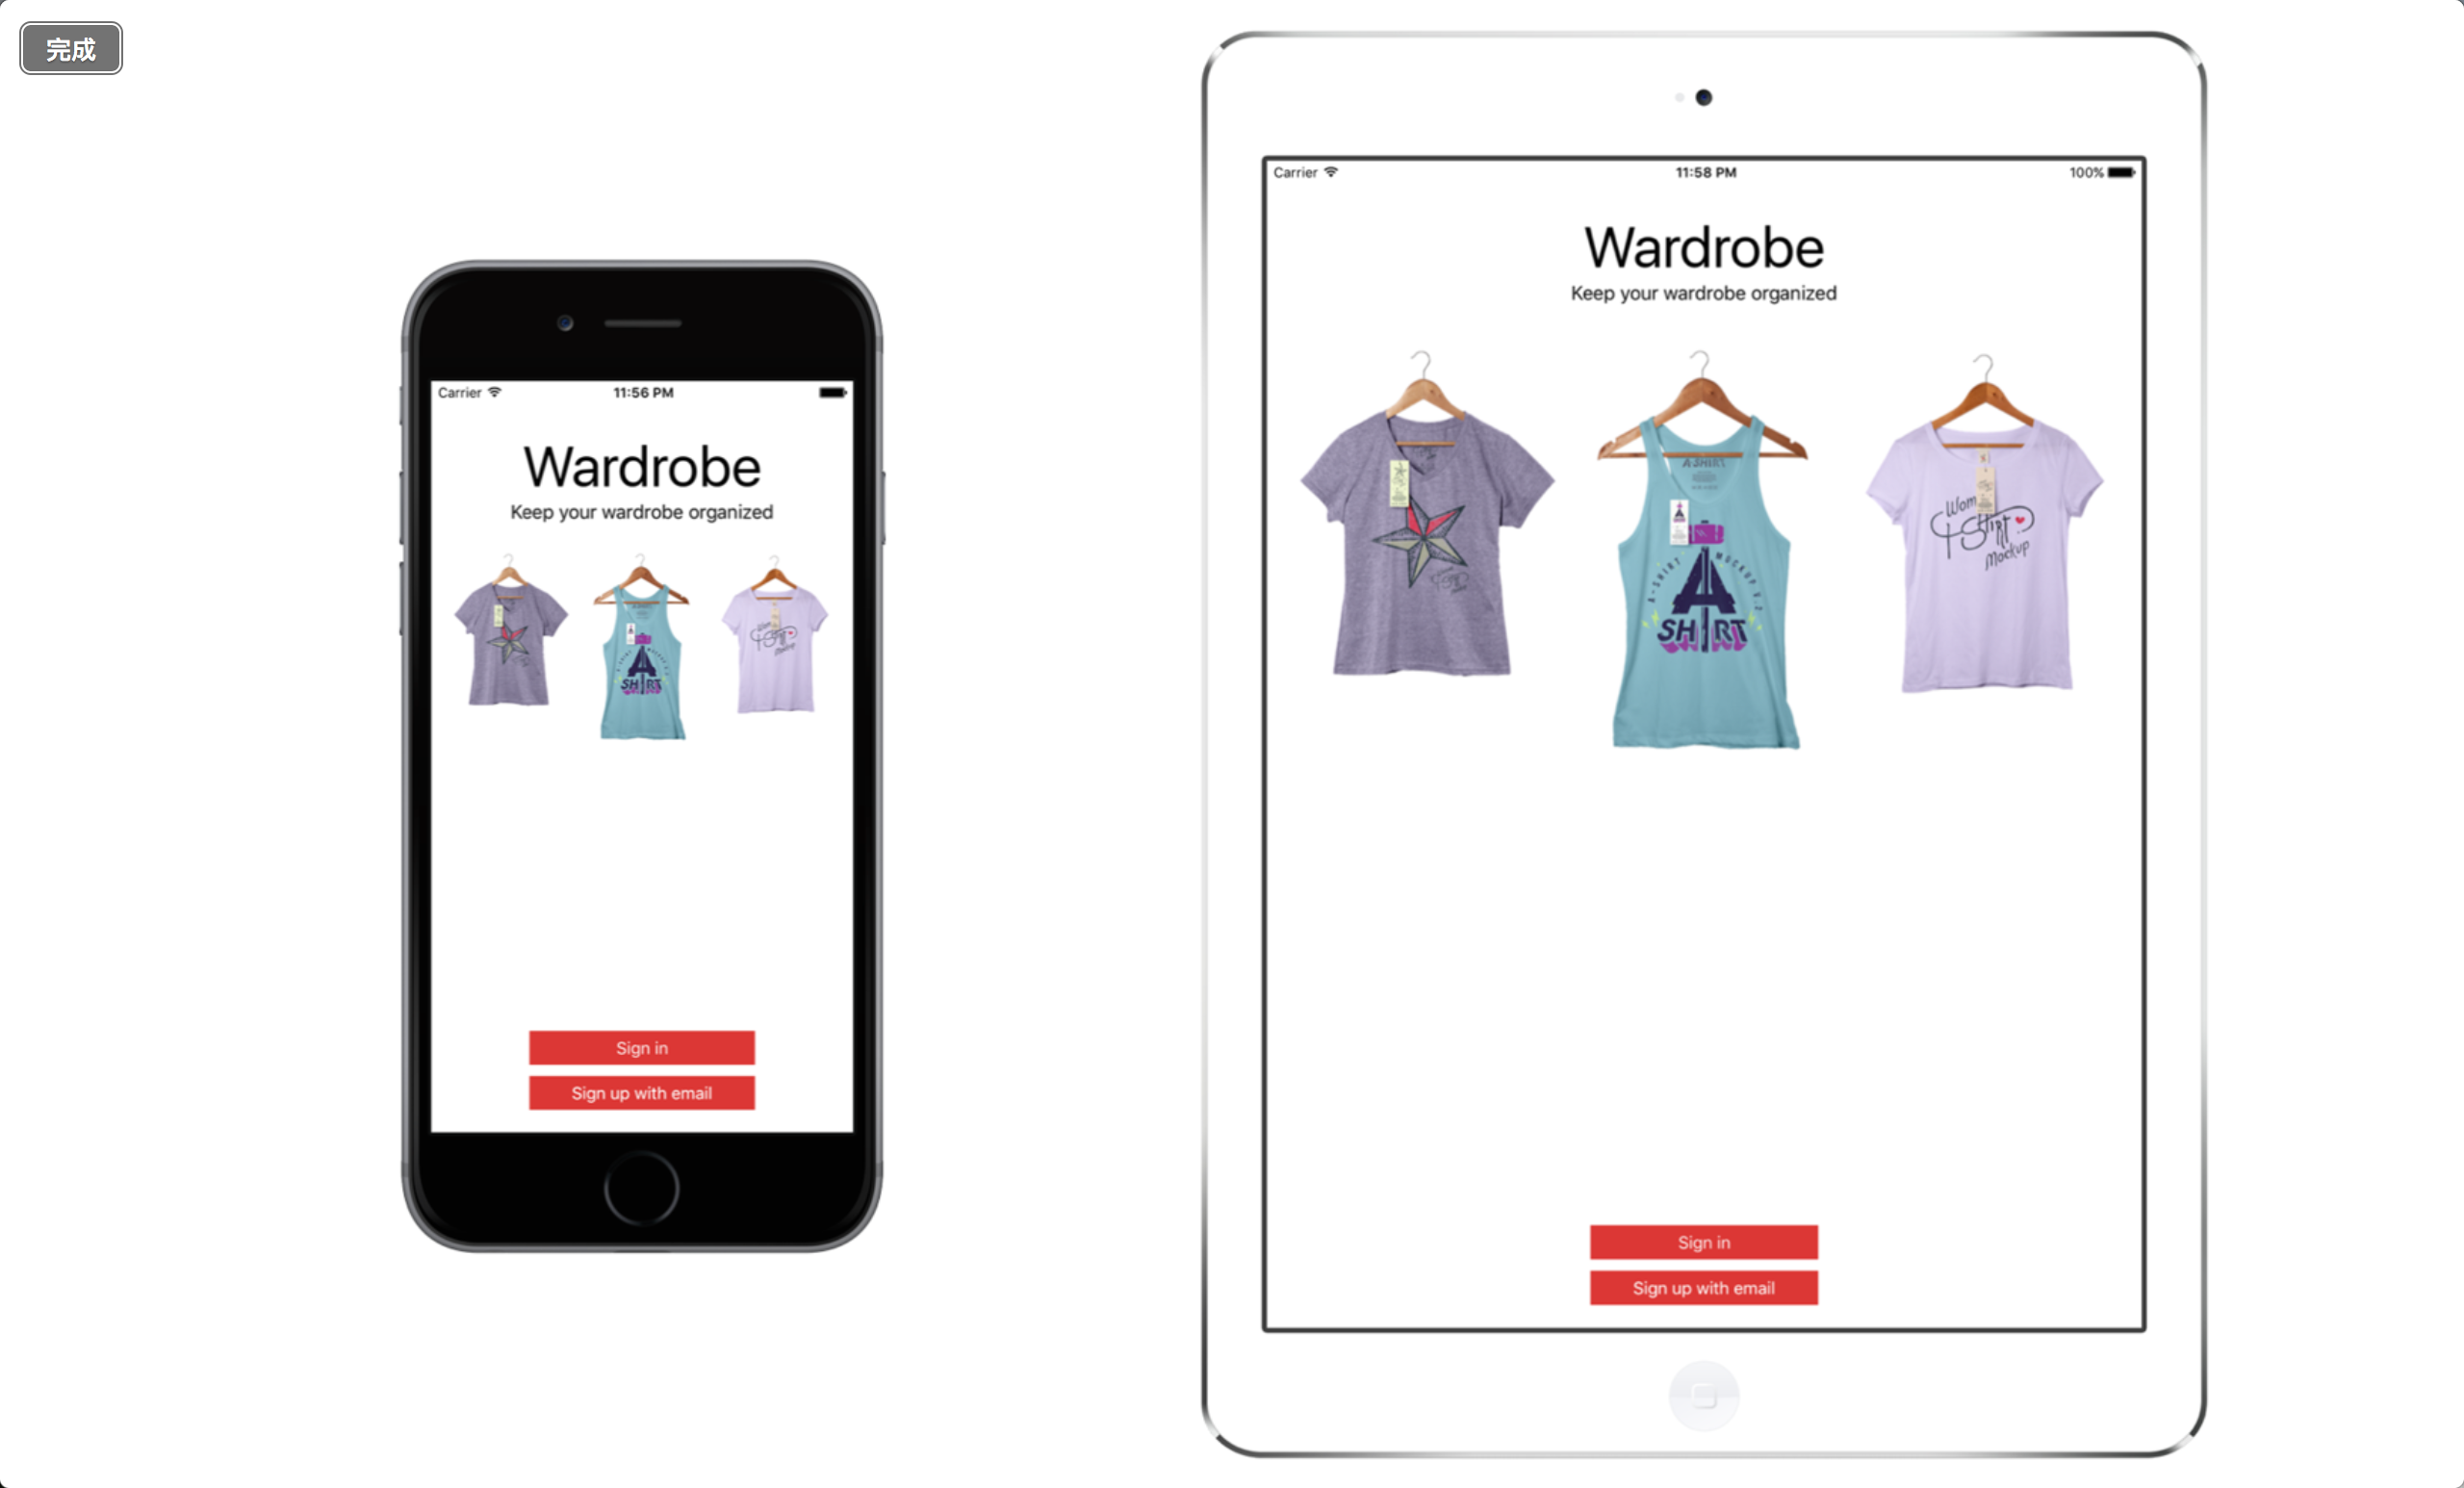
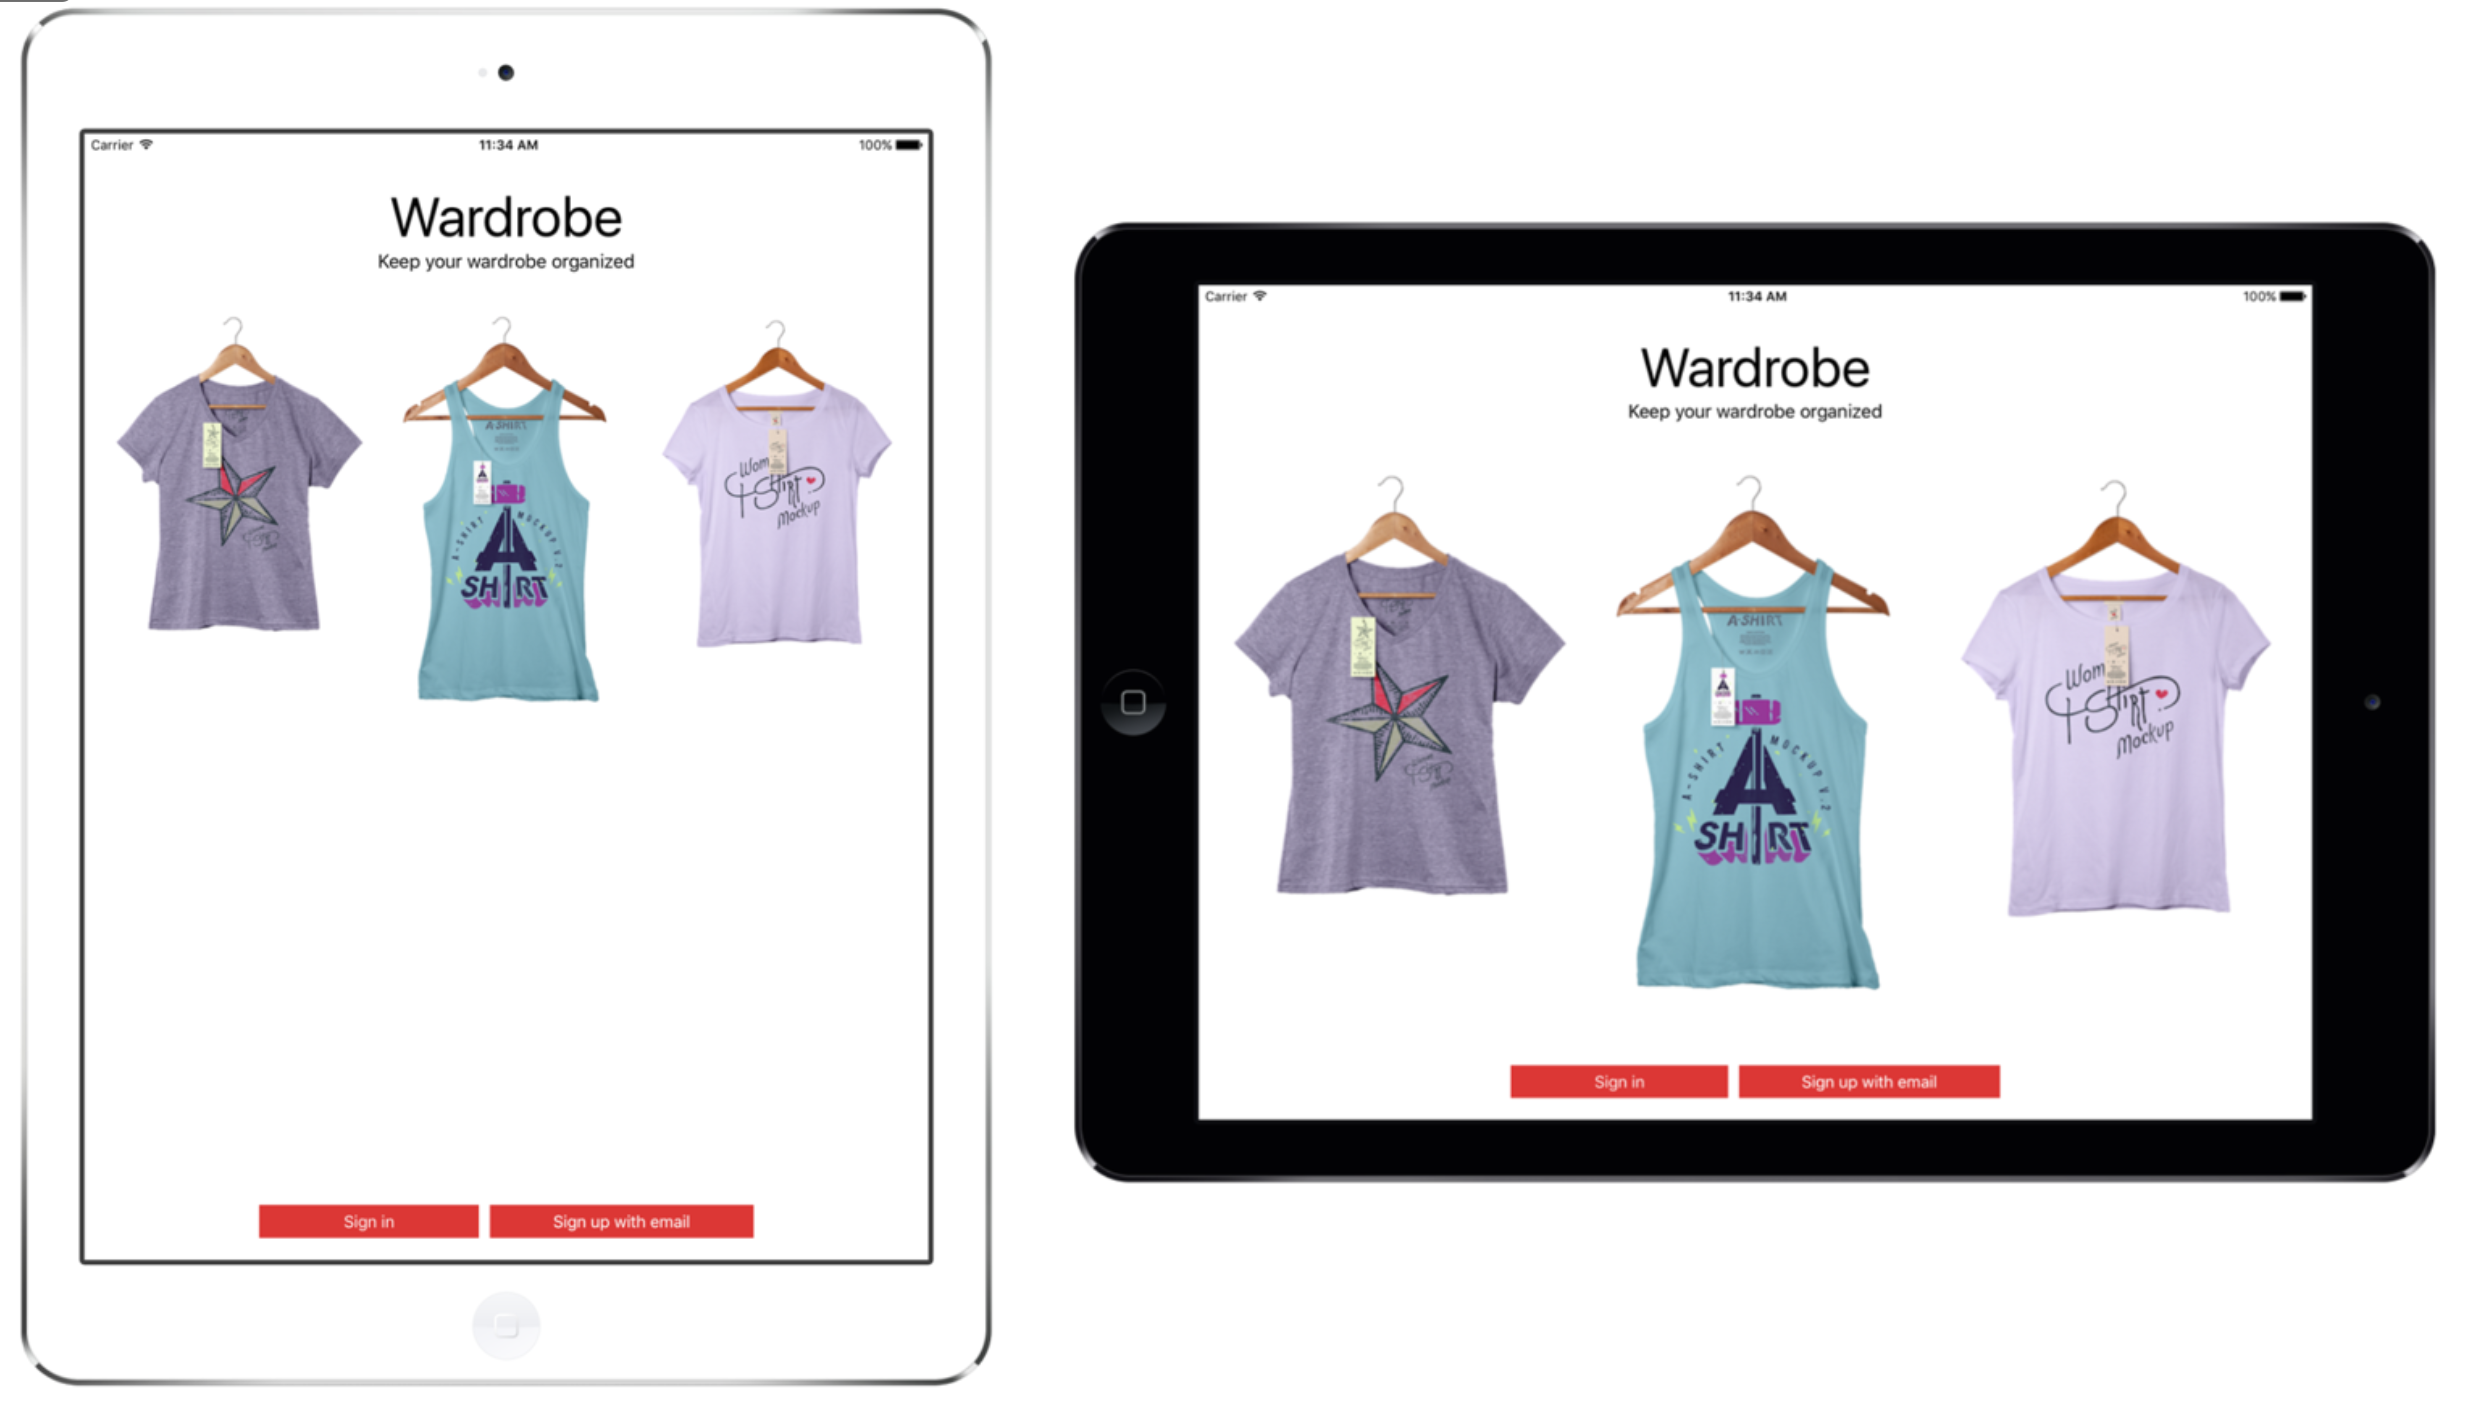
Then test the app. The iPhone(Or ipad)Running the project. Your UI should look like this
Adjust the stack views by Size Classes
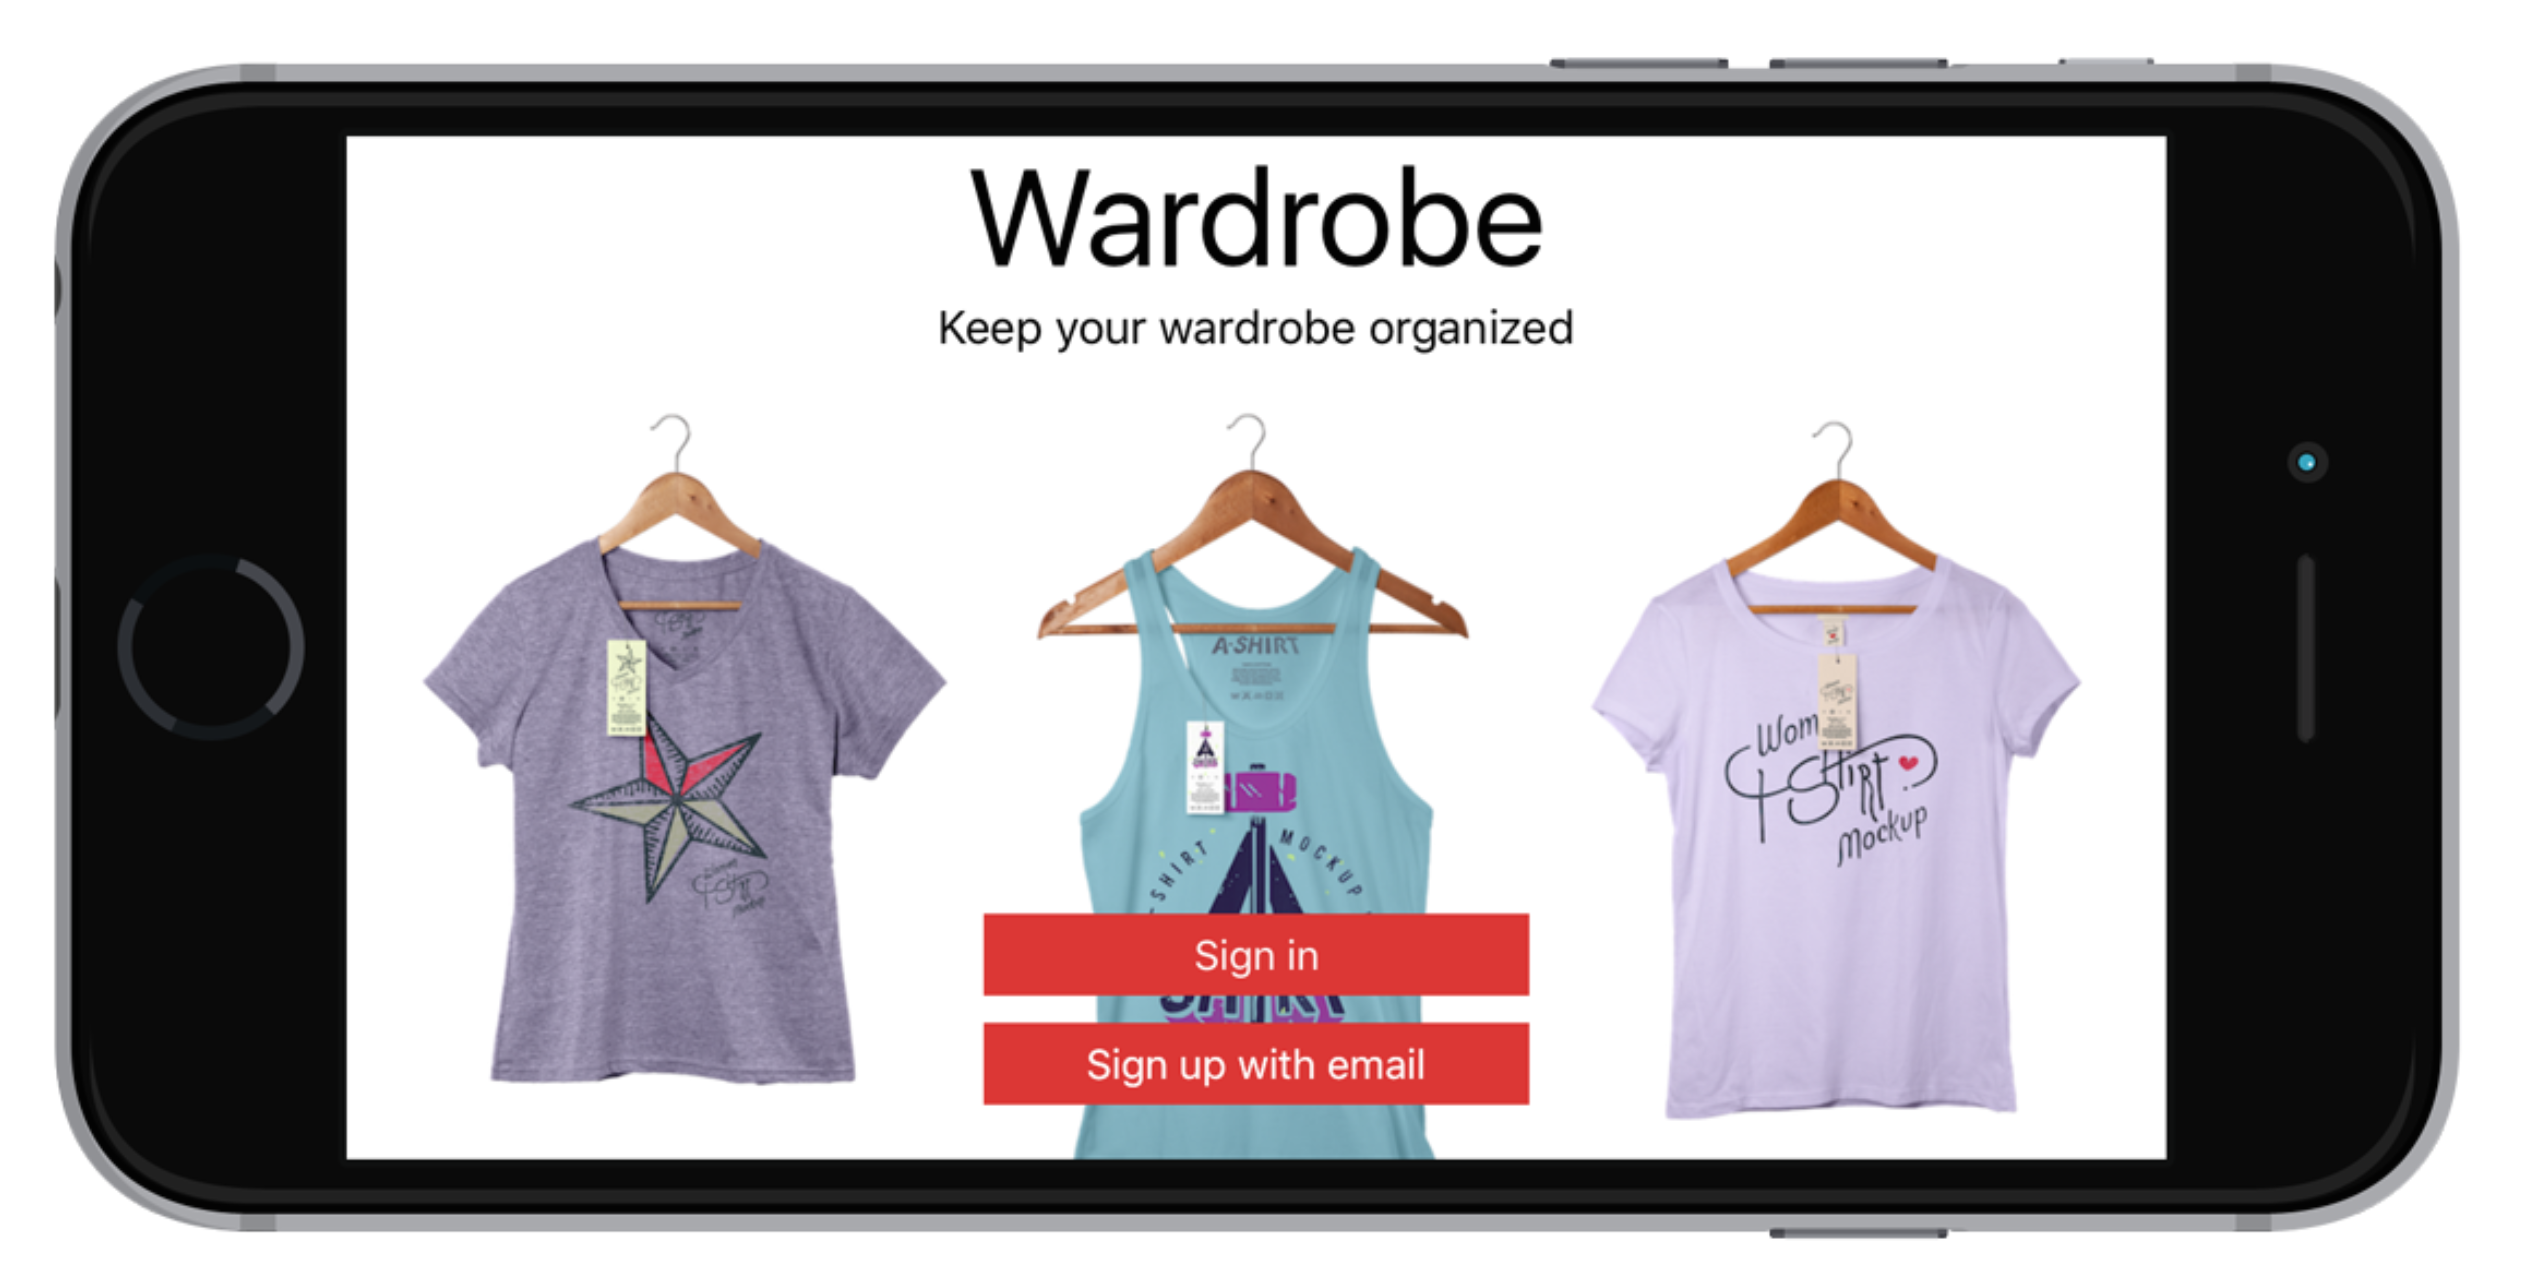
If you another way to run the iPhone Simulator,UI in landscape mode looks like this:
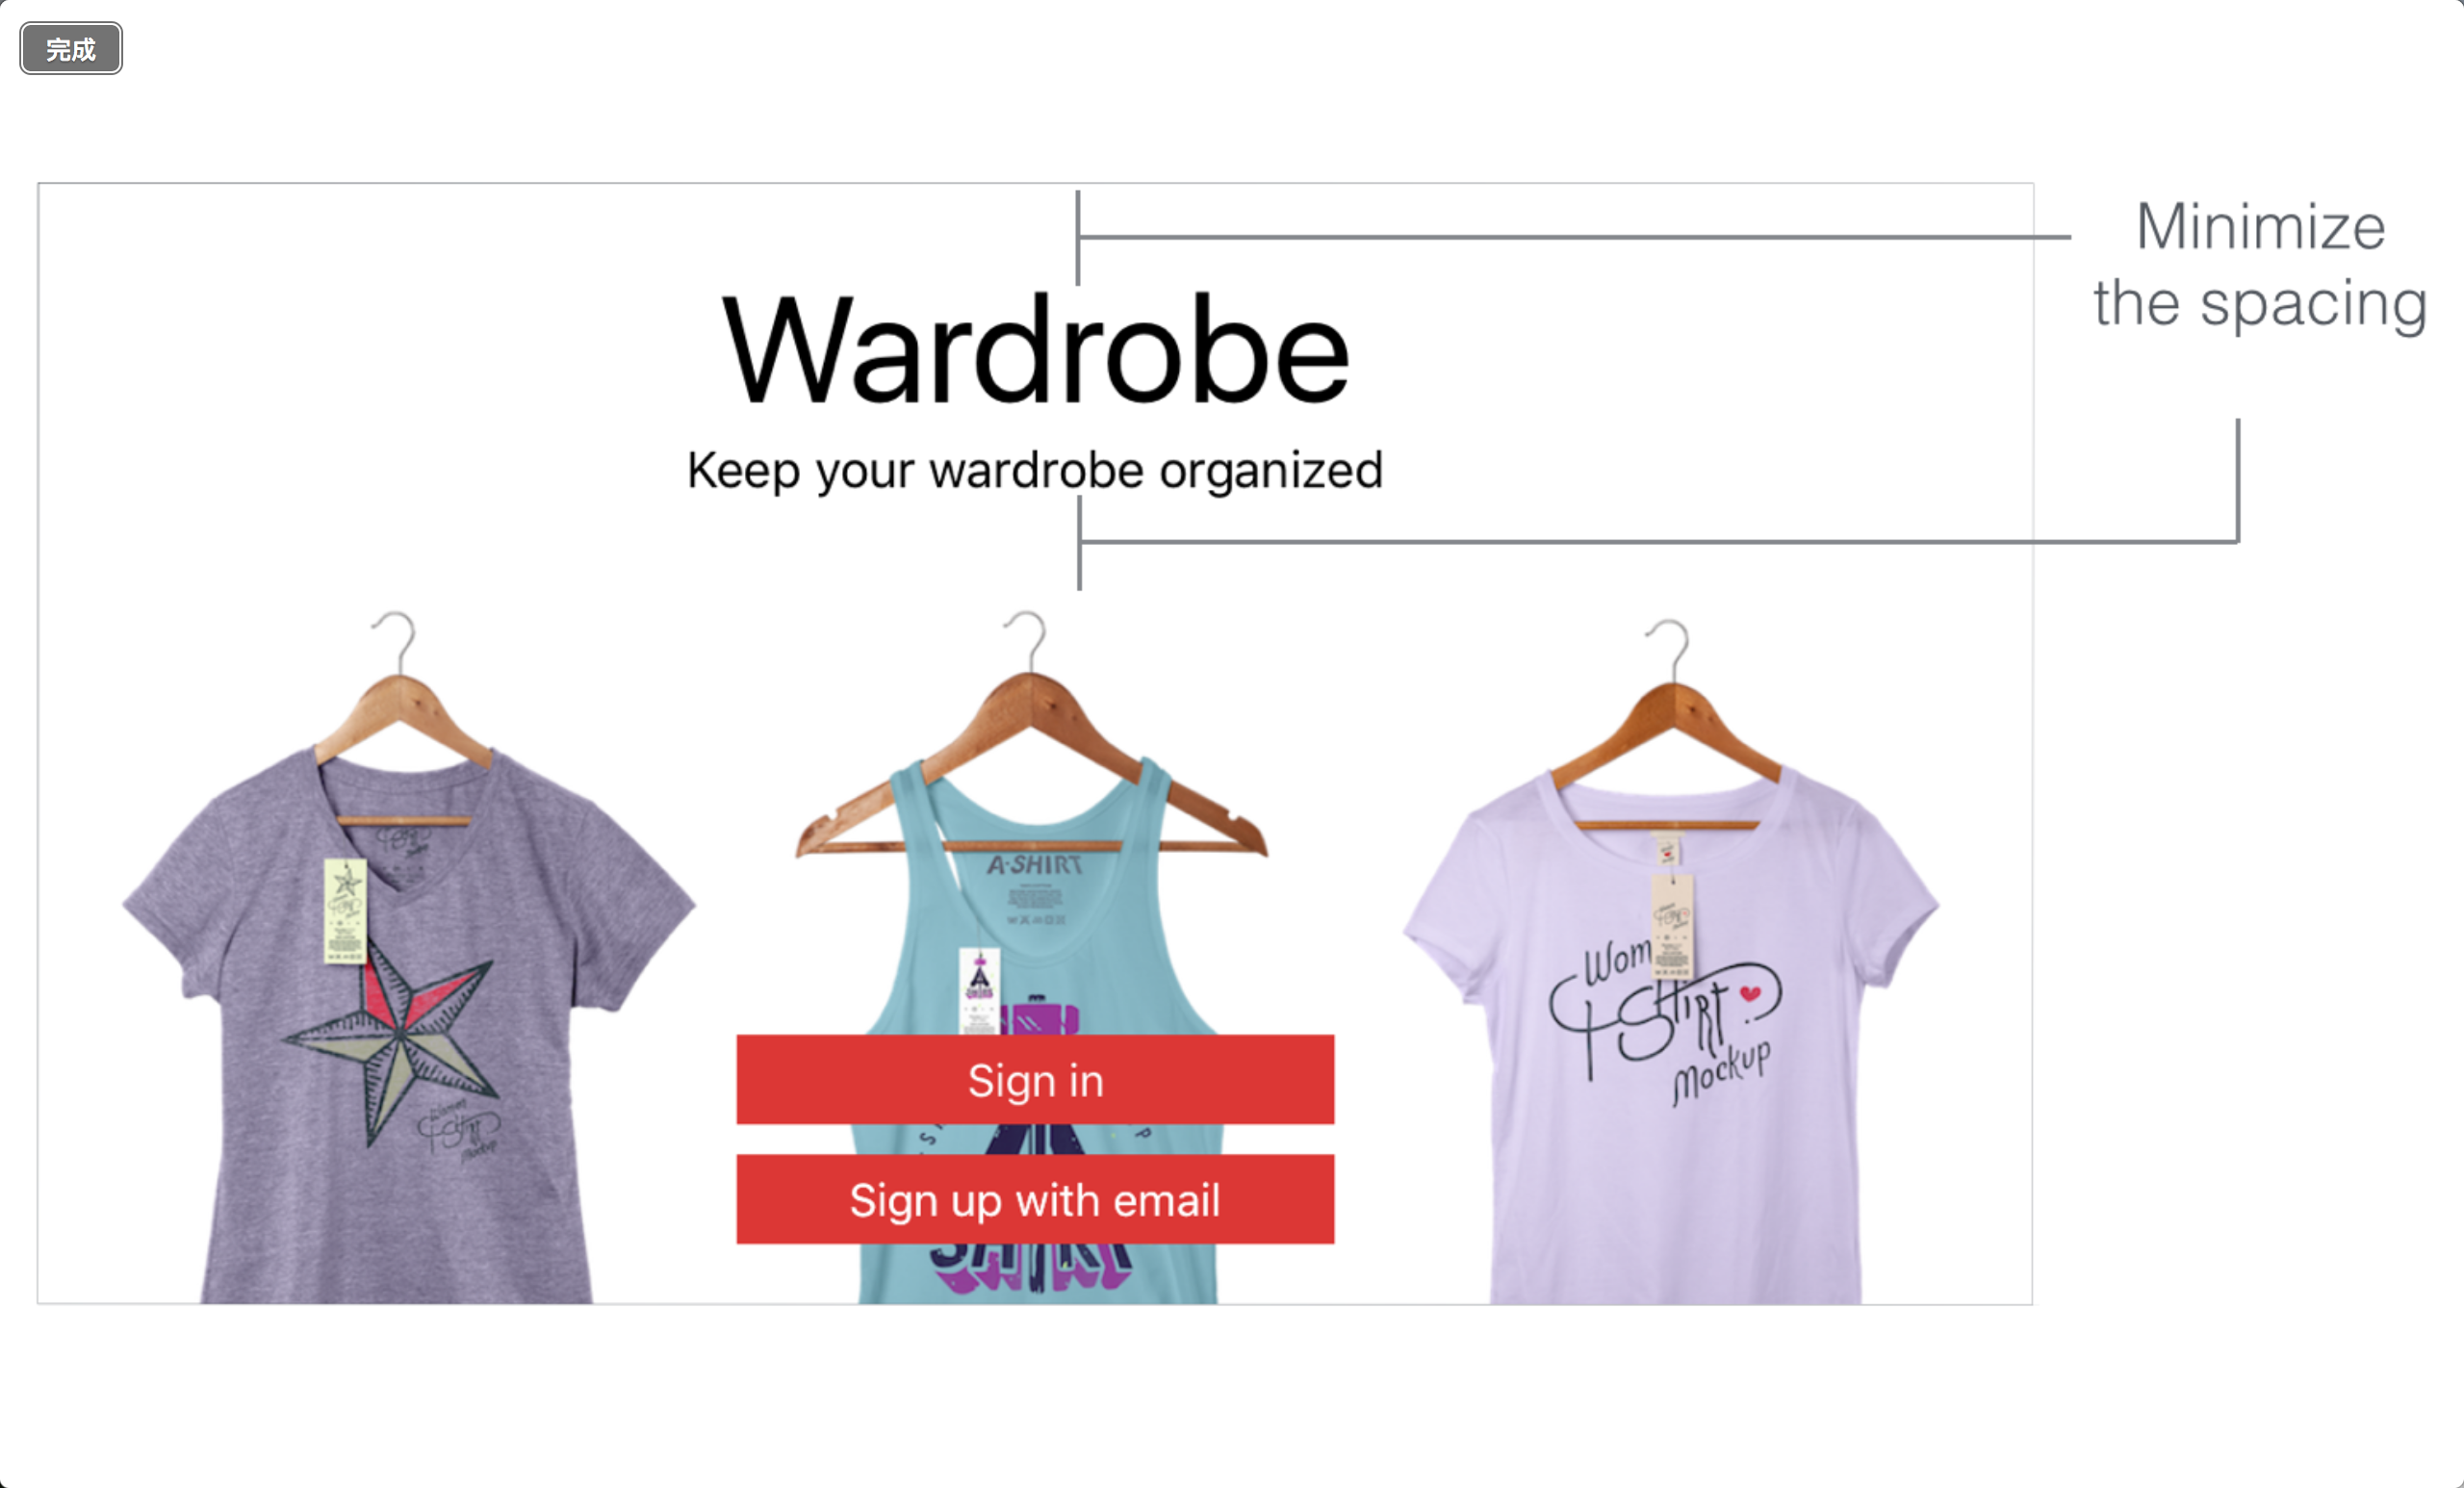
It works very well. Let's make it look better. I want to change the title of Top Layout Guide and spacing,Same,Title and interval picture will be changed. However, please note that these changes only to the landscape mode only(Horizontal screen)Under iPhone.
As you know it,We can change the amount of space constraints to adjust the spacing. The real question is:How can I adjust the iPhone landscape mode only(Horizontal screen)?
Here to bring a new design concept called adaptive layout(Adaptive Layout),This is iOS8 release when introduced. Adaptive layout,Your apps can make their UI to fit a special device and device orientation in order to achieve adaptive layout,Apple introduced a new concept,Called the Size Classes. This may be adaptive layout of the most important aspects .Size classes is an abstract concept,It illustrates how a device depends on its screen size and orientation to the classification.
A longitudinal size class(high)And lateral(width)Size identifies the relative number .size classes a display space, there are two types of:regular and compact. a regular size class represents the majority of screen space,At the same compact size class represents a small part of the screen space by using a size class to describe each display size,This will be four kinds of results:Regular width-Regular Height,Regular width-Compact Height,Compact width-Regular Height,Compact width-Compact Height.
The following table shows iOS devices and their correct size classes:
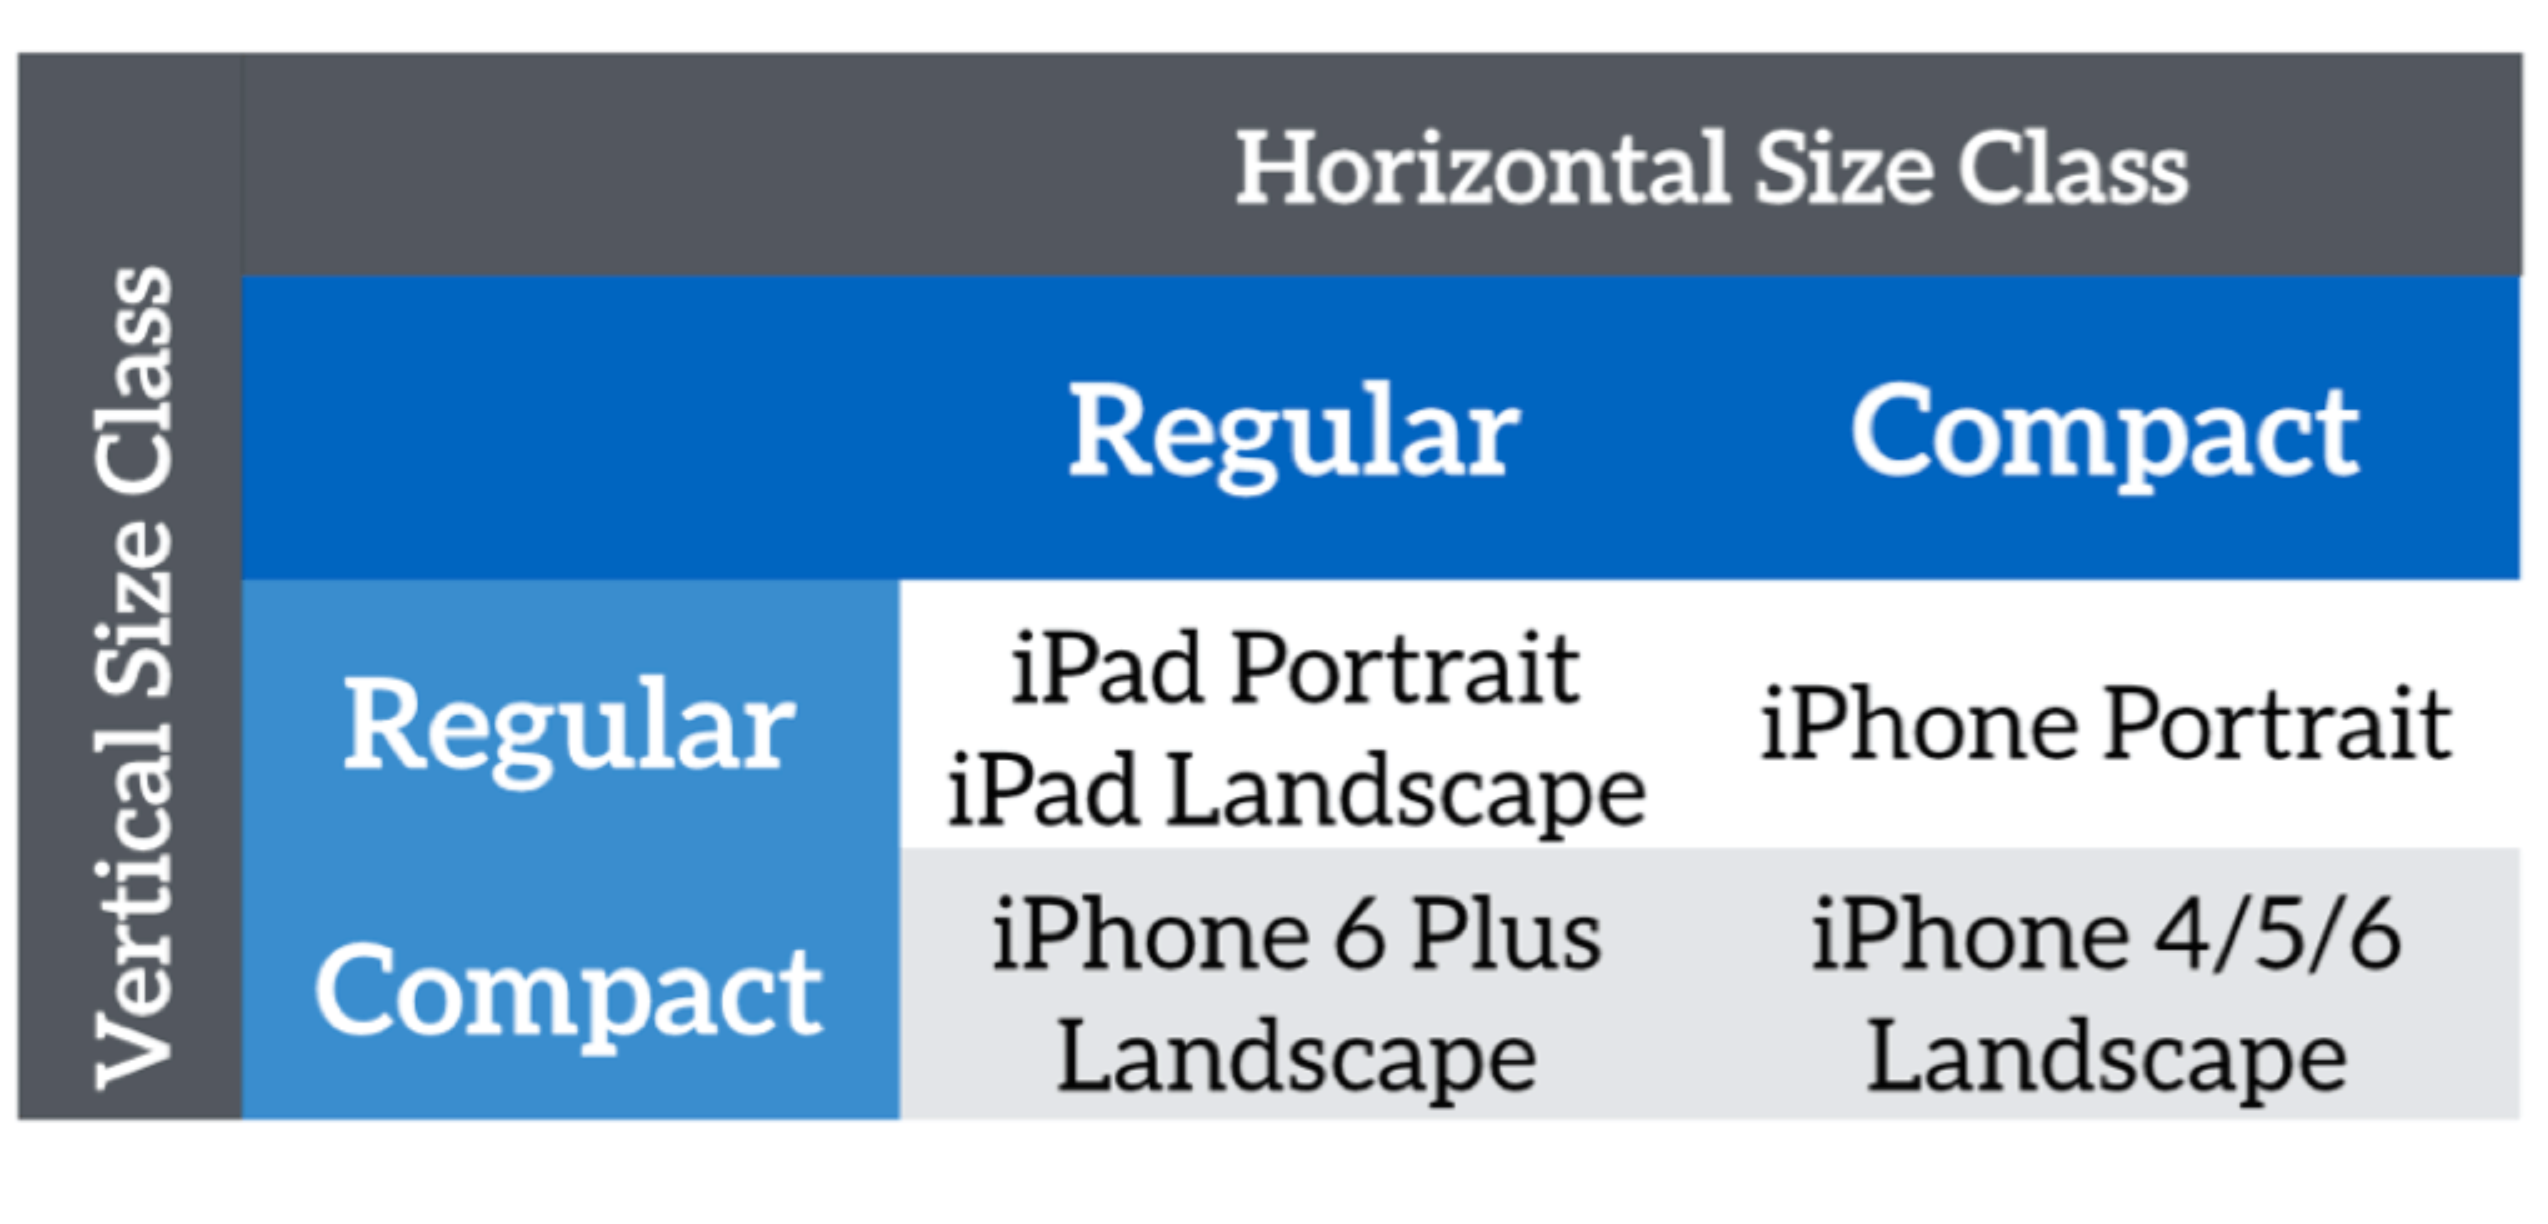
To show a display environment,You need to specify a horizontal and a vertical size class size class. For example,,iPad has a fixed lateral size class and the fixed longitudinal size class. In our case,We give the iPhone offer special layout in landscape mode. In other words,Here we are dealing with two size classes:
- Compact width-Compact Height
- Regular width-Compact Height
Now back Main.storyboard. Select Top Layout Guide and stack view spacing constraints in the Size inspector in,Click Constant options on the edge of the + button. Select Any Width>Compact heigt,Then set the size of a value of 0.
Quick note: Here,Any width including compact and regular width
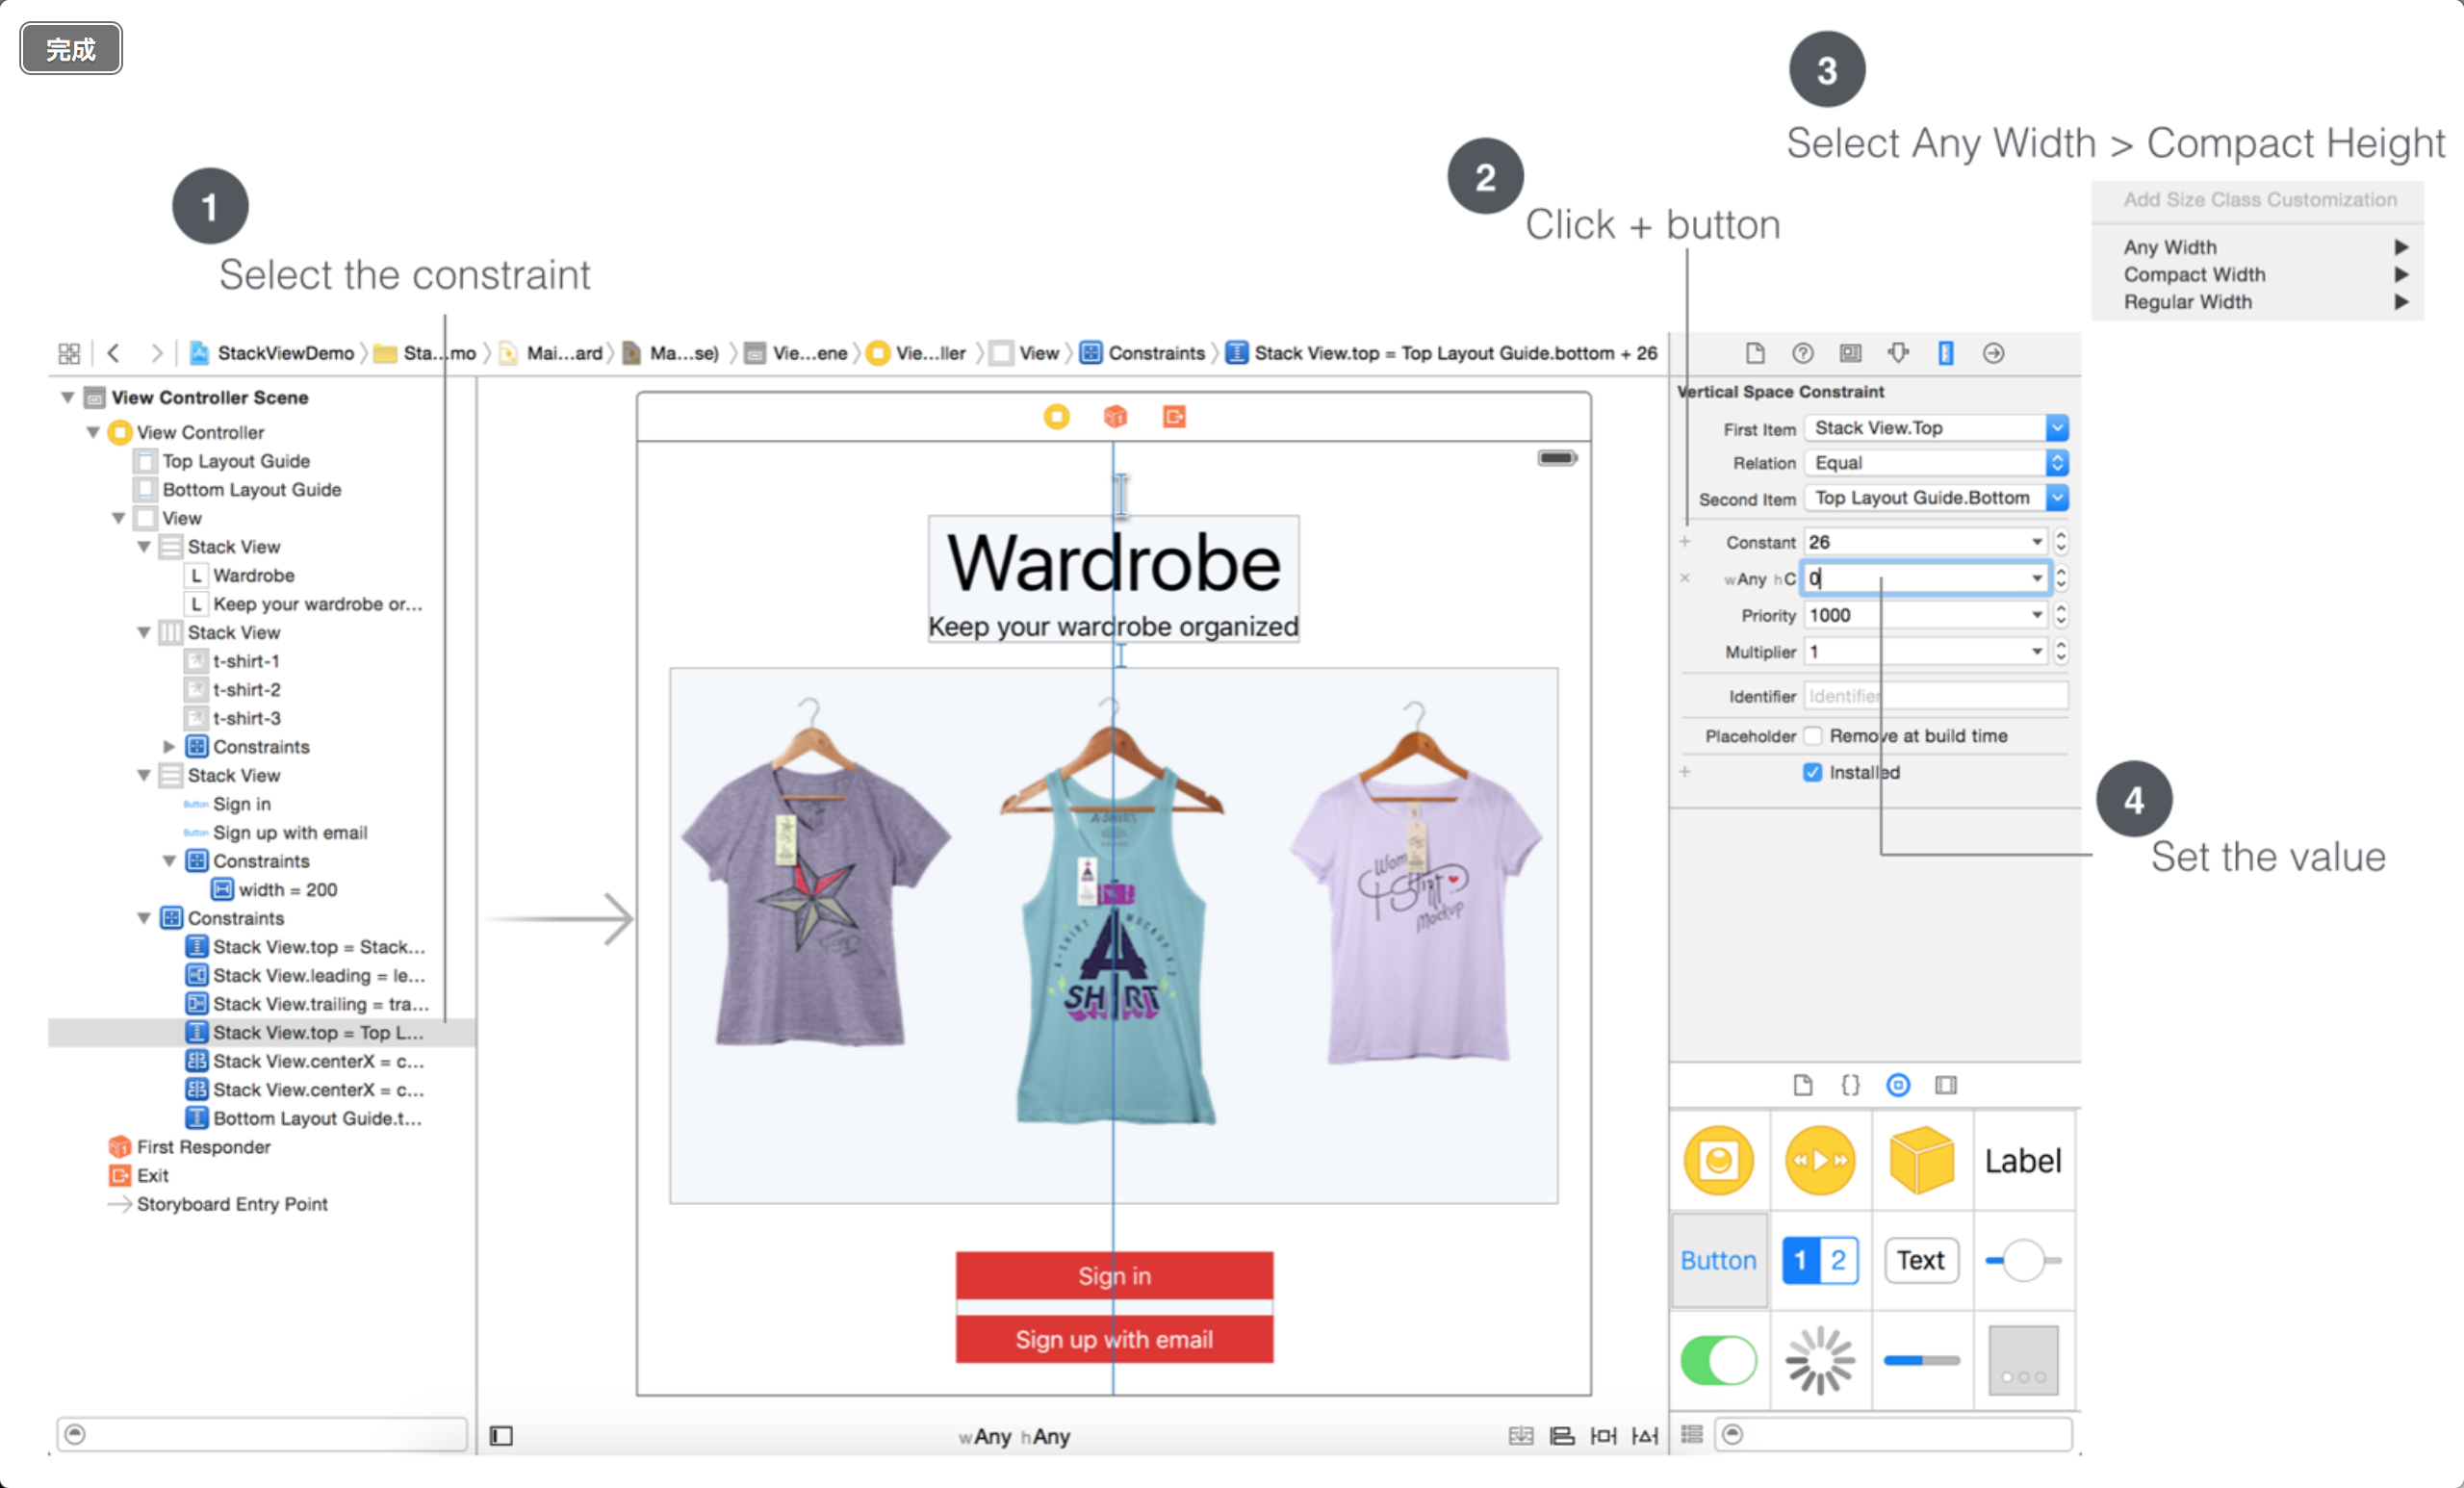
After doing those,When you cross over when the iPhone,Stack view and spacing between the Top Layout Guide will be minimized. On different iOS devices run the project and then look at the results.
You can do the same steps to adjust the pitch of the title and pictures. I put this to you when practicing to stay.
Your practice
To help you better understand how it works size classes,In addition we do a simple example requires you to create a layout created specifically for the iPad additional equipment. Please place it horizontally on the iPad instead of the horizontal stack view to layout Sign in / Sign up button.
Original article written by LogStudio:R0uter's Blog » Chapter VI with the stack view(Stack Views)UI design
Reproduced Please keep the source and description link:https://www.logcg.com/archives/1372.html
Good translation