The instruction manual of drop-off input method is a static site compiled with Gitbook,Has been deployed on netlify before,It's a pity that his house is gradually being walled... I had to move this static station to the server of R0uter's Blog。Now I plan to migrate the whole,So after thinking,Simply throw this static site into the aws container alone.,I just recently used aws for work and study,I'm more familiar with it。
To run a static site in aws,First let's plan the topology,probably so:
GitHub → S3 Containers → Cloud Front CDN → docs.logcg.com → User Browser
I submitted a content update on GitHub,GitHub Actions run automatically,Push the compiled static site to s3. when the user visits, cdn back-to-source to s3 to get data display。
So the question is,Why add this cdn? What is this? - The S3 container itself can provide an http access point,You can also set cname to customize the domain name。But the problem is that it no longer supports https。 it's a headache,According to aws official tutorial,To enable https,just use cdn。 So pay attention here,Open s3 container without having to select the region specially,because no matter what you choose,Finalcitygo cdn。
of course,After my actual test,I chose aws port area s3,The access speed is not much different from direct connection and CDN.。User feedback is "seconds open",So there is no difference in speed,It depends on the long-term stability.。--of course,If you stick to https like me,Then there's no choice。
Configure S3
First of all you must have an aws account, Both s3 and cf have free credits,So no need to spend。
create
find aws s3 service,Create a new container,All options default,In addition to "Block Public Access settings for this bucket" this one needs attention:
In fact, you can also default here,a little safer。Although our static site needs to be public so that everyone can access it,But due to the need to set cdn,In fact, it can be configured later to allow only cdn access。Anyway, if you don't care about it like I do,Set as shown。

Allow everyone access to make static sites visible
and then create。
Enable static station support
After the creation is successful, we continue to modify the configuration,open your container,Select the "Properties" tab,scroll to the bottom,Has a static website support,point edit,Select "enabled"。note,Below the "Index document" here,You want to write the default home page address of the static site,so that when you open the domain name,The website can open the default home page correctly。(usually index.html )
Others can be left as default,click save configuration。
Modify permission configuration
back to top of page,Open the "Permission" tab,Click here to edit "Bucket policy",Enter the following:
|
1 2 3 4 5 6 7 8 9 10 11 12 |
{ "Version": "2012-10-17", "Statement": [ { "Sid": "PublicReadGetObject", "Effect": "Allow", "Principal": "*", "Action": "s3:GetObject", "Resource": "arn:aws:s3:::BUCKET_NAME/*" } ] } |
Note the highlighted lines, BUCKET_NAME Change it to the name of the container you are currently configuring。This makes the container fully usable。
configure https (cdn)
Add custom domain name
Search and find the Certificate Manager service for aws,Make sure that the region selected is N. Virginia (Because only the domain name in this area can be recognized by the cdn service),Then click "Request a certificate". By default only the first option is available,Click Next to enter your domain name,Click on "Request"。back to certificate list,You will see the certificate just created,click in,have cname information for you,Go to your domain name resolution service and add these two data,After a while, you should be able to verify successfully。
Configure CloudFront
Search and find the cloudfront service for aws,This service is global,No need to select area。Click on "Create distribution",The source domain name is the s3 container that was just created,address is blank。
"Default cache behavior" here "Viewer protocol policy" I chose Https only, because i don't want to provide 80 port,Of course you can also keep the default,Nothing wrong。
then others keep default,Scroll to the "Settings" area at the bottom,Select "Use North America, Europe, Asia, Middle East, and Africa” option,Avoid paying outside。 Because we are mainly for domestic users, right?。
Then in "Alternate domain name (CNAME)" here,select add,Then enter the domain name you just verified。
Immediately after "Custom SSL certificate” Here select the certificate corresponding to the domain name。
⚠️ Attention! exist "Default root object” Enter your default home page here,Usually " index.html ”,Refer to the "Index document" entered when creating the container above ,Both should be consistent。
Then click create。
Configure CNAME
After the CDN is created, it will take a while to deploy,At this time, we can first add domain name resolution。Click on the details of this cdn service,you will find a similar https://d3r59fz8m0j4vu.cloudfront.net the address of,This is the address of your cdn,You can use it directly... Of course we are doing a static station here,So you need to go to your domain name resolution and add cname,For example I am docs.logcg.com,Then I set this subdomain cname to https://d3r59fz8m0j4vu.cloudfront.net。
Configure GitHub
Your static site should now be fully functional - no files of course。Here I use GitHub for automation,First go to generate an authorization specifically for submitting data。
Create IAM
Search and find Identity and Access Management (IAM) ,This is also global,No need to select a region。It will recommend you to upgrade the management system,Do not care,just skip。
Then click "Users" on the left, Click the "Add users" button on the right。Write a meaningful name to facilitate future maintenance,Type to choose"Access key – Programmatic access”,Because we are going to use it for automation scripts。Click Next to set permissions,Here we choose to add existing rules directly,search for s3,Select "AmazonS3FullAccess":
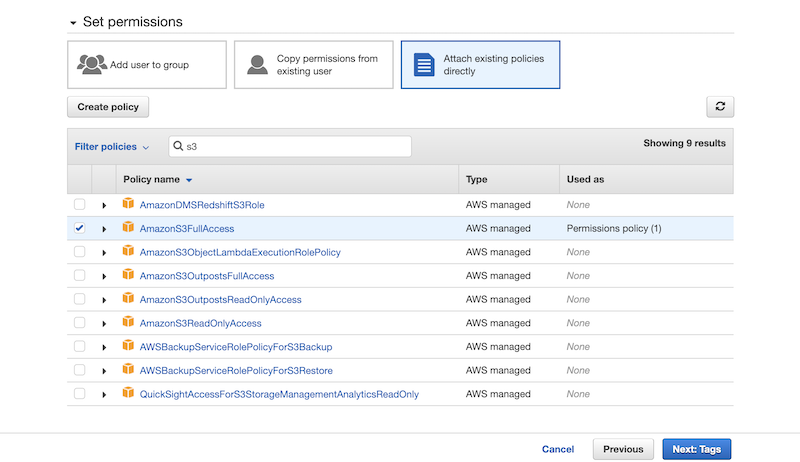
Grant s3 write access to the newly created user
Next point,tags are left blank by default,complete creation。Don't rush to close the page,At this point it will show the id and secret,Let's go to GitHub to configure。
Configure GitHub Secrets
Find Secrets in your repository's settings,Select Actions,Add two keys,They are AWS_ACCESS_KEY_ID and AWS_SECRET_ACCESS_KEY The content also naturally corresponds to the id and secret you just obtained,The final effect is shown in the figure:
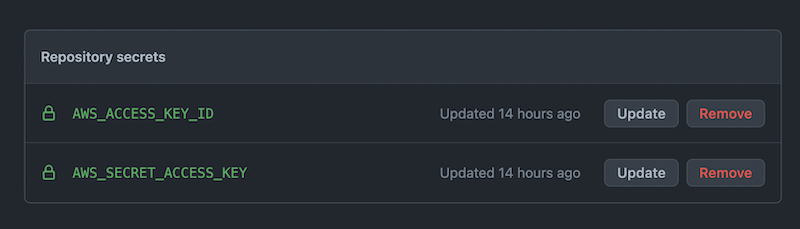
Add a key to the GitHub repo
Configure GitHub Actions
Now our container is ready,Access is also ready,Finally got to the last step,Configure actions to automate deployment。The basic principle is to detect the master and compile it automatically after each commit,Then upload the compilation result to the s3 container。
Here I only list the key steps,See the full content at https://github.com/R0uter/loginput-faq/blob/master/.github/workflows/main.yml
|
1 2 3 4 5 6 7 8 9 10 11 12 13 |
- name: Configure AWS credentials uses: aws-actions/configure-aws-credentials@v1 with: aws-access-key-id: ${{ secrets.AWS_ACCESS_KEY_ID }} aws-secret-access-key: ${{ secrets.AWS_SECRET_ACCESS_KEY }} aws-region: ap-east-1 - name: Install dependencies run: npm install - name: Build run: npm run build - name: Deploy run: aws s3 sync ./_book s3://docs.logcg.com |
One of the things to pay attention to is that the region of your container should be written correctly,The name of the container must be spelled correctly,Otherwise, you may accidentally push to other containers。
Summarize
It takes a lot of effort to prostitute。Compared to off-the-shelf paid web hosting services, aws provides more basic but also more free customization operations。The price is that a certain knowledge base is required to deploy and configure。Coordination between different underlying services is prone to errors,of course,Once configured,once and for all,Easy to maintain and due to the existence of free quota,Small sites like mine are almost forever free。Now,Due to the huge size of aws,It is also unlikely to be walled for a short time.,Even without the domestic version,You can also get good access speed in China。
From a safety point of view,You can further configure the container to be invisible to the outside world,Then set the rule to be accessible by cdn。This way no one can directly access your container,only via cdn。
Then IAM permissions are the default template,It allows writes to all containers,In fact, there is a potential risk,It's better to write your own rules,Only allow write access to this specific container。This way even if the key is compromised,Only this one container is affected.。
One last screenshot:
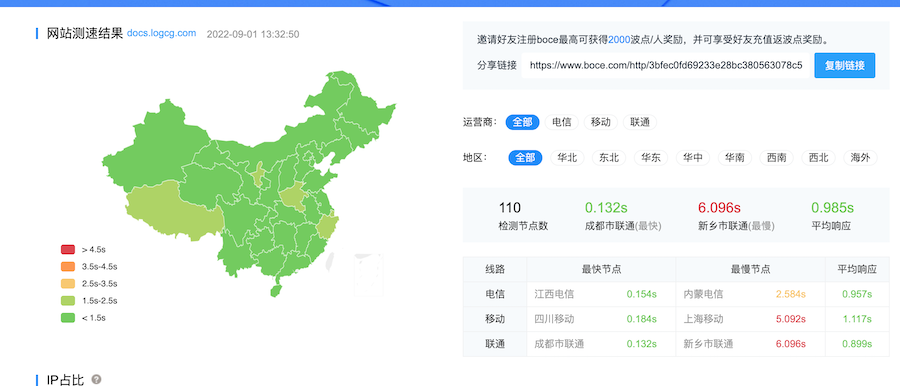
Website Speed Test from docs.logcg.com
Reference links
- https://docs.aws.amazon.com/AmazonS3/latest/userguide/HostingWebsiteOnS3Setup.html
- https://docs.aws.amazon.com/AmazonS3/latest/userguide/WebsiteEndpoints.html
- https://aws.amazon.com/premiumsupport/knowledge-center/cloudfront-https-requests-s3/
- https://docs.aws.amazon.com/AmazonCloudFront/latest/DeveloperGuide/CNAMEs.html
- https://serverfault.com/questions/581268/amazon-cloudfront-with-s3-access-denied
- https://faun.pub/deploying-website-to-aws-s3-w-github-actions-279998db5dae
Original article written by LogStudio:R0uter's Blog » Run a static website with AWS S3 Enable https
Reproduced Please keep the source and description link:https://www.logcg.com/archives/3584.html