First of all, this is not a new technology,It's very old,So old that almost no one mentions it。
This is a product of Apple's MVC model,It was born when there was no iPhone,It is used in conjunction with the Xcode graphical setting interface-such as NIB,of course,Now it has become XIB,Oh,And storyboard。
Now if you want to bind a storyboard object to the code,All you may find are like this:
Click the right mouse button in the left column to open a small window,Then [pull wire] connect the declaration in the code with the actual UIButton...
So when the program loads this storyboard,The Button you created graphically is automatically connected to the declaration of the code,such as:
|
1 2 |
@IBOutlet var myBox:NSBox! @IBOutlet var myButton:UIButton! |
Yes,Usually we use it like this,But if this is a "settings" interface,There are a lot of simple controls inside,But it should be changed and displayed according to the user’s current setting status (this is a very common scenario,After all, which App does not have a preference setting? ),Lots of @IBOutlet and @IBAction May not be a good choice,Because besides these,You also need to add a lot of configuration reading code to the initialization code,State judgment,Then go to change the state of the corresponding control,If there are more options,That is basically a disaster。
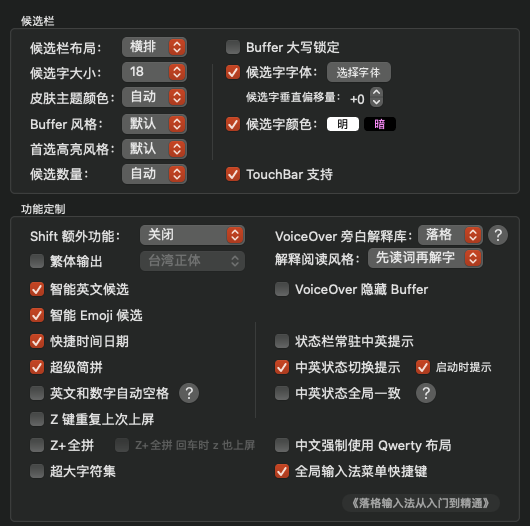
Take the setting interface of the drop grid input method as an example,There are many button controls on each page
Cocoa Binding save your life
Open Xcode ,Load a Xib,Select a control,In the right column you will see the common property setting interface:
Common property setting bar in Xcode
You may often use the first few functions:
Commonly used function options in Xcode
but,You must have never used this feature:
Cocoa Binding setting interface
If you go online to find,That hardly gets any useful introduction-because it is very old。Thanks to Objc's MVC design style,In fact, every control can directly monitor the variables in your object,And automatically change its display according to its changes,You don’t need to initialize that object at all,There is no need to set whether this button is available or not according to the user's current settings,Everything can actually be automatic,What you need to provide-just a variable。
But here comes the problem,Swift is already used now,How can it be bound to a variable in Swift code? If you declare a variable,And use this interface to bind,Then you will encounter runtime errors:
|
1 |
this class is not key value coding-compliant for the key xxx |
This is because Swift does not expose variable names to Objc by default.,If any #selector() The calling method is the same,We add before the corresponding variable @objc dynamic ,For example, this @objc dynamic where mySetting = false ,Such,You can bind successfully。
note,In addition to the common @objc outer,Also added dynamic Retouch,If only the former,It may fail on the first call, Swift will still optimize the variables you declare into static,In this way, Cocoa Binding cannot dynamically monitor our binding。
(Depending on your compilation optimization,To ensure that binding can take effect no matter what,Should still be added dynamic Modification)
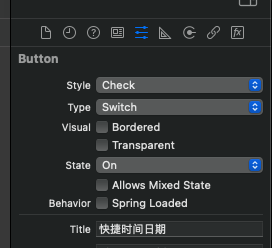
In the binding interface,We select a Button,For example, my button control is a selected one ☑️,So it has two states: on and off,So I can take it value Bind,Remember to set up Xib first File's Owner Generally this is empty by default,After setting,We can choose to bind to File's Owner It's:
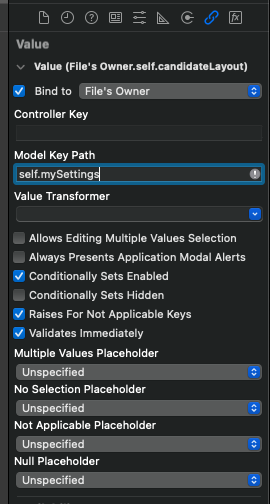
Bind object instance variables to the UI interface
Here to use KeyPath to set,Is actually the name of your variable。Now the state of this button will automatically change according to the value of the variable。No initial setup required。
additional,Except button object,You can also bind Label,Obviously,Its value is a string object。It is worth mentioning that,If you bind an array control... such as NSPopUpButton,It actually has multiple data,Then you can also find it at the bottom of this setting interface selectedIndex Bind in this state,Value type is what we are familiar with Int ,If you bind value directly,That value is actually a more complicated NSArrayController。
of course,As you can see,You can also easily bind a space Enabled, isHidden and so on,Anything that can be set,Almost can bind to variables,It changes automatically according to the situation-no more tedious code to operate the interface!
Advanced:ValueTransformer
When setting up binding,There will be an option left blank by default, ValueTransformer ,It can perform certain processing on the value you bind,Such as the default,Invert the boolean value,Judge empty true or false ,In addition to,We can also customize how to process the value。
For example, my setting options are 0 1 2 Three states,But whether the button is selected or not is two,I need to map it to 0 and 2 on,The default Transformer can do nothing。
First of all,We are going to inherit one ValueTransformer ,So you can customize the process:
|
1 2 3 4 5 6 7 8 9 10 11 12 13 |
class ValueTransformer2:ValueTransformer { override func transformedValue(_ value: Any?) -> Any? { guard let a = value as? Int else {return false} return a == 2 } class override func allowsReverseTransformation() -> Bool { return true } override func reverseTransformedValue(_ value: Any?) -> Any? { guard let a = value as? Bool else {return false} return a ? 2 : 0 } } |
among them transformedValue(_ value: Any?)-> Any? Returns the value required by the control,Like my button,I just set return a == 2 So if and only if the value is 2 When the button state is enabled。
allowsReverseTransformation() -> Bool Prescribed this ValueTransformer Can reverse conversion,Default is false ,Here i need to reverse,Because the variable should be set to 2 rather than 1 ,So i want to use reverseTransformedValue(_ value: Any?) -> Any? To convert the value passed by the button control into the value required by the variable。
After writing, we need to customize this ValueTransformer Register,Otherwise Swift cannot find this object:
|
1 |
ValueTransformer.setValueTransformer(ValueTransformer2(), forName: NSValueTransformerName("ValueTransformer2")) |
We can register in any place before the initialization interface,Note that I directly named it "ValueTransformer2" ,Then you can write ValueTransformer as this in Xcode's Binding interface ValueTransformer2 It's,Here I deliberately write the name to be consistent with the class name,You can also write other names that do not correspond。
Additionally,If you use your own configuration management instance,Then you can also write the bound variable as a calculated attribute,This is no problem at all,But it’s worth mentioning,Bound variable control,It depends on monitoring the corresponding variable didSet To get notified,This is the only way to trigger an interface update,so,If you use calculated attributes,After updating the background storage,Remember to also trigger the calculated attribute didSet ,such as
|
1 2 3 4 5 6 7 |
@objc var myValue:Int { get {your code...} set {do nothing} } myValue = 0 |
Original article written by LogStudio:R0uter's Blog » Cocoa Binding practical tutorial
Reproduced Please keep the source and description link:https://www.logcg.com/archives/3456.html