根据苹果官方的说明,自 macOS 10.15 起,所有从互联网下载的未进行 notarize 的 app,默认将无法被打开,所以在 App Store 外分发的 app,也必须在发布前将 app 上传到苹果的服务器进行处理。
使用 Xcode 自带 archive 工具可以很方便地进行 notarize,但这个操作无法实现自动化处理,为了方便分发,我将 落格输入法 macOS 2 的分发流程都做成了自动化脚本,现在,只好给脚本添加自动化提交功能了。
命令工具
苹果官方实际上有提供cli 命令,首先你需要运行 xcode-select --install 来安装支持,然后我们使用 $ xcrun altool --notarize-app --primary-bundle-id "" --username "" --password "" --file "" 来上传app给苹果服务器;使用 $ xcrun altool --notarization-info -u "" 来轮询检查处理结果(尽管官方说在一小时内,但一般很快,几分钟就搞定);最后使用 $ xcrun stapler staple "" 来给文件盖章。
我应该提交哪些文件?
首先,我们要搞明白应该提交哪些(个)文件到服务器,比如,你有个 Great.app 这个编译结果,然后你可能还有一个 Great.pkg,用来给用户安装 Great.app,最后,为了分发方便,你可能还会把这个 pkg 文件放入 Great.dmg 中,这样,我们就有了三个文件:Great.app,Great.pkg,Great.dmg 。
实际上,Great.app 就是个目录,所以,如果你仅仅分发 app,那么你需要将 Great.app 打包成 Great.app.zip,然后再上传到苹果的服务器进行 notarize。
总之,如果你和我一样,一次有这么三个互相包含的文件,那么你【只需要】上传嵌套最多的 Great.dmg 即可,苹果的服务器会自动将你的 dmg 文件打开,取出 pkg,然后取出 app,并为【三者】完成 notarize。
这样,当 notarize 完成,我们虽然没有上传 app 和 pkg,但依旧可以为这两个文件单独完成 staple。
项目设定
实际上,当你在使用 Xcode 自带 archive 进行 notarize 时,它为你完成了很多工作,如果我们自己使用命令,则需要进行额外的配置,打开你的 Xcode 项目,project 的 Build Settings 中,设置代码签名包含时间戳,这是 notarize 必须的操作:
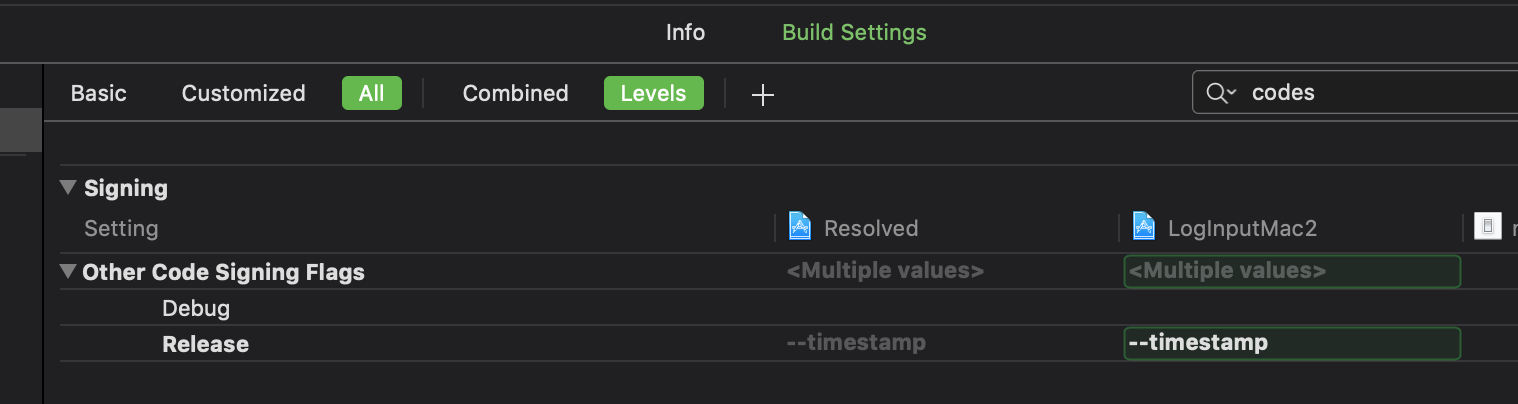
为所有项目签名增加时间戳
另外还有:

去掉debug文件,注意debug模式下不要去掉不然你就不能debug了
上传
|
1 |
xcrun altool --notarize-app --primary-bundle-id "app bundle id" --username "your appleid" --password "one-time-password" --file "Great.dmg" -itc_provider "your team id" &> tmp |
这里有几点要注意,首先上传结果输出到 tmp 文件供稍后获取查询id,注意使用 &> 而不是 > ,后者无法把输出的内容放入 tmp ;
对于 -itc_provider "your team id" 这个参数,如果你的 Apple ID 下只有一个开发者账号,那就不需要这个参数了,如果你和我一样,Apple ID除了自己的开发者账号,还加入了别人的组,那你就有了多个“ provider”需要手动指明是上传到哪个,要查看你的 provider ,到 App Store Connect,登录后在右上角点击菜单,选择编辑账号信息,你能找到一个叫做“Team ID”的字段,里边的内容就是;
对于 --primary-bundle-id "app bundle id" ,就是你app的 bundle id,如果你上传的是 Great.app.zip,那么这个参数不是必须的;
还有就是注意 --password "one-time-password" 这个参数,要生成一次性密码。
等待并完成
总之,上传成功之后,我们会得到 tmp 文件最后一行:
|
1 |
RequestUUID = 2EFE2717-52EF-43A5-96DC-0797E4CA1041 |
依靠这个 UUID,我们可以使用命令来检查 notarize 的状态实现等待,一旦成功,就可以 staple 了。
|
1 |
uuid=[crayon-6a45d760c005b153720643 inline="true" ]cat tmp | grep -Eo '\w{8}-(\w{4}-){3}\w{12}$' |
while true; do
echo “checking for notarization…”
xcrun altool –notarization-info “$uuid” –username “Apple ID” –password “one time password” &> tmp
r=
cat tmp
t=
echo "$r" | grep "success"
f=
echo "$r" | grep "invalid"
if [[ “$t” != “” ]]; then
echo “notarization done!”
xcrun stapler staple “Great.app”
xcrun stapler staple “Great.dmg”
echo “stapler done!”
break
fi
if [[ “$f” != “” ]]; then
echo “$r”
return 1
fi
echo “not finish yet, sleep 2m then check again…”
sleep 120
done[/crayon]
实际上返回的内容是这样的:
|
1 2 3 4 5 6 |
RequestUUID: 2EFE2717-52EF-43A5-96DC-0797E4CA1041 Date: 2018-07-02 20:32:01 +0000 Status: invalid LogFileURL: https://osxapps.itunes.apple.com/... Status Code: 2 Status Message: Package Invalid |
但我们只检测文中是否包含 success 即可,一旦包含,就使用 xcrun stapler staple "Great.app" 来完成 notarize。
接下来,就是原本的操作了,生成 sparkle 更新包,上传分发。
参考文献
- Customizing the Notarization Workflow
- How to notarize your software on macOS
- Notarizing Automator applications
本文由 落格博客 原创撰写:落格博客 » macOS app 实现自动化 notarize 脚本
转载请保留出处和原文链接:https://www.logcg.com/archives/3222.html
我看了一下 xcrun altool –notarize-app primary-bundle-id 这条命令的文档,有点哭笑不得。
Include the primary-bundle-id option — which is required — to specify an identifier that helps you keep track of automated correspondence from the notarization service. The value you give doesn’t need to match the bundle identifier of the submitted app or have any particular value, as long as it makes sense to you.
感觉是说在上传 pkg 的时候,这个 bundle ID 随便填就好了吗?
哈哈哈,没错,说是这个就用来给你自己分辨不同的项目~
如果 pkg 包中有两个 app 文件怎么办?
按照文中所述,直接上传你的pkg即可,这样你的pkg文件和两个app都会被验证,得到的结果可以直接给三个文件单独签名。
xcrun altool 一直卡这不动了,用xcode archive上传也是一直卡在不动,这个什么原因呢,
那可能是网络问题,如果Xcode archive 都上传不能,那你得看看你网络配置啥的了,比如防火墙?
这个每次出包都要传一次吗,还是只要每个版本传一次就好了
每一次都需要,所以最好弄成自动化,不然烦死。
如果我的包是没有压缩再dmg里,比如我有个pkg包和.zip的包。那我需要上传2次吗
是的,你pkg不能拆出app, zip 和 pkg 要分别上传。